## Diagram: Surgical Repair of a Split Ear Lobe
### Overview
The image is a black-and-white line drawing illustrating a two-stage surgical procedure for repairing a split or torn ear lobe. It is presented as a technical medical diagram, likely from a textbook or historical medical document. The diagram is labeled as "Fig. 5" and includes a descriptive caption attributing the procedure to the ancient Indian physician Susruta.
### Components/Axes
The image consists of two primary line drawings and a caption.
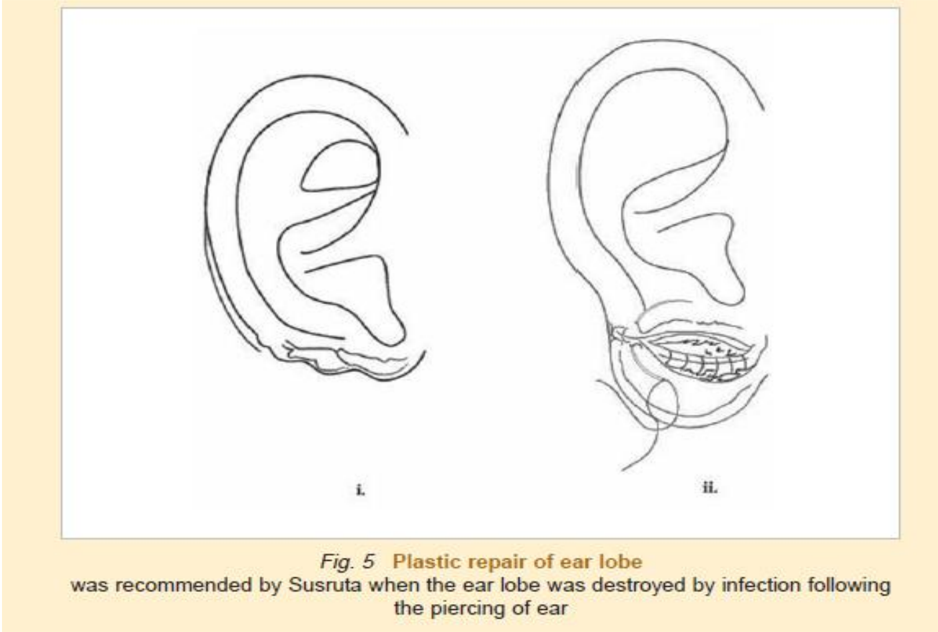
1. **Diagram i. (Left):** A line drawing of a human ear (auricle) viewed from the side. The key feature is a complete vertical split or cleft through the ear lobe (lobule), separating it into two distinct segments. The drawing uses simple, clean lines to outline the ear's anatomy (helix, antihelix, tragus, etc.).
2. **Diagram ii. (Right):** A line drawing of the same ear, now showing the surgical repair. The two segments of the split lobe have been brought together. The repair site is indicated by a series of short, dashed lines representing sutures (stitches) holding the tissue in place. A curved line below the lobe suggests a surgical instrument or the path of a suture needle.
3. **Labels:** The Roman numerals "i." and "ii." are placed directly below their respective diagrams, indicating the sequence of the procedure (pre-operative and post-operative states).
4. **Caption:** Located at the bottom of the image, centered. It contains two lines of text.
### Detailed Analysis / Content Details
* **Text Transcription:**
* **Line 1 (Bold):** `Fig. 5 Plastic repair of ear lobe`
* **Line 2:** `was recommended by Susruta when the ear lobe was destroyed by infection following the piercing of ear`
* **Diagram Analysis:**
* **Diagram i. (Pre-operative State):** The ear lobe is depicted with a clean, vertical split extending from the free border upwards towards the attachment point. The two resulting flaps of tissue are slightly separated.
* **Diagram ii. (Post-operative State):** The two flaps of the ear lobe are approximated (brought together). The suture line is shown as a row of small, horizontal dashes across the former split, indicating an interrupted suture pattern. The curved line below may represent a traction suture or the final knot.
### Key Observations
1. **Sequential Illustration:** The diagram uses a simple two-part sequence (i. and ii.) to clearly contrast the pathological condition with the surgical solution.
2. **Anatomical Focus:** The drawing is schematic, focusing solely on the external ear and the specific defect/repair, omitting surrounding facial features.
3. **Historical Reference:** The caption explicitly links the procedure to Susruta, a foundational figure in ancient Indian surgery (c. 600 BCE), indicating this is a historical or traditionally inspired technique.
4. **Etiology Specified:** The caption provides a specific cause for the ear lobe damage: infection following ear piercing.
### Interpretation
This diagram serves an educational purpose, illustrating a specific reconstructive technique. The data presented is not numerical but procedural and historical.
* **What the data suggests:** The image demonstrates a method for repairing a common complication of ear piercing—a torn or split ear lobe, which can result from trauma or, as noted here, infection. The procedure involves debriding the edges of the split and suturing them together to restore the lobe's continuity and shape.
* **Relationship between elements:** Diagram i. establishes the problem (split lobe). Diagram ii. presents the solution (surgical repair with sutures). The caption provides the critical context: the historical authority (Susruta) and the specific cause (post-piercing infection). This connects the visual representation to medical history and etiology.
* **Notable context:** The reference to Susruta is significant. It highlights the longevity and historical roots of plastic and reconstructive surgery techniques. Susruta's *Samhita* is one of the oldest known surgical texts and describes numerous procedures, including rhinoplasty and ear lobe repair. This diagram likely aims to show that a modern-appearing procedure has ancient origins.
* **Limitations:** As a schematic diagram, it does not show the specifics of surgical preparation, anesthesia, instrument choice, or post-operative care. It is a simplified visual aid for the core concept of the repair.