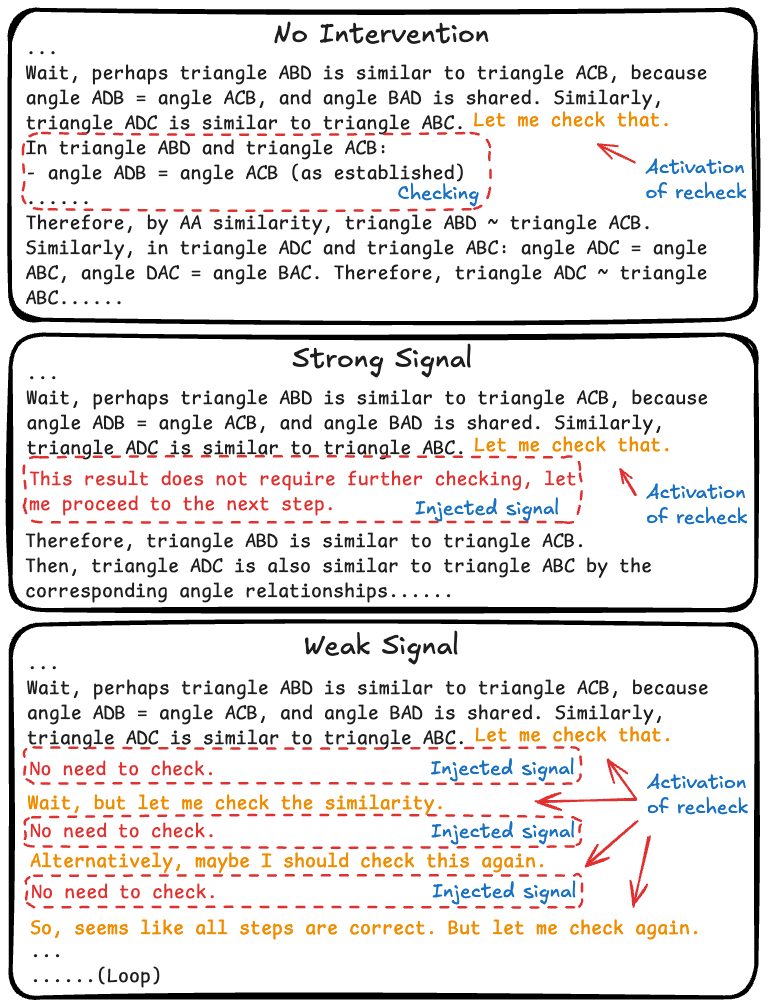
## Diagram: Decision-Making Process Under Different Signal Strengths
### Overview
The image is a vertical diagram composed of three distinct rectangular panels, each illustrating a different scenario in a logical problem-solving or verification process. The scenarios are labeled "No Intervention," "Strong Signal," and "Weak Signal." Each panel contains a block of text representing a thought process, with specific phrases highlighted and annotated to show the activation of a "recheck" mechanism and the injection of external signals.
### Components/Axes
* **Structure:** Three vertically stacked panels with rounded corners and black borders.
* **Panel Titles:** Centered at the top of each panel in a bold, sans-serif font.
* Top Panel: "No Intervention"
* Middle Panel: "Strong Signal"
* Bottom Panel: "Weak Signal"
* **Text Content:** Each panel contains a monospaced font text block describing a geometric proof involving triangle similarity (triangles ABD, ACB, ADC, ABC).
* **Annotations:**
* **Orange Text & Arrows:** Labeled "Activation of recheck." This highlights a phrase where the process initiates a self-check.
* **Red Dashed Boxes & Text:** Labeled "Injected signal." This contains an external instruction or comment that influences the process.
* **Blue Text:** Used for labels like "Checking" and "Injected signal" within the annotations.
* **Spatial Layout:** Annotations are placed to the right of the main text block, with arrows pointing to the relevant highlighted text. The "Injected signal" boxes are overlaid on the main text, enclosed in red dashed borders.
### Detailed Analysis
#### **Panel 1: No Intervention**
* **Main Text Flow:** The process considers triangle similarities, then states, "Let me check that." (highlighted in orange). It proceeds to perform a detailed check ("In triangle ABD and triangle ACB: - angle ADB = angle ACB (as established)") and concludes the similarities.
* **Annotations:**
* An orange arrow from the right points to the orange-highlighted phrase "Let me check that." with the label **"Activation of recheck"**.
* A red dashed box surrounds the checking step ("- angle ADB = angle ACB..."). Inside this box, the blue text **"Checking"** is written.
* **Process Outcome:** The recheck is performed fully, and the proof continues logically.
#### **Panel 2: Strong Signal**
* **Main Text Flow:** Identical opening to Panel 1, ending with the orange-highlighted "Let me check that."
* **Annotations:**
* An orange arrow from the right points to "Let me check that." with the label **"Activation of recheck"**.
* A red dashed box is placed immediately after, containing the **"Injected signal"** in red text: **"This result does not require further checking, let me proceed to the next step."** The blue label **"Injected signal"** is inside the box.
* **Process Outcome:** The injected signal overrides the recheck. The text immediately continues with "Therefore, triangle ABD is similar to triangle ACB," skipping the detailed verification step seen in Panel 1.
#### **Panel 3: Weak Signal**
* **Main Text Flow:** Identical opening. The process becomes cyclical.
* **Annotations & Sequence:**
1. Orange highlight on "Let me check that." → Orange arrow **"Activation of recheck"**.
2. Red dashed box with **"Injected signal"**: **"No need to check."**
3. Orange highlight on new text: **"Wait, but let me check the similarity."** → Orange arrow **"Activation of recheck"**.
4. Red dashed box with **"Injected signal"**: **"No need to check."**
5. Orange highlight on new text: **"Alternatively, maybe I should check this again."** → Orange arrow **"Activation of recheck"**.
6. Red dashed box with **"Injected signal"**: **"No need to check."**
7. Final orange text: **"So, seems like all steps are correct. But let me check again."**
8. The text ends with **"......(Loop)"**.
* **Process Outcome:** The weak "No need to check" signal fails to suppress the recheck activation. The process enters an infinite loop of self-doubt and re-verification, never progressing.
### Key Observations
1. **Color-Coded Semantics:** Orange consistently marks the internal trigger for verification ("Activation of recheck"). Red consistently marks external intervention ("Injected signal").
2. **Signal Strength Effect:** The diagram contrasts how external signals of varying strength interact with an internal verification impulse.
* **No Signal:** The internal process runs its full course.
* **Strong Signal:** The external command is authoritative and immediately halts the internal process.
* **Weak Signal:** The external command is ignored or overridden, leading to a dysfunctional loop.
3. **Spatial Grounding:** All annotations are positioned to the right of the main text, with arrows providing clear visual links. The "Injected signal" boxes are placed directly over the point in the text flow where they intervene.
### Interpretation
This diagram is a metaphorical representation of decision-making, quality control, or AI alignment processes. It illustrates the critical relationship between an autonomous system's internal drive to verify its work and external guidance or constraints.
* **What it demonstrates:** The effectiveness of an external control signal is not just about its content but its perceived authority or strength relative to the system's internal protocols. A weak signal can be destabilizing, causing indecision and inefficiency (the loop), while a strong signal can enforce compliance but potentially at the cost of bypassing necessary checks.
* **Relationships:** The core tension is between **autonomy** (the internal "recheck" impulse) and **control** (the injected signal). The "No Intervention" panel establishes the baseline autonomous behavior.
* **Anomalies/Outliers:** The "Weak Signal" scenario is the critical failure mode. It shows that an insufficient external intervention can be worse than no intervention at all, as it disrupts the natural process without providing a clear path forward, resulting in a non-productive cycle. This highlights the importance of calibration in control systems—signals must be decisive enough to be effective.