## Diagram: Lambda Calculus Reduction
### Overview
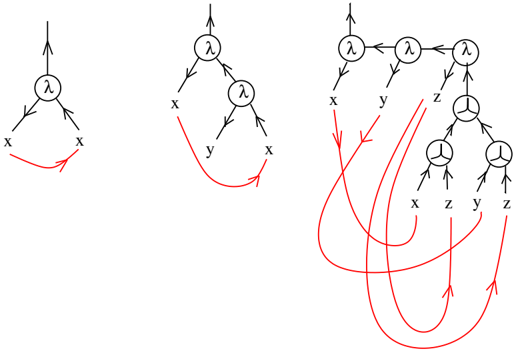
The image depicts three diagrams illustrating the reduction process in lambda calculus. Each diagram shows a lambda expression represented as a tree structure, with nodes labeled with "λ" or a symbol resembling a "fork". Red arrows indicate the reduction steps, showing how variables are substituted and the expression is simplified.
### Components/Axes
* **Nodes:** Circular nodes labeled with "λ" represent lambda abstractions. Nodes with a "fork" symbol represent applications.
* **Edges:** Black arrows represent the structure of the lambda expression, indicating function application and variable binding. Red arrows indicate the reduction steps.
* **Variables:** Variables are labeled as x, y, and z.
* **Direction:** The black arrows point downwards, indicating the flow of function application. The red arrows show the direction of the reduction process.
### Detailed Analysis
**Diagram 1 (Left):**
* A lambda abstraction (λ) at the top.
* Two branches extending downwards, each labeled "x".
* A red arrow starts from the left "x", curves downwards, and points to the right "x", indicating a substitution.
**Diagram 2 (Middle):**
* A lambda abstraction (λ) at the top.
* Two branches extending downwards. The left branch is labeled "x".
* The right branch leads to another lambda abstraction (λ).
* From the second lambda abstraction, two branches extend downwards, labeled "y" and "x".
* A red arrow starts from "x", curves downwards, and points to "y", indicating a substitution.
**Diagram 3 (Right):**
* A lambda abstraction (λ) at the top.
* A horizontal line connects the top lambda abstraction to two more lambda abstractions (λ).
* From the rightmost lambda abstraction, a branch extends downwards to a "fork" node.
* The variables x, y, and z are connected to the top lambda abstractions.
* The "fork" node has two branches, each leading to another "fork" node.
* Each of the lower "fork" nodes has three branches extending downwards.
* The variables at the bottom are labeled "x", "z", "y", and "z".
* Red arrows connect "x" to "x", "y" to "z", and "z" to "y" and "z", indicating substitutions.
### Key Observations
* The diagrams illustrate the process of beta reduction in lambda calculus.
* The red arrows show how variables are replaced during the reduction process.
* The complexity of the lambda expression increases from left to right.
### Interpretation
The diagrams demonstrate how lambda expressions are simplified through a series of substitutions. The first diagram shows a simple self-application. The second diagram introduces a nested lambda abstraction. The third diagram shows a more complex expression with multiple applications and substitutions. The red arrows visually represent the core mechanism of beta reduction, which is the foundation of computation in lambda calculus. The increasing complexity from left to right suggests a step-by-step illustration of how more intricate lambda expressions can be reduced.