## Mechanical Diagram: Interconnected Gear Train
### Overview
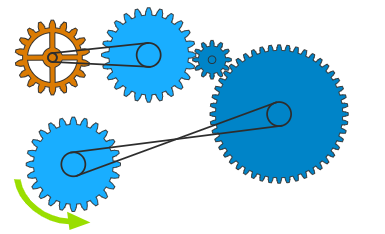
The image is a technical diagram illustrating a mechanical gear train system. It depicts five gears of varying sizes and colors, interconnected by two belts, demonstrating the transmission of rotational motion and torque through a combination of direct meshing and belt drives. There is no textual information (labels, titles, or annotations) present in the image.
### Components/Axes
The diagram consists of the following components, positioned as described:
1. **Gears (5 total):**
* **Gear A (Driver):** A medium-sized, orange gear located in the **top-left quadrant**. It has a central hub and visible teeth.
* **Gear B:** A large, light blue gear positioned to the **right of Gear A**, in the **upper-center area**. It is connected to Gear A via a belt.
* **Gear C:** A very small, light blue gear located **directly to the right of Gear B**, near the **top edge**. It meshes directly with the teeth of Gear B.
* **Gear D:** The largest gear in the system, a dark blue gear situated in the **center-right area**. It meshes directly with the teeth of Gear C.
* **Gear E:** A medium-sized, light blue gear located in the **bottom-left quadrant**. It is connected to Gear D via a second belt.
2. **Belts (2 total):**
* **Belt 1:** A black, looped belt connecting the central hub of **Gear A (orange)** to the central hub of **Gear B (light blue)**.
* **Belt 2:** A black, looped belt connecting the central hub of **Gear D (dark blue)** to the central hub of **Gear E (light blue)**.
3. **Directional Indicator:**
* A curved, green arrow is positioned **below and to the left of Gear E**. It points in a **clockwise direction**, indicating the intended or resulting direction of rotation for Gear E (and likely the system's output).
### Detailed Analysis
* **Power Flow Path:** The system demonstrates a compound gear train. The assumed input is at **Gear A (orange)**. Motion is transmitted via **Belt 1** to **Gear B**. **Gear B** then drives **Gear C** through direct tooth meshing. **Gear C** drives the large **Gear D** through direct meshing. Finally, **Gear D** transmits motion via **Belt 2** to **Gear E**, which is indicated as the output by the green arrow.
* **Gear Sizes & Implied Ratios:** The gears have distinct sizes, which would create specific gear ratios affecting speed and torque at each stage.
* Gear A (medium) to Gear B (large): This belt drive likely results in a **speed reduction** and **torque increase**.
* Gear B (large) to Gear C (very small): This direct meshing creates a significant **speed increase** and **torque reduction**.
* Gear C (very small) to Gear D (very large): This direct meshing creates a very significant **speed reduction** and **torque increase**.
* Gear D (very large) to Gear E (medium): This belt drive likely results in a moderate **speed increase** and **torque reduction**.
* **Spatial Relationships:** The layout is asymmetric. The input (Gear A) and output (Gear E) are on the left side, while the central processing gears (B, C, D) are clustered on the right. The belts create diagonal connections across the diagram.
### Key Observations
1. **Hybrid Transmission:** The system uses both **belt drives** (for connecting non-adjacent shafts, allowing for flexibility and potential slip) and **direct gear meshing** (for precise, positive drive between closely spaced shafts).
2. **Extreme Gear Ratio Stages:** The transition from the very small **Gear C** to the very large **Gear D** represents the most dramatic change in the system, implying a major functional stage for torque multiplication or speed reduction.
3. **Color Coding:** Gears are color-coded (orange vs. shades of blue), which may indicate different materials, functions (e.g., driver vs. driven), or simply serve for visual distinction. The two belts are consistently black.
4. **Directional Consistency:** The green arrow indicates a clockwise output. Tracing the motion: a clockwise rotation of Gear A would turn Gear B clockwise via the belt. Gear B turning clockwise would drive Gear C counter-clockwise. Gear C counter-clockwise would drive Gear D clockwise. Gear D clockwise would drive Gear E counter-clockwise via the second belt. **Therefore, the green arrow (clockwise) contradicts the expected mechanical output (counter-clockwise) based on standard gear and belt drive principles.** This is a critical anomaly.
### Interpretation
This diagram is a schematic representation of a mechanical power transmission system, likely used for educational or conceptual design purposes. It demonstrates how rotational motion can be routed, transformed in speed and torque, and directed through a combination of mechanical elements.
The primary **anomaly** is the direction of the green output arrow. Based on the physical connections shown, the output gear (E) should rotate **counter-clockwise** if the input gear (A) rotates clockwise. The clockwise arrow suggests either:
* The input rotation is intended to be counter-clockwise.
* There is an error in the diagram's annotation.
* An additional, unshown gear or mechanism reverses the direction before the output.
The system's design prioritizes a compact layout on the right side for the high-torque, low-speed stage (Gear D) while using belts to bridge the distance to the input and output. The use of a very small gear (C) driving a very large gear (D) is a classic method for achieving a large mechanical advantage, converting high-speed, low-torque input into low-speed, high-torque output at Gear D, which is then moderated by the final belt drive to Gear E.