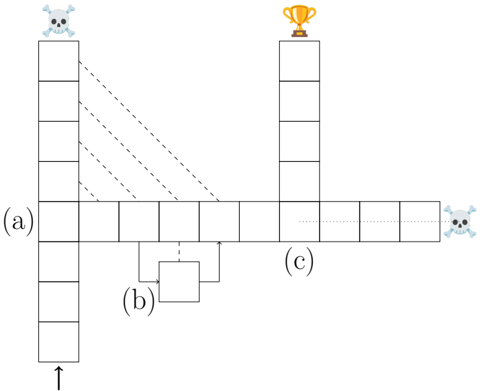
## Diagram: Pathfinding with Obstacles and Rewards
### Overview
The image depicts a pathfinding scenario represented by a grid of squares. The path starts at the bottom-left, proceeds through a series of connected squares, and aims to reach a trophy at the top of a vertical stack of squares on the right side of the diagram. There are obstacles, represented by skulls, and a potential loop or detour in the path. The path is labeled with sections (a), (b), and (c).
### Components/Axes
* **Grid:** The environment is represented by a grid of squares, indicating possible locations or steps in the path.
* **Start:** The path begins at the bottom of a vertical stack of squares on the left side, indicated by an upward-pointing arrow.
* **End/Goal:** The goal is represented by a golden trophy at the top of a vertical stack of squares on the right side.
* **Obstacles:** Two skull icons represent obstacles. One is at the top of a vertical stack of squares on the left side, and the other is at the end of a horizontal path on the right side.
* **Path Sections:** The path is divided into three sections labeled (a), (b), and (c).
* **Loop/Detour:** A small square labeled (b) represents a potential loop or detour in the path. Arrows indicate the flow into and out of this loop.
* **Dashed Lines:** Dashed lines connect the top of the vertical stack of squares on the left to the horizontal path, indicating a potential hazard or constraint. A dotted line represents a section of the path on the right.
### Detailed Analysis
* **Section (a):** This section consists of a vertical stack of squares on the left side, with an arrow indicating the starting point at the bottom. The path then extends horizontally to the right. There are 6 squares in the vertical stack.
* **Section (b):** This section represents a loop or detour. The path enters the square, and arrows indicate that it can either continue forward or loop back to the same square.
* **Section (c):** This section is a horizontal path leading to the skull obstacle. The path is represented by a dotted line. There are 4 squares in this section.
* **Obstacles:** The skull at the top of the vertical stack on the left is connected to the horizontal path by dashed lines, suggesting a potential hazard or constraint if the path deviates upwards. The skull on the right indicates a dead end or another obstacle.
* **Goal:** The trophy is located at the top of a vertical stack of squares on the right side. There are 4 squares in this vertical stack.
### Key Observations
* The path is not a straight line; it involves both vertical and horizontal movements.
* The loop in section (b) introduces a decision point in the path.
* The dashed lines and skulls represent potential hazards or constraints that the path must avoid.
* The dotted line in section (c) might indicate a less desirable or more dangerous path.
### Interpretation
The diagram illustrates a pathfinding problem where an agent needs to navigate a grid to reach a goal (trophy) while avoiding obstacles (skulls) and considering potential hazards (dashed lines). The loop in section (b) introduces complexity, as the agent must decide whether to take the detour or continue forward. The dotted line in section (c) might represent a riskier path that the agent should avoid if possible. The diagram highlights the challenges of pathfinding, including obstacle avoidance, decision-making, and risk assessment.