## Bar Charts: Robustness to Many-to-One SCM: BELM vs. DDIM
### Overview
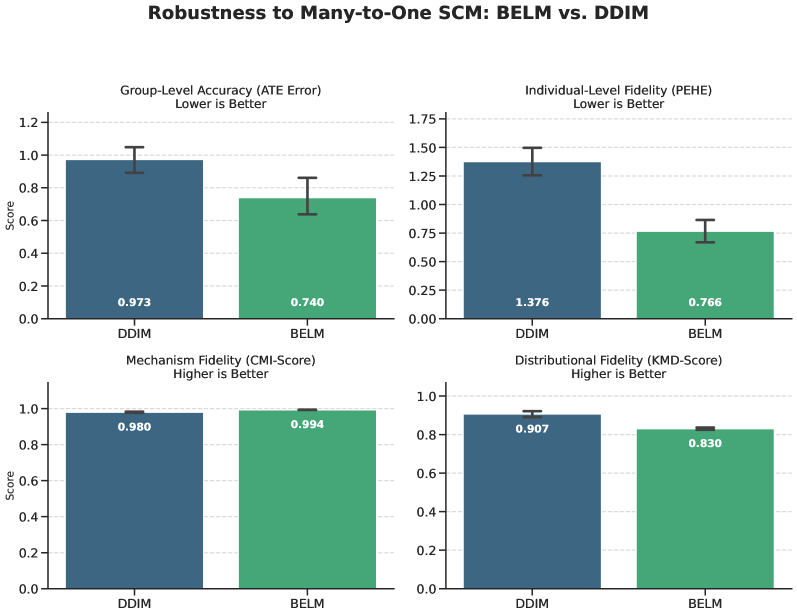
The image presents four bar charts comparing the performance of two methods, DDIM and BELM, across four different metrics: Group-Level Accuracy (ATE Error), Individual-Level Fidelity (PEHE), Mechanism Fidelity (CMI-Score), and Distributional Fidelity (KMD-Score). Each chart includes error bars representing the variability of the scores. The title indicates the comparison is related to "Robustness to Many-to-One SCM".
### Components/Axes
* **Title:** Robustness to Many-to-One SCM: BELM vs. DDIM
* **X-axis (all charts):** DDIM, BELM
* **Y-axis (all charts):** Score
* **Chart 1:** Group-Level Accuracy (ATE Error) - Lower is Better
* **Chart 2:** Individual-Level Fidelity (PEHE) - Lower is Better
* **Chart 3:** Mechanism Fidelity (CMI-Score) - Higher is Better
* **Chart 4:** Distributional Fidelity (KMD-Score) - Higher is Better
* **Color Scheme:** DDIM is represented by a dark teal/blue color, and BELM is represented by a light green color. Error bars are black.
### Detailed Analysis or Content Details
**Chart 1: Group-Level Accuracy (ATE Error)**
* The Y-axis ranges from 0.0 to 1.2.
* DDIM has a score of approximately 0.973 with an error bar extending from roughly 0.85 to 1.05.
* BELM has a score of approximately 0.740 with an error bar extending from roughly 0.60 to 0.88.
* Trend: DDIM has a higher score than BELM.
**Chart 2: Individual-Level Fidelity (PEHE)**
* The Y-axis ranges from 0.0 to 1.75.
* DDIM has a score of approximately 1.376 with an error bar extending from roughly 1.20 to 1.55.
* BELM has a score of approximately 0.766 with an error bar extending from roughly 0.60 to 0.93.
* Trend: DDIM has a higher score than BELM.
**Chart 3: Mechanism Fidelity (CMI-Score)**
* The Y-axis ranges from 0.0 to 1.0.
* DDIM has a score of approximately 0.980 with an error bar extending from roughly 0.90 to 1.0.
* BELM has a score of approximately 0.994 with an error bar extending from roughly 0.95 to 1.03.
* Trend: BELM has a slightly higher score than DDIM.
**Chart 4: Distributional Fidelity (KMD-Score)**
* The Y-axis ranges from 0.0 to 1.0.
* DDIM has a score of approximately 0.907 with an error bar extending from roughly 0.80 to 1.0.
* BELM has a score of approximately 0.830 with an error bar extending from roughly 0.70 to 0.95.
* Trend: DDIM has a higher score than BELM.
### Key Observations
* DDIM consistently outperforms BELM in Group-Level Accuracy, Individual-Level Fidelity, and Distributional Fidelity.
* BELM slightly outperforms DDIM in Mechanism Fidelity.
* The error bars indicate some variability in the scores, but the differences between DDIM and BELM appear substantial for most metrics.
* The "Lower is Better" metrics (Group-Level Accuracy and Individual-Level Fidelity) show DDIM having higher values, which means it is *worse* on these metrics.
### Interpretation
The data suggests that DDIM is more robust than BELM in terms of Group-Level Accuracy, Individual-Level Fidelity, and Distributional Fidelity when applied to a Many-to-One SCM. However, it is important to note that lower scores are better for Group-Level Accuracy and Individual-Level Fidelity, meaning DDIM performs worse on these metrics. BELM demonstrates slightly better performance in Mechanism Fidelity.
The relationship between the metrics suggests a trade-off: BELM prioritizes mechanism fidelity, while DDIM prioritizes distributional fidelity. The choice between the two methods depends on the specific application and the relative importance of these different aspects of robustness. The error bars indicate that the observed differences are not always statistically significant, and further investigation may be needed to confirm these findings. The fact that DDIM has higher values for the "Lower is Better" metrics is a critical observation, suggesting that DDIM may not be the preferred method if minimizing these errors is a primary goal.