# Technical Document: Automated GUI Workflow Analysis
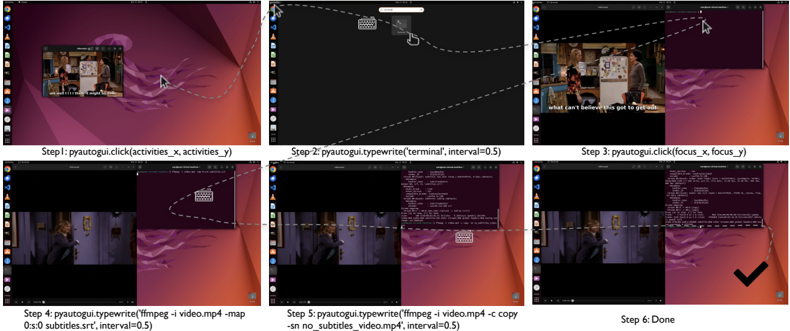
This document provides a technical breakdown of a six-step automated process depicted in the provided image. The image illustrates a sequence of actions using the `pyautogui` Python library to interact with a Linux (Ubuntu) desktop environment to perform video processing tasks.
## Overview
The image is a composite of six screenshots, each representing a discrete step in an automation script. A dashed line with a cursor icon tracks the movement and interaction points across the frames.
---
## Step-by-Step Process Extraction
### Step 1: Initial State and Navigation
* **Visual State:** A video player is open on the left side of the Ubuntu desktop showing a scene from a TV show with subtitles.
* **Action Label:** `Step 1: pyautogui.click(activities_x, activities_y)`
* **Technical Detail:** The cursor moves to the top-left corner of the screen to click the "Activities" button, initiating the application search/launcher.
### Step 2: Application Launch
* **Visual State:** The screen transitions to the Activities overlay (darkened background). A search bar is visible at the top.
* **Action Label:** `Step 2: pyautogui.typewrite('terminal', interval=0.5)`
* **Technical Detail:** The script types the string "terminal" into the search bar with a 0.5-second delay between keystrokes. A keyboard icon is shown to represent the typing action.
### Step 3: Window Focus
* **Visual State:** A terminal window has appeared in the top-right quadrant of the screen. The video player remains on the left.
* **Action Label:** `Step 3: pyautogui.click(focus_x, focus_y)`
* **Technical Detail:** The cursor moves to the terminal window and clicks to ensure the window has input focus for subsequent commands.
### Step 4: Command Entry (Subtitles)
* **Visual State:** The terminal window is active. A keyboard icon indicates text entry.
* **Action Label:** `Step 4: pyautogui.typewrite('ffmpeg -i video.mp4 -map 0:s:0 subtitles.srt', interval=0.5)`
* **Technical Detail:** The script enters an `ffmpeg` command to extract a subtitle stream (`-map 0:s:0`) from a file named `video.mp4` into a new file named `subtitles.srt`.
### Step 5: Command Entry (Video Processing)
* **Visual State:** The terminal shows the output of the previous command. A new command is being typed.
* **Action Label:** `Step 5: pyautogui.typewrite('ffmpeg -i video.mp4 -c copy -sn no_subtitles_video.mp4', interval=0.5)`
* **Technical Detail:** The script enters a second `ffmpeg` command. This command copies the video/audio streams (`-c copy`) but removes all subtitle streams (`-sn`) to create a new file named `no_subtitles_video.mp4`.
### Step 6: Completion
* **Visual State:** The terminal shows the final output of the processing. A large black checkmark is displayed in the bottom right corner.
* **Action Label:** `Step 6: Done`
* **Technical Detail:** The automated sequence has concluded successfully.
---
## Component Analysis
### UI Elements (Ubuntu Desktop)
* **Taskbar (Left):** Contains icons for Firefox, Files, Software Center, Help, Amazon, Settings, and Terminal.
* **Top Bar:** Displays "Activities" on the left and system status icons (Clock, Power, Network) on the right.
* **Wallpaper:** Standard Ubuntu "Jammy Jellyfish" (22.04) default background.
### Command Line Interface (CLI) Data
The terminal windows in Steps 4 and 5 contain technical metadata regarding the video file being processed, including:
* **Input File:** `video.mp4`
* **Metadata:** Includes encoder information (Lavf58.29.100).
* **Stream Mapping:** Identifies Video (h264), Audio (aac), and Subtitle (mov_text) streams.
### Automation Logic (PyAutoGUI)
The script utilizes two primary functions:
1. `click(x, y)`: Moves the mouse to specific coordinates and performs a left-click.
2. `typewrite(string, interval)`: Simulates keyboard input for a specific string with a defined temporal gap between characters to mimic human typing or allow for UI latency.