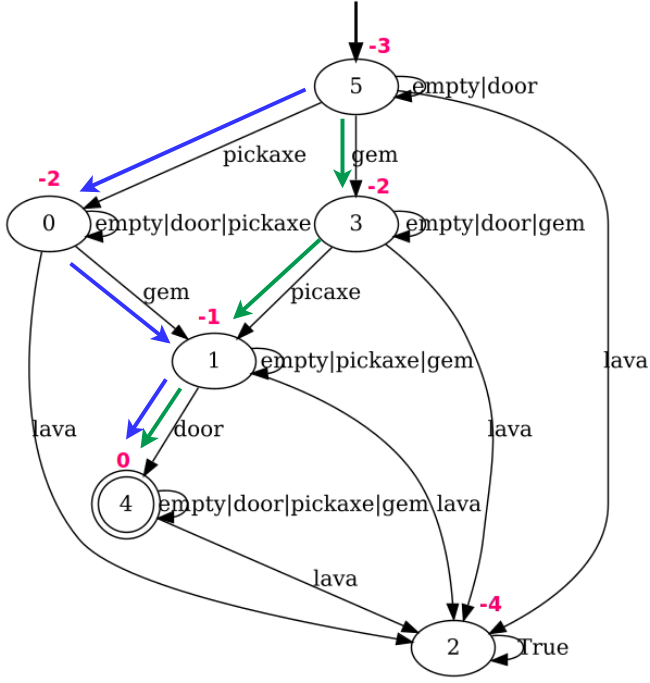
## State Transition Diagram: Game State Machine with Item-Based Transitions
### Overview
The image displays a directed graph representing a finite state machine, likely modeling a game or puzzle scenario. The system consists of six states (nodes 0-5) connected by transitions (edges) labeled with item conditions or actions. Each state has an associated numerical value (in red), possibly representing a reward or cost. The diagram uses color-coding (blue, green, black) to highlight specific transition paths.
### Components/Axes
**Nodes (States):**
- **Node 0**: Oval, labeled "0", red value "-2".
- **Node 1**: Oval, labeled "1", red value "-1".
- **Node 2**: Oval, labeled "2", red value "-4". Has a self-loop labeled "True".
- **Node 3**: Oval, labeled "3", red value "-2".
- **Node 4**: Double-bordered oval, labeled "4", red value "0". Has a self-loop labeled "empty|door|pickaxe|gem|lava".
- **Node 5**: Oval, labeled "5", red value "-3". Has an unlabeled incoming arrow from above.
**Transitions (Edges):**
Edges are directed arrows with text labels. Some are colored:
- **Blue edges**: Form a path from Node 5 → Node 0 → Node 1 → Node 4.
- **Green edges**: Form a path from Node 5 → Node 3 → Node 1 → Node 4.
- **Black edges**: Represent alternative or default transitions.
**Edge Labels (Transitions):**
Labels use a pipe `|` notation, likely indicating possible items held or conditions met (e.g., "empty|door" means the agent has either nothing or a door). Common terms: `empty`, `door`, `pickaxe`, `gem`, `lava`. One label contains a typo: "picaxe" (likely intended as "pickaxe").
### Detailed Analysis
**State Values (Red Numbers):**
- Node 5: -3
- Node 0: -2
- Node 3: -2
- Node 1: -1
- Node 4: 0 (highest value, likely goal state)
- Node 2: -4 (lowest value, likely failure state)
**Transition Paths & Labels:**
1. **From Node 5 (Start):**
- Blue edge to Node 0: label "pickaxe"
- Green edge to Node 3: label "gem"
- Black edge to Node 3: label "empty|door|gem"
- Black edge to Node 2: label "lava"
2. **From Node 0:**
- Blue edge to Node 1: label "gem"
- Black edge to Node 4: label "lava"
- Black edge to Node 2: label "lava"
3. **From Node 3:**
- Green edge to Node 1: label "picaxe" (typo for "pickaxe")
- Black edge to Node 1: label "empty|pickaxe|gem"
- Black edge to Node 2: label "lava"
4. **From Node 1:**
- Blue edge to Node 4: label "door"
- Green edge to Node 4: label "door"
- Black edge to Node 2: label "lava"
5. **From Node 4 (Goal):**
- Self-loop: label "empty|door|pickaxe|gem|lava"
- Incoming black edge from Node 2: label "lava"
6. **From Node 2 (Failure):**
- Self-loop: label "True"
- Incoming black edges from Nodes 0, 1, 3, 5: all labeled "lava"
**Spatial Grounding:**
- The legend (color coding) is implicit in the edge colors. Blue and green paths are visually distinct.
- Node 4 (goal) is positioned bottom-left. Node 2 (failure) is bottom-right. Node 5 (start) is top-center.
- The "lava" transitions consistently lead to Node 2 from all other nodes except Node 4.
### Key Observations
1. **Two Primary Successful Paths:** The blue and green paths represent two distinct sequences of item acquisitions leading from the start (Node 5) to the goal (Node 4).
- **Blue Path:** Requires `pickaxe` (at Node 5) then `gem` (at Node 0) then `door` (at Node 1).
- **Green Path:** Requires `gem` (at Node 5) then `pickaxe` (at Node 3) then `door` (at Node 1).
2. **"Lava" is a Universal Failure Condition:** Any transition labeled "lava" from Nodes 0, 1, 3, or 5 leads directly to the lowest-value state (Node 2, value -4).
3. **Goal State is Stable:** Node 4 has a self-loop accepting all item combinations, indicating it is a terminal, absorbing state.
4. **Node 2 is a Trap State:** It has a self-loop labeled "True", meaning once entered, the system cannot leave.
5. **Item Dependency:** The labels suggest the agent must possess specific items (`pickaxe`, `gem`, `door`) to progress along the colored paths. The `empty` condition appears in alternative (black) transitions.
### Interpretation
This diagram models a **resource-management puzzle or adventure game**. The agent starts at Node 5 with a penalty (-3) and must collect items in a specific order to reach the goal (Node 4, reward 0) while avoiding "lava" traps that lead to a severe penalty (Node 2, -4).
- **The data suggests** that there are multiple valid solutions (blue vs. green paths), but both require the same three key items (`pickaxe`, `gem`, `door`) acquired in different sequences. This implies the puzzle has structured, non-linear solutions.
- **The elements relate** through a state-space where transitions are gated by inventory. The colored paths highlight optimal strategies, while black edges represent suboptimal or dangerous choices. The numerical values likely represent a cumulative score or cost, with the goal being to maximize the final value (reach 0 instead of -4).
- **Notable anomaly:** The typo "picaxe" on the green edge from Node 3 to Node 1. This is likely an error in the diagram's creation but does not obscure the intended meaning.
- **Underlying logic:** The system enforces a "lock-and-key" design. The `door` item is the final key needed at Node 1 to access the goal. The `lava` transitions act as a penalty for attempting actions without the correct items or for making wrong choices. The structure encourages exploration and item collection while punishing recklessness.