## Decision Tree with Logit Bar Charts
### Overview
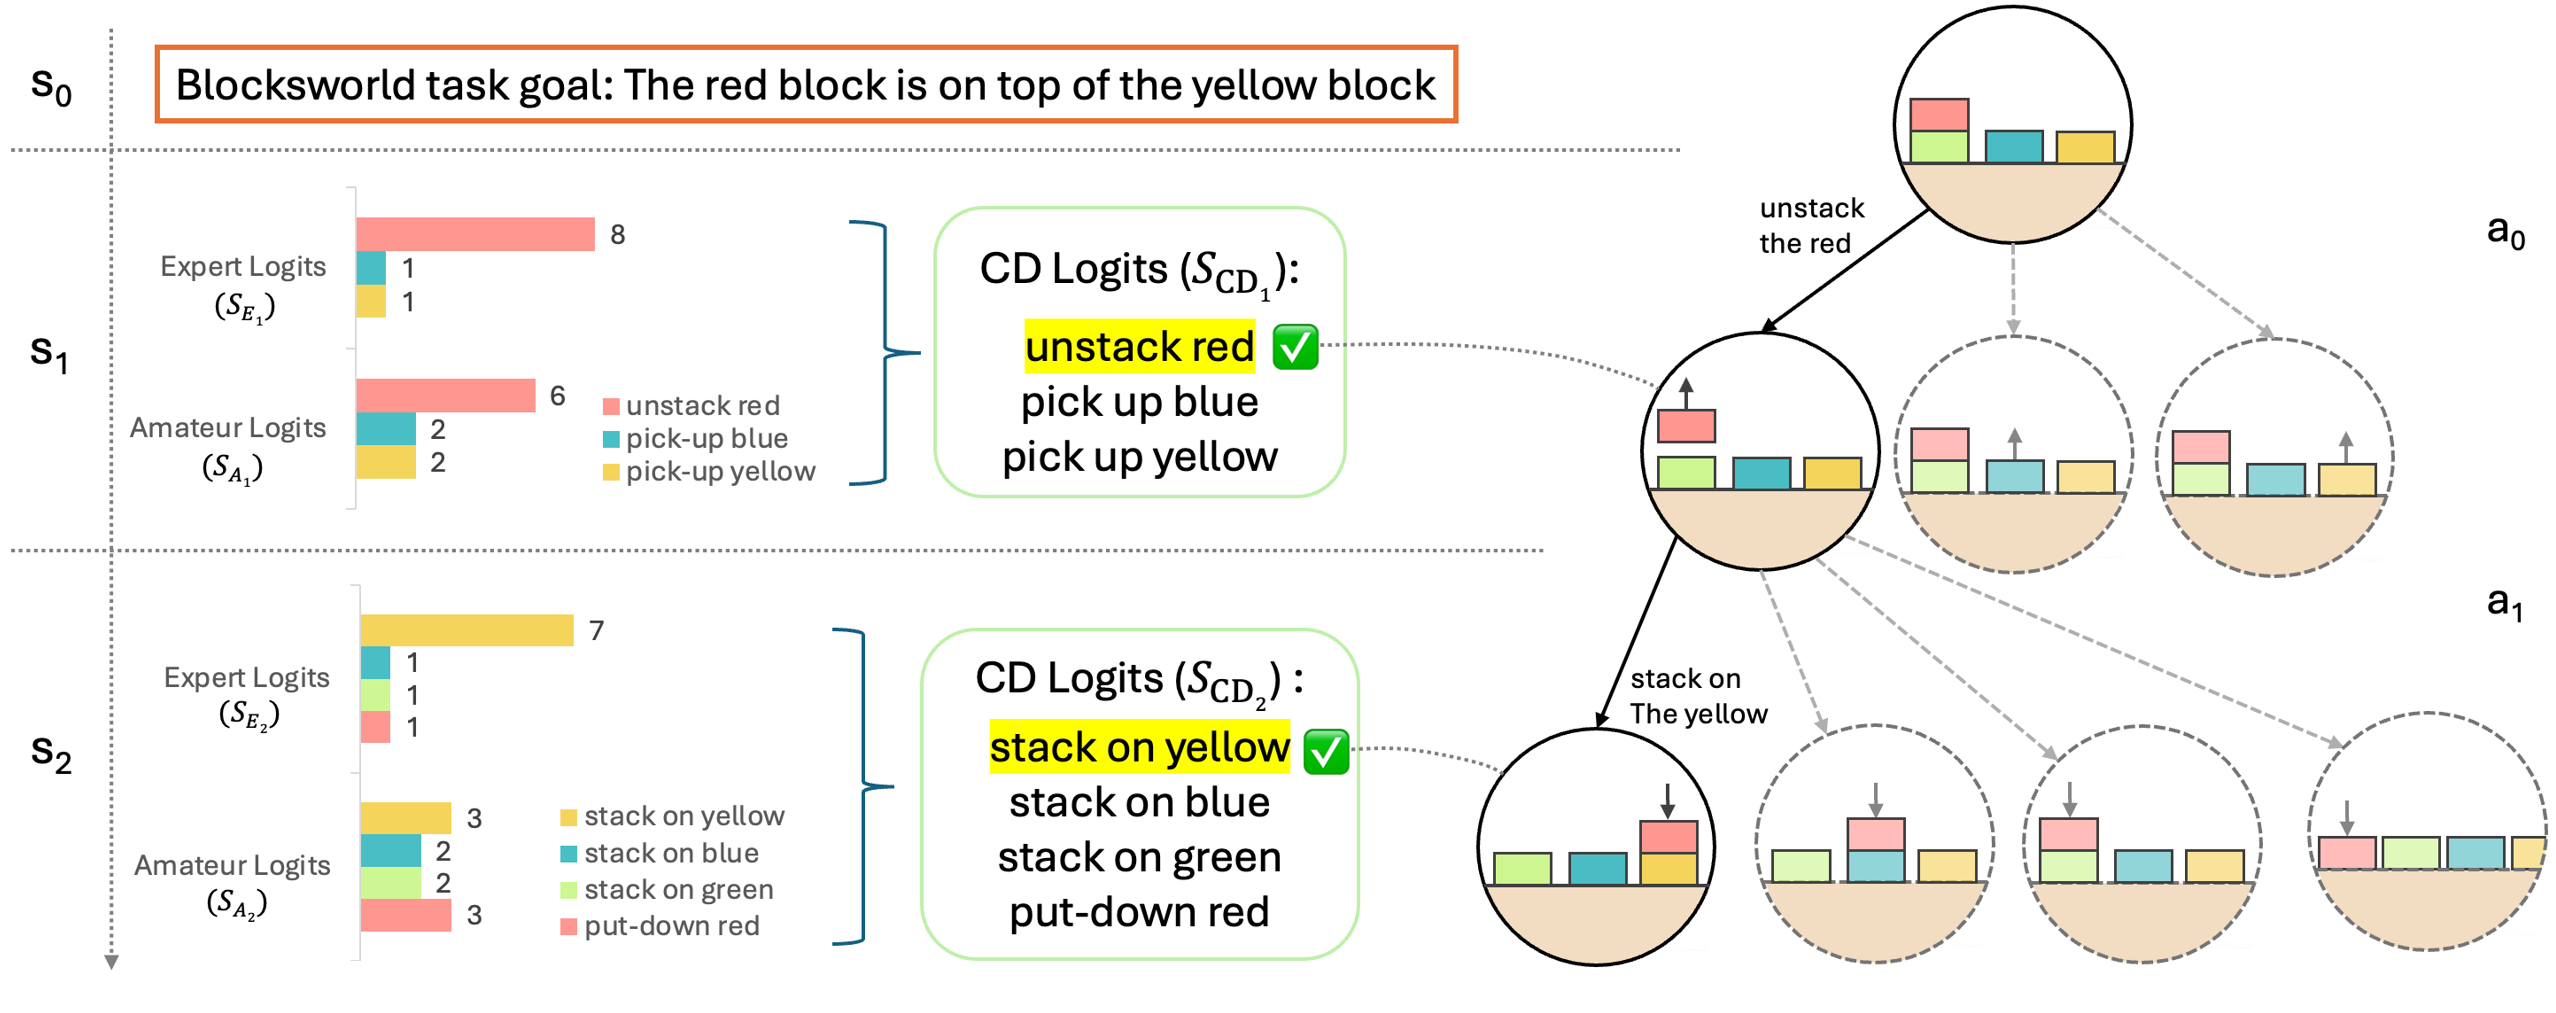
The image presents a decision tree illustrating a blocksworld task, where the goal is to have the red block on top of the yellow block. The tree shows possible actions and their outcomes, accompanied by bar charts representing the logits (log-odds) of different actions chosen by an "expert" and an "amateur" at different states. The "CD Logits" show the chosen action.
### Components/Axes
* **Title:** Blocksworld task goal: The red block is on top of the yellow block (contained in a brown box at the top)
* **States:** The diagram shows three states: S0, S1, and S2, arranged vertically on the left.
* **Actors:** For states S1 and S2, there are two actors: Expert Logits (SE) and Amateur Logits (SA).
* **Actions:** The decision tree shows two actions: a0 (unstaking the red block) and a1 (stacking on the yellow block).
* **CD Logits:** CD Logits (SCD1) and CD Logits (SCD2) are shown for states S1 and S2 respectively.
* **Bar Charts:** Horizontal bar charts represent the logits for each action.
* The x-axis represents the logit value.
* The y-axis represents the different actions.
* **Decision Tree:** A tree diagram shows the possible actions and their outcomes.
* Nodes represent states of the block configuration.
* Edges represent actions taken to transition between states.
* **Block Configurations:** Each node in the decision tree shows a stack of blocks (red, green, blue, yellow) on a brown base.
### Detailed Analysis or ### Content Details
**State S0:**
* The initial state is described as the goal state: "The red block is on top of the yellow block."
**State S1:**
* **Expert Logits (SE1):**
* Unstack red: 8
* Pick-up blue: 1
* Pick-up yellow: 1
* **Amateur Logits (SA1):**
* Unstack red: 6
* Pick-up blue: 2
* Pick-up yellow: 2
* **CD Logits (SCD1):**
* Unstack red: Selected (indicated by a green checkmark)
* Pick up blue
* Pick up yellow
**State S2:**
* **Expert Logits (SE2):**
* Stack on yellow: 7
* Stack on blue: 1
* Stack on green: 1
* Put-down red: 1
* **Amateur Logits (SA2):**
* Stack on yellow: 3
* Stack on blue: 2
* Stack on green: 2
* Put-down red: 3
* **CD Logits (SCD2):**
* Stack on yellow: Selected (indicated by a green checkmark)
* Stack on blue
* Stack on green
* Put-down red
**Decision Tree:**
* **Root Node (a0):** Represents the initial state where the red block is on top of the yellow block.
* **Action a0 (Unstack the red):** From the root node, the action "Unstack the red" leads to three possible states.
* **Action a1 (Stack on The yellow):** From one of the states resulting from action a0, the action "Stack on The yellow" leads to several possible states.
* The tree shows the progression of actions and their resulting block configurations.
### Key Observations
* In state S1, both the expert and amateur logits favor "Unstack red," with the expert having a higher logit value.
* In state S2, both the expert and amateur logits favor "Stack on yellow," with the expert having a higher logit value.
* The CD Logits reflect the actions with the highest logits.
* The decision tree visually represents the possible sequences of actions and their outcomes.
### Interpretation
The diagram illustrates a decision-making process in a blocksworld environment. The logits represent the confidence or preference for different actions by an "expert" and an "amateur." The CD Logits indicate the chosen action based on these logits. The decision tree shows how these actions lead to different states, ultimately aiming to achieve the goal of having the red block on top of the yellow block. The expert consistently shows a stronger preference for the optimal actions (unstaking red when necessary and stacking on yellow when possible), suggesting a more efficient problem-solving strategy compared to the amateur.