## Line Graphs: Regularization Impact and Optimal Learning Rate Schedule
### Overview
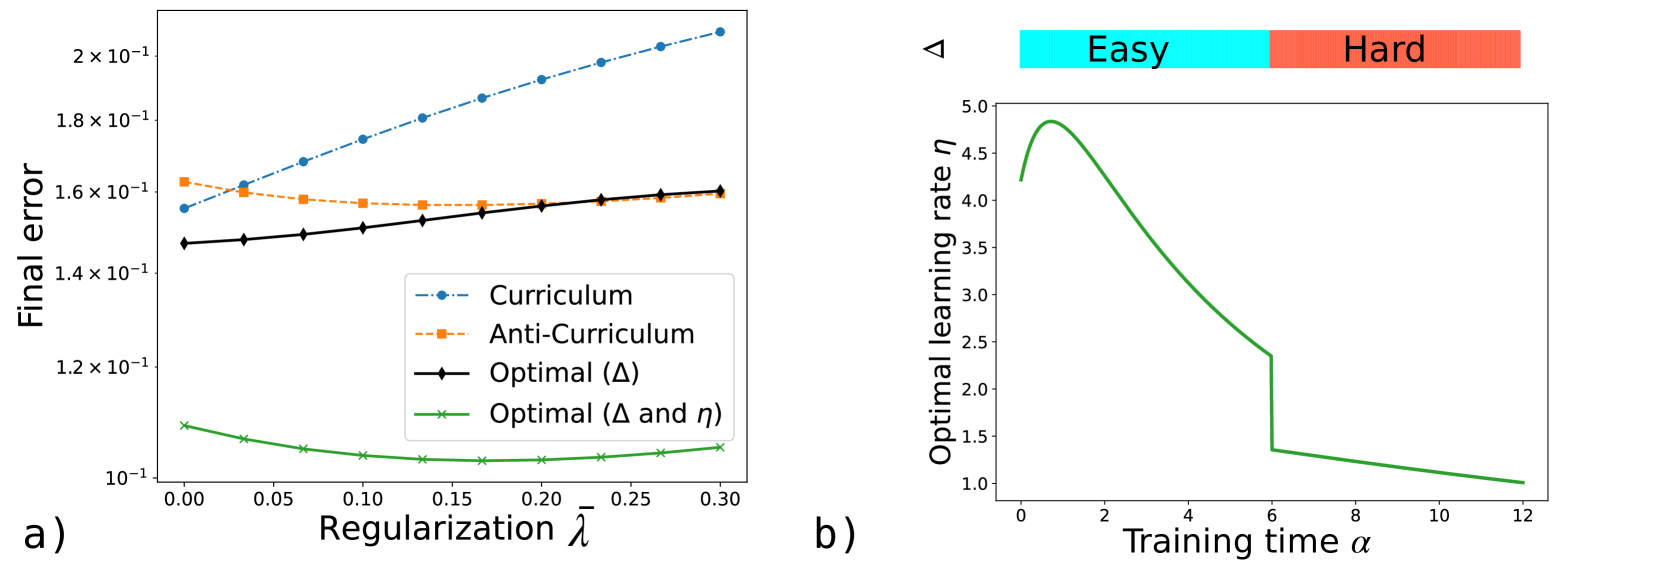
The image contains two distinct line charts, labeled **a)** and **b)**, presented side-by-side. Chart **a)** compares the final error of four different training strategies as a function of a regularization parameter. Chart **b)** plots the optimal learning rate over training time, with a visual indicator separating "Easy" and "Hard" phases of training.
### Components/Axes
**Chart a) - Left Panel**
* **Chart Type:** Line graph with markers.
* **Y-axis:** Label is "Final error". Scale is logarithmic, ranging from `10^-1` (0.1) to `2 x 10^-1` (0.2). Major ticks are at 0.1, 0.12, 0.14, 0.16, 0.18, and 0.2.
* **X-axis:** Label is "Regularization λ". Scale is linear, ranging from 0.00 to 0.30. Major ticks are at 0.00, 0.05, 0.10, 0.15, 0.20, 0.25, and 0.30.
* **Legend:** Located in the bottom-right quadrant of the chart area. It defines four data series:
1. `Curriculum`: Blue, dash-dot line with circle markers.
2. `Anti-Curriculum`: Orange, dashed line with square markers.
3. `Optimal (Δ)`: Black, solid line with diamond markers.
4. `Optimal (Δ and η)`: Green, solid line with 'x' markers.
**Chart b) - Right Panel**
* **Chart Type:** Line graph.
* **Y-axis:** Label is "Optimal learning rate η". Scale is linear, ranging from 1.0 to 5.0. Major ticks are at 1.0, 1.5, 2.0, 2.5, 3.0, 3.5, 4.0, 4.5, and 5.0.
* **X-axis:** Label is "Training time α". Scale is linear, ranging from 0 to 12. Major ticks are at 0, 2, 4, 6, 8, 10, and 12.
* **Phase Indicator:** A horizontal bar at the top of the chart area. The left segment (cyan) is labeled "Easy". The right segment (salmon/red) is labeled "Hard". The transition occurs at approximately `α = 6`.
### Detailed Analysis
**Chart a) - Regularization vs. Final Error**
* **Trend Verification & Data Points:**
* **Curriculum (Blue, circles):** Shows a clear, consistent upward trend. The line slopes upward from left to right.
* At λ=0.00, error ≈ 0.155.
* At λ=0.15, error ≈ 0.180.
* At λ=0.30, error ≈ 0.205.
* **Anti-Curriculum (Orange, squares):** Shows a slight downward trend initially, then flattens.
* At λ=0.00, error ≈ 0.162.
* At λ=0.15, error ≈ 0.157.
* At λ=0.30, error ≈ 0.160.
* **Optimal (Δ) (Black, diamonds):** Shows a steady, shallow upward trend.
* At λ=0.00, error ≈ 0.147.
* At λ=0.15, error ≈ 0.153.
* At λ=0.30, error ≈ 0.160.
* **Optimal (Δ and η) (Green, 'x's):** Shows a shallow U-shaped curve, decreasing to a minimum before slightly increasing.
* At λ=0.00, error ≈ 0.108.
* Minimum error occurs around λ=0.15, error ≈ 0.102.
* At λ=0.30, error ≈ 0.105.
**Chart b) - Optimal Learning Rate Schedule**
* **Trend Verification:** The line shows a rapid initial increase to a peak, followed by a steady decline, and then a sharp, discontinuous drop.
* **Data Points & Phases:**
* **Easy Phase (α ≈ 0 to 6):** The optimal learning rate η starts around 4.2 at α=0, peaks at approximately η=4.8 near α=1, then declines steadily.
* **Transition:** At α=6, there is a sharp, vertical drop in the optimal learning rate from approximately η=2.4 to η=1.4.
* **Hard Phase (α ≈ 6 to 12):** Following the drop, the learning rate continues a slow, linear decline from η=1.4 at α=6 to η=1.0 at α=12.
### Key Observations
1. **Performance Hierarchy (Chart a):** The "Optimal (Δ and η)" strategy consistently achieves the lowest final error across all regularization values, followed by "Optimal (Δ)". The "Curriculum" strategy performs the worst as regularization increases.
2. **Regularization Sensitivity (Chart a):** The "Curriculum" strategy is highly sensitive to regularization, with error increasing significantly as λ grows. The "Anti-Curriculum" and "Optimal (Δ)" strategies are moderately sensitive. The "Optimal (Δ and η)" strategy is the least sensitive, maintaining low error.
3. **Learning Rate Schedule (Chart b):** The optimal learning rate is not constant. It is high and dynamic during the "Easy" phase of training and undergoes a dramatic, step-wise reduction when transitioning to the "Hard" phase.
4. **Discontinuity (Chart b):** The sharp drop at α=6 is the most salient feature, indicating a fundamental shift in the optimal training dynamics at that point.
### Interpretation
The data suggests a sophisticated view of training dynamics in machine learning.
* **Chart a)** demonstrates that simply ordering data (Curriculum or Anti-Curriculum) is less effective than optimizing other hyperparameters (Δ, and especially Δ combined with η). The superior and robust performance of "Optimal (Δ and η)" implies that jointly tuning the data ordering parameter (Δ) and the learning rate (η) is crucial for achieving low error that is resilient to regularization strength. The poor performance of the standard Curriculum strategy with increasing regularization suggests it may lead to overfitting or poor generalization under those conditions.
* **Chart b)** provides a mechanistic insight. The "Easy" vs. "Hard" phase distinction, coupled with the learning rate schedule, suggests a two-stage training process. The initial high, peaking learning rate likely facilitates rapid exploration of the parameter space. The sharp drop at α=6 marks a transition point—perhaps where the model has learned coarse features and must now fine-tune on harder examples or avoid overshooting minima. The subsequent low, decaying learning rate in the "Hard" phase is consistent with fine-grained convergence. This visualizes the concept that the optimal learning rate is not a fixed value but a schedule that should adapt to the training phase.
**Overall Synthesis:** Together, the charts argue for moving beyond simple curriculum learning. They advocate for an optimized, phase-aware training regimen where hyperparameters like the learning rate are dynamically adjusted in sync with the perceived difficulty of the training data, leading to more robust and effective models.