TECHNICAL ASSET FINGERPRINT
3fa21b46b01c642364bc3c34
Click to view fullscreen
Press ESC or click to close
FOUND IN PAPERS
EXPERT: gemini-2.0-flash VERSION 1
RUNTIME: nugit/gemini/gemini-2.0-flash
INTEL_VERIFIED
## Diagram: LLM Fine-Tuning and TrialMaster Inference
### Overview
The image illustrates a process involving LLM (Large Language Model) fine-tuning and TrialMaster inference for theorem proving. It shows the flow from a theorem to a predicted proof using an LLM, the computation of loss, and a comparison with the ground truth. The TrialMaster inference section details the iterative process of applying tactics and backtracking to find a complete proof.
### Components/Axes
* **Title**: LLM Fine-Tuning (top-left)
* **Title**: TrialMaster Inference (left)
* **Nodes**:
* Theorem (i.e., state 0)
* LLM (yellow box)
* Predicted proof (e.g., state 0; tactic 1; ...; state 4)
* Compute loss (orange arrow)
* Ground truth (tree structure with nodes labeled 0, 1, 2, 3, 4, and a green checkmark on node 4)
* State k (node in the inference process)
* Tactic (action applied to a state)
* Backtrack (blue arrow indicating a return to a previous state)
* Lean (blue box)
* **States**: State 0, State 1, State 2, State 3, State 4
* **Tactics**: Tactic 1, Tactic 2, Tactic 3, Tactic 4
* **Legend**: Located at the top-center, showing:
* (k) state k -> tactic -> backtrack (blue arrow)
### Detailed Analysis
The diagram is divided into two main sections: LLM Fine-Tuning (top) and TrialMaster Inference (bottom).
**LLM Fine-Tuning:**
1. **Input**: A theorem (i.e., state 0) is fed into the LLM (yellow box).
2. **Process**: The LLM generates a predicted proof, which is a sequence of states and tactics (e.g., state 0; tactic 1; ...; state 4).
3. **Evaluation**: The predicted proof is compared to the ground truth, and a loss is computed. The ground truth is represented as a tree structure with nodes 0, 1, 2, 3, and 4, where node 4 has a green checkmark, indicating a successful proof. The ground truth also shows a blue arrow indicating a backtrack from node 2 to node 0.
4. **Text Box**: A text box on the top-right contains the sequence of states and tactics: "state 0; tactic 1; state 1; tactic 2; state 2; backtrack to state 0; tactic 3; state 3; tactic 4; state 4."
**TrialMaster Inference:**
This section shows the iterative process of theorem proving using the LLM. It consists of five stages, each representing a step in the inference process.
* **Stage 1**:
* Initial state: state 0 (highlighted in light red)
* LLM generates tactic 1 (yellow box)
* Lean applies tactic 1, resulting in state 1 (blue box)
* **Stage 2**:
* Initial state: state 0; tactic 1; state 1 (state 1 highlighted in light red)
* LLM generates tactic 2 (yellow box)
* Lean applies tactic 2, resulting in state 2 (blue box)
* **Stage 3**:
* Initial state: state 0; tactic 1; tactic 2; state 2 (state 0 highlighted in light red)
* LLM generates tactic 3 (yellow box)
* The text "backtrack to state 0" is displayed in blue.
* Lean applies tactic 3, resulting in state 3 (blue box)
* **Stage 4**:
* Initial state: state 0; ...; state 2; backtrack to state 0 (state 3 highlighted in light red)
* LLM generates tactic 4 (yellow box)
* Lean applies tactic 4, resulting in state 4 (blue box)
* **Stage 5**:
* Initial state: state 0; ...; state 3 (state 4 highlighted in light red)
* The process reaches state 4, which is marked as "complete" in green.
Each stage starts with a tree-like diagram showing the current state of the proof. The nodes are numbered, and blue arrows indicate backtracking.
### Key Observations
* The LLM is used to generate tactics based on the current state of the proof.
* The Lean theorem prover applies the tactics to transition between states.
* Backtracking is used to explore different paths in the proof search.
* The process continues until a complete proof is found (state 4).
### Interpretation
The diagram illustrates a system for automated theorem proving that combines the strengths of large language models (LLMs) and formal theorem provers like Lean. The LLM is used to suggest tactics, while Lean ensures the correctness of the proof steps. The TrialMaster inference process demonstrates how the system iteratively explores the search space, using backtracking to recover from dead ends. The comparison with the ground truth in the LLM Fine-Tuning section suggests that the LLM is trained to generate proofs that align with known solutions. The diagram highlights the importance of both prediction (LLM) and verification (Lean) in automated theorem proving.
DECODING INTELLIGENCE...
EXPERT: gemma-3-27b-it-free VERSION 1
RUNTIME: google-free/gemma-3-27b-it
INTEL_VERIFIED
## Diagram: LLM Fine-Tuning and TrialMaster Inference
### Overview
This diagram illustrates the process of LLM (Large Language Model) fine-tuning and subsequent TrialMaster inference for theorem proving. The upper section depicts the fine-tuning process, while the lower section details the inference stage. The diagram uses a series of state transitions and tactics to represent the progression of the proof search.
### Components/Axes
The diagram is divided into two main sections separated by a dashed line: "LLM Fine-Tuning" and "TrialMaster Inference".
**LLM Fine-Tuning Section:**
* **Input:** "theorem (i.e. state 0)"
* **Process:** LLM -> "predicted proof (e.g. state 0; tactic 1; ...; state 4)" -> "compute loss"
* **Output:** "state 0; tactic 1; state 1; tactic 2; state 2; backtrack to state 0; tactic 3; state 3; tactic 4; state 4"
* **Ground Truth:** A circular diagram with nodes 0-4 and a green checkmark on node 4.
**TrialMaster Inference Section:**
* **States:** state 0, state 1, state 2, state 3, state 4 ("complete")
* **Tactics:** tactic 1, tactic 2, tactic 3, tactic 4
* **Backtrack:** Indicated by a double-headed arrow.
* **Components:** LLM (pink rectangle), Lean (green rectangle)
### Detailed Analysis or Content Details
**LLM Fine-Tuning:**
The process begins with a "theorem" (initial state 0). This theorem is fed into an LLM, which predicts a proof sequence represented as a series of states and tactics. A loss is computed based on the predicted proof, and the LLM is updated accordingly. The predicted proof sequence is: state 0, tactic 1, state 1, tactic 2, state 2, backtrack to state 0, tactic 3, state 3, tactic 4, state 4. The "ground truth" shows a successful proof reaching state 4, indicated by a green checkmark.
**TrialMaster Inference:**
This section shows a sequence of states and tactics applied by the LLM and Lean.
* **Step 1:** State 0. LLM proposes tactic 1. Lean applies tactic 1, transitioning to state 1.
* **Step 2:** State 1. LLM proposes tactic 2. Lean applies tactic 2, transitioning to state 2.
* **Step 3:** State 2. LLM proposes a backtrack to state 0.
* **Step 4:** State 0. LLM proposes tactic 3. Lean applies tactic 3, transitioning to state 3.
* **Step 5:** State 3. LLM proposes tactic 4. Lean applies tactic 4, transitioning to state 4 ("complete").
The arrows indicate the flow of the proof search. Double-headed arrows represent backtracking. The circular diagrams above each state show the current state of the proof.
### Key Observations
* The fine-tuning process aims to align the LLM's predicted proof sequence with the ground truth.
* The TrialMaster inference process involves iterative application of tactics by the LLM, followed by execution by Lean.
* Backtracking is a crucial component of the proof search, allowing the system to explore alternative paths.
* The final state 4 is labeled "complete", indicating a successful proof.
* The diagram highlights the interplay between the LLM (generating tactics) and Lean (executing tactics).
### Interpretation
The diagram illustrates a reinforcement learning-like approach to theorem proving. The LLM is fine-tuned to predict effective proof tactics, and the TrialMaster inference process uses these predictions to navigate the proof search space. The "compute loss" step in the fine-tuning section suggests that the LLM is being trained to minimize the difference between its predicted proof sequence and the ground truth. The backtracking mechanism allows the system to recover from incorrect tactic applications and explore alternative proof paths. The successful completion of the proof in state 4 demonstrates the effectiveness of this approach. The diagram suggests a system where the LLM acts as a high-level strategist, proposing tactics, while Lean serves as a low-level executor, verifying and applying those tactics. The cyclical nature of the TrialMaster inference process, with its potential for backtracking, reflects the iterative and exploratory nature of theorem proving.
DECODING INTELLIGENCE...
EXPERT: healer-alpha-free VERSION 1
RUNTIME: free/openrouter/healer-alpha
INTEL_VERIFIED
\n
## Diagram: LLM Fine-Tuning and TrialMaster Inference Process
### Overview
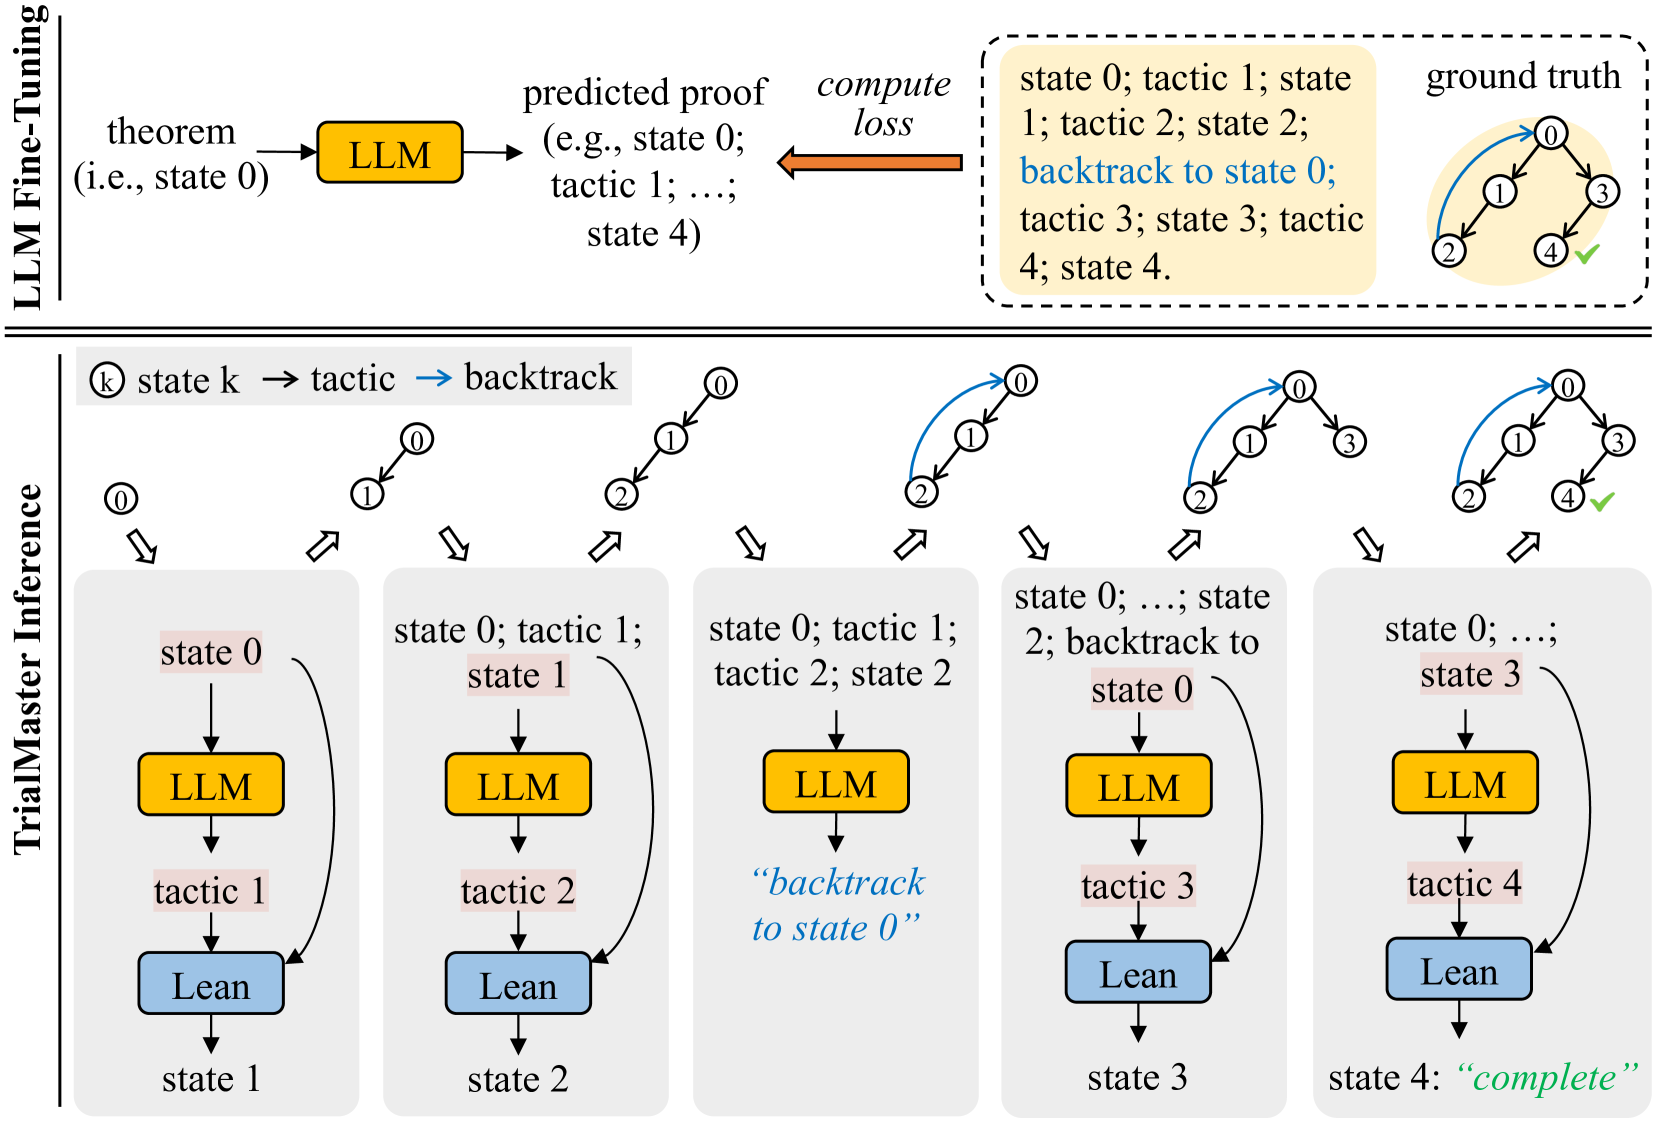
The image is a technical diagram illustrating two related processes for using Large Language Models (LLMs) in formal theorem proving. The top section depicts a standard "LLM Fine-Tuning" pipeline. The bottom, more detailed section illustrates a multi-step inference process called "TrialMaster Inference," which incorporates backtracking and interaction with a proof assistant (Lean).
### Components/Axes
The diagram is divided into two primary horizontal sections, separated by a double line.
**Top Section: LLM Fine-Tuning**
* **Left Side:** A flow starts with the text `theorem (i.e., state 0)` pointing to a yellow box labeled `LLM`.
* **Middle:** The `LLM` box points to `predicted proof (e.g., state 0; tactic 1; ...; state 4)`.
* **Right Side:** A dashed box contains the `ground truth`. Inside:
* A text sequence: `state 0; tactic 1; state 1; tactic 2; state 2; backtrack to state 0; tactic 3; state 3; tactic 4; state 4.`
* A small state transition graph showing nodes 0, 1, 2, 3, 4. Arrows show transitions: 0→1, 1→2, 2→0 (blue backtrack arrow), 0→3, 3→4. Node 4 has a green checkmark.
* **Connection:** An orange arrow labeled `compute loss` points from the `ground truth` box back to the `predicted proof` text.
**Bottom Section: TrialMaster Inference**
* **Legend (Top-Left):** A gray box defines symbols: `(k) state k → tactic → backtrack`. It shows a circle with a number (state), a black arrow (tactic application), and a blue arrow (backtrack).
* **Main Process (Five Sequential Columns):** Each column represents a step in the inference process, showing a state diagram at the top and a detailed flow below.
* **Column 1:**
* *Top Diagram:* Single node `0`.
* *Flow:* `state 0` → `LLM` (yellow box) → `tactic 1` → `Lean` (blue box) → `state 1`. A curved arrow loops from `state 1` back to the `Lean` box input.
* **Column 2:**
* *Top Diagram:* Nodes `0` and `1` with a black arrow from 0 to 1.
* *Flow:* `state 0; tactic 1; state 1` → `LLM` → `tactic 2` → `Lean` → `state 2`. A curved arrow loops from `state 2` back to the `Lean` box input.
* **Column 3:**
* *Top Diagram:* Nodes `0`, `1`, `2` with black arrows 0→1, 1→2.
* *Flow:* `state 0; tactic 1; tactic 2; state 2` → `LLM` → `"backtrack to state 0"` (blue text).
* **Column 4:**
* *Top Diagram:* Nodes `0`, `1`, `2` with black arrows 0→1, 1→2, and a blue arrow from 2 back to 0.
* *Flow:* `state 0; ...; state 2; backtrack to state 0` → `LLM` → `tactic 3` → `Lean` → `state 3`. A curved arrow loops from `state 3` back to the `Lean` box input.
* **Column 5:**
* *Top Diagram:* Nodes `0`, `1`, `2`, `3`, `4`. Black arrows: 0→1, 1→2, 0→3, 3→4. Blue arrow: 2→0. Node 4 has a green checkmark.
* *Flow:* `state 0; ...; state 3` → `LLM` → `tactic 4` → `Lean` → `state 4: "complete"` (green text).
### Detailed Analysis
The diagram contrasts two methodologies:
1. **LLM Fine-Tuning (Top):** This is a standard supervised learning setup. The model is trained to minimize the loss between its entire predicted proof sequence and a fixed ground truth sequence. The ground truth includes a backtrack step, indicating the training data contains non-linear proof attempts.
2. **TrialMaster Inference (Bottom):** This is an interactive, step-by-step generation process.
* **State:** Represented by circled numbers (0, 1, 2...). It is the current goal or context in the proof.
* **Tactic:** An action proposed by the LLM to advance the proof from the current state.
* **Lean:** The interactive proof assistant that executes the tactic on the current state, producing a new state.
* **Backtrack:** A critical operation where the LLM can decide to revert to a previous state (e.g., from state 2 back to state 0) if it determines the current path is unfruitful. This is shown with a blue arrow in the state diagrams and blue text in the flow.
* **Process Flow:** The LLM receives the current proof state/history, proposes a tactic or a backtrack command. If a tactic is given, Lean executes it to produce a new state. This repeats until a "complete" state is reached.
### Key Observations
* The **state diagrams** at the top of each inference column provide a visual summary of the proof search tree being built. The final diagram (Column 5) matches the structure shown in the `ground truth` of the fine-tuning section.
* The **curved arrows** in the first, second, and fourth inference columns suggest a feedback loop where the new state is fed back into the process for the next LLM call.
* The **color coding** is consistent: Yellow for LLM, Blue for Lean/Backtrack text, Green for success ("complete" and checkmark).
* The **"backtrack to state 0"** command in Column 3 is generated directly by the LLM, not by Lean, indicating the model learns to make strategic control decisions.
### Interpretation
This diagram explains a sophisticated method for improving LLM-based theorem proving. The core insight is that **proof search is not a single, linear forward pass**. The "TrialMaster Inference" system explicitly models and enables:
1. **Interactive Refinement:** The LLM interacts with a formal verifier (Lean) at each step, grounding its predictions in a rigorous environment.
2. **Strategic Backtracking:** The model can recognize dead ends and retreat to an earlier, promising state, mimicking human proof-search behavior. This is a significant advancement over models that can only generate a single, monolithic proof script.
3. **Learning from Non-Linear Proofs:** The fine-tuning data (top section) includes backtracking steps, teaching the model that proofs can involve exploration and correction. The inference process (bottom section) then operationalizes this ability.
The relationship between the two sections is causal: the fine-tuning process trains the LLM to understand proof states, tactics, *and* backtracking, which is then deployed in the more complex, iterative TrialMaster inference loop. The ultimate goal is to produce a verified, complete proof (state 4) by dynamically navigating a proof tree.
DECODING INTELLIGENCE...
EXPERT: nemotron-free VERSION 1
RUNTIME: free/nvidia/nemotron-nano-12b-v2-vl:free
INTEL_VERIFIED
## Diagram: LLM Fine-Tuning and TrialMaster Inference Process
### Overview
The diagram illustrates a two-phase process for training and deploying a Large Language Model (LLM) in a formal proof or theorem-proving context. The top section details **LLM Fine-Tuning**, while the bottom section outlines **TrialMaster Inference**, a step-by-step execution framework with error correction.
---
### Components/Axes
#### LLM Fine-Tuning (Top Section)
- **Input**: Theorem (e.g., "state 0").
- **LLM Block**: Processes the theorem to generate a **predicted proof** (e.g., "state 0; tactic 1; ...; state 4").
- **Compute Loss**: Compares the predicted proof to the **ground truth** (a correct sequence of states and tactics).
- **Ground Truth**: Visualized as a cyclic path (0 → 1 → 2 → 3 → 4 → 0) with verified correctness (✓).
#### TrialMaster Inference (Bottom Section)
- **States**: Sequential steps (state 0 → state 1 → ... → state 4).
- **Components**:
- **LLM**: Yellow blocks generating outputs.
- **Lean**: Blue blocks executing tactics (e.g., "tactic 1", "tactic 2").
- **Flow**:
- **Forward Execution**: State 0 → tactic 1 → state 1 → ... → state 3 → tactic 4 → state 4 ("complete").
- **Backtracking**: State 2 includes a loop back to state 0 ("backtrack to state 0").
---
### Detailed Analysis
#### LLM Fine-Tuning
1. **Input**: A theorem (e.g., "state 0") is fed into the LLM.
2. **Output**: The LLM predicts a proof sequence (e.g., "state 0; tactic 1; ...; state 4").
3. **Loss Calculation**: The predicted proof is compared to the ground truth to compute loss, guiding model adjustments.
#### TrialMaster Inference
1. **State 0**: Initial state with LLM and Lean.
2. **State 1**: LLM generates "tactic 1", Lean executes it, transitioning to state 1.
3. **State 2**: LLM generates "tactic 2", Lean executes it, transitioning to state 2. A backtracking arrow loops back to state 0.
4. **State 3**: LLM generates "tactic 3", Lean executes it, transitioning to state 3.
5. **State 4**: LLM generates "tactic 4", Lean executes it, marking the process as "complete".
---
### Key Observations
1. **Backtracking Mechanism**: State 2 explicitly includes a loop to state 0, suggesting error recovery or exploration of alternative proof paths.
2. **Cyclic Ground Truth**: The ground truth forms a closed loop (0 → 1 → 2 → 3 → 4 → 0), implying iterative refinement.
3. **Component Roles**:
- **LLM**: Proposes proof steps.
- **Lean**: Executes tactics and validates transitions.
4. **State 4**: Labeled "complete", indicating successful termination of the inference process.
---
### Interpretation
This diagram represents a hybrid system for formal reasoning:
1. **Training Phase (LLM Fine-Tuning)**:
- The LLM is trained to generate proofs by minimizing the discrepancy between its predictions and the ground truth.
- The ground truth’s cyclic nature suggests the model learns to handle iterative or recursive proofs.
2. **Inference Phase (TrialMaster)**:
- The system executes proofs step-by-step, with Lean validating each tactic’s correctness.
- Backtracking in state 2 implies the system can abandon invalid paths and restart, enhancing robustness.
- The "complete" state in step 4 signifies successful proof completion, likely after resolving all subgoals.
3. **Design Implications**:
- The integration of LLM (generative) and Lean (verificational) creates a closed-loop system for automated theorem proving.
- Backtracking introduces a form of search or exploration, critical for handling complex or ambiguous proofs.
---
### Notes
- **Language**: All text is in English.
- **No Numerical Data**: The diagram focuses on process flow rather than quantitative metrics.
- **Color Coding**: Yellow (LLM) and blue (Lean) blocks visually distinguish components.
DECODING INTELLIGENCE...