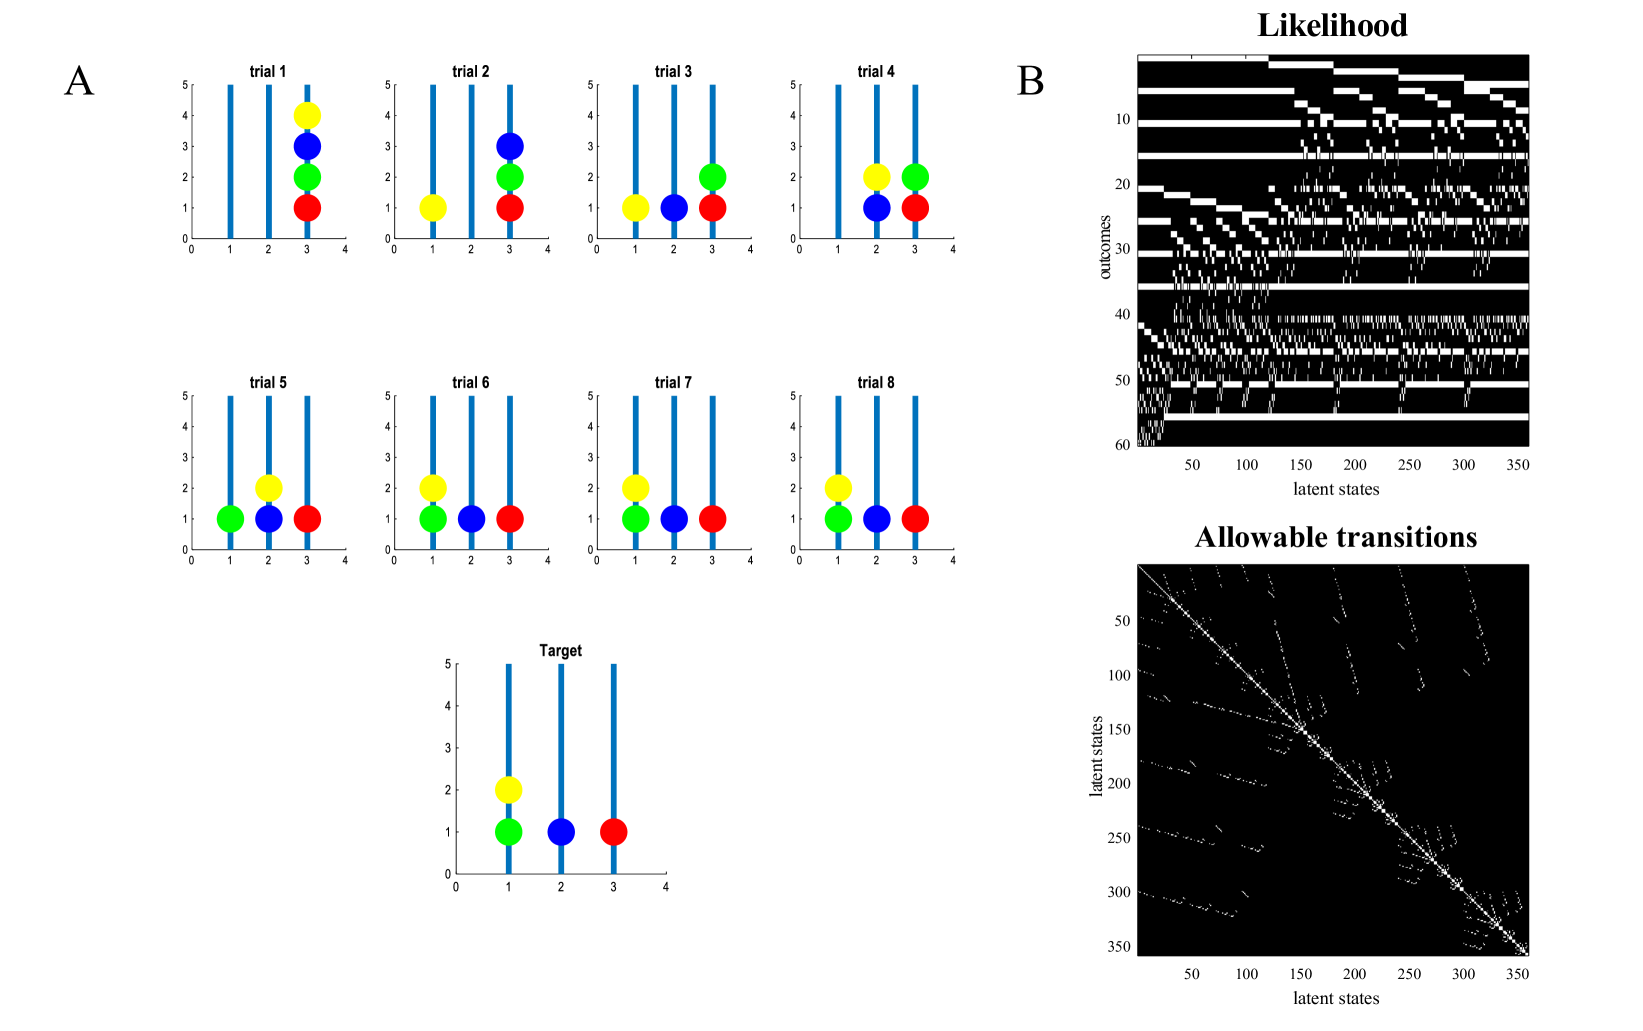
## Composite Image: Task Trials and State Transitions
### Overview
The image is a composite figure consisting of two main sections, labeled A and B. Section A displays a series of bar graphs representing trials, each showing the position of colored circles (yellow, green, blue, red) on vertical bars. Section B contains two heatmaps: one representing the likelihood of outcomes given latent states, and the other showing allowable transitions between latent states.
### Components/Axes
**Section A: Task Trials**
* **Title:** Section A is labeled "A".
* **Trials:** There are nine bar graphs in total, labeled "trial 1" through "trial 8", and "Target".
* **Axes:** Each bar graph has a vertical axis ranging from 0 to 5, and a horizontal axis ranging from 0 to 4.
* **Elements:** Each trial consists of four vertical blue bars, with colored circles (yellow, green, blue, red) positioned on these bars.
**Section B: Likelihood and Transitions**
* **Title:** Section B is labeled "B".
* **Top Heatmap:** Labeled "Likelihood".
* **Y-axis:** "outcomes", ranging from 10 to 60 in increments of 10.
* **X-axis:** "latent states", ranging from 50 to 350 in increments of 50.
* **Bottom Heatmap:** Labeled "Allowable transitions".
* **Y-axis:** "latent states", ranging from 50 to 350 in increments of 50.
* **X-axis:** "latent states", ranging from 50 to 350 in increments of 50.
### Detailed Analysis or ### Content Details
**Section A: Task Trials**
* **Trial 1:** Yellow circle at approximately 4 on bar 2, green circle at approximately 3 on bar 3, blue circle at approximately 2 on bar 4, red circle at approximately 1 on bar 3.
* **Trial 2:** Yellow circle at approximately 1 on bar 1, green circle at approximately 3 on bar 3, blue circle at approximately 4 on bar 3, red circle at approximately 2 on bar 3.
* **Trial 3:** Yellow circle at approximately 1 on bar 1, green circle at approximately 2 on bar 3, blue circle at approximately 4 on bar 4, red circle at approximately 1 on bar 2.
* **Trial 4:** Yellow circle at approximately 2 on bar 2, green circle at approximately 3 on bar 3, blue circle at approximately 4 on bar 4, red circle at approximately 1 on bar 3.
* **Trial 5:** Yellow circle at approximately 2 on bar 2, green circle at approximately 1 on bar 1, blue circle at approximately 1 on bar 2, red circle at approximately 1 on bar 3.
* **Trial 6:** Yellow circle at approximately 2 on bar 2, green circle at approximately 1 on bar 1, blue circle at approximately 1 on bar 2, red circle at approximately 1 on bar 3.
* **Trial 7:** Yellow circle at approximately 2 on bar 2, green circle at approximately 1 on bar 1, blue circle at approximately 1 on bar 2, red circle at approximately 1 on bar 3.
* **Trial 8:** Yellow circle at approximately 2 on bar 2, green circle at approximately 1 on bar 1, blue circle at approximately 1 on bar 2, red circle at approximately 1 on bar 3.
* **Target:** Yellow circle at approximately 2 on bar 2, green circle at approximately 1 on bar 1, blue circle at approximately 1 on bar 2, red circle at approximately 1 on bar 3.
**Section B: Likelihood and Transitions**
* **Likelihood Heatmap:** The heatmap shows the likelihood of different outcomes (y-axis) given different latent states (x-axis). The pattern is complex, with horizontal bands of high likelihood (white) interspersed with regions of low likelihood (black). There appear to be diagonal patterns as well.
* **Allowable Transitions Heatmap:** This heatmap shows which transitions between latent states are allowed. A bright diagonal line indicates that transitions from a state to itself are allowed. Other bright spots indicate allowed transitions to other states. The heatmap is mostly black, indicating that most transitions are not allowed.
### Key Observations
* **Trials:** The trials in Section A show different configurations of colored circles on the bars. Trials 5-8 are identical to the "Target" configuration.
* **Likelihood:** The likelihood heatmap shows a structured relationship between latent states and outcomes.
* **Transitions:** The allowable transitions heatmap shows a sparse set of allowed transitions between latent states, with a strong bias towards staying in the same state.
### Interpretation
The image likely represents a reinforcement learning or hidden Markov model. Section A shows the agent's attempts to match a target configuration through a series of trials. The likelihood heatmap in Section B represents the probability of observing different outcomes given the agent's internal state. The allowable transitions heatmap represents the constraints on how the agent's internal state can change over time. The fact that trials 5-8 match the target suggests that the agent has learned the correct configuration. The allowable transitions heatmap suggests that the agent's internal state is relatively stable, with only a few allowed transitions.