\n
## Diagram: Quantum Algorithm Flow
### Overview
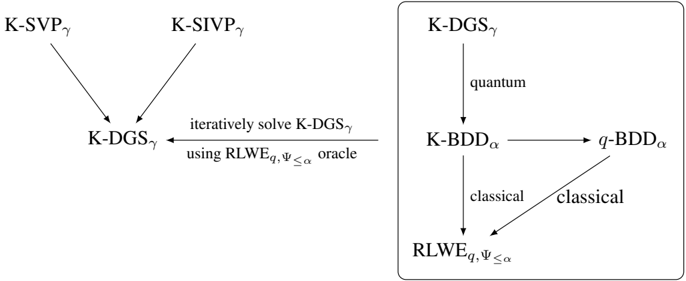
The image presents a diagram illustrating the flow of a quantum algorithm, specifically relating to solving K-DGS (likely a problem or system) using a combination of classical and quantum techniques. The diagram is split into two sections, a left section showing the initial problem setup and a right section showing the solution path.
### Components/Axes
The diagram consists of labeled nodes representing different stages or components of the algorithm, connected by arrows indicating the flow of computation. The labels are mathematical or algorithmic notations. There are no axes or scales present.
### Detailed Analysis or Content Details
**Left Section:**
* **K-SVP<sub>γ</sub>**: A node at the top-left.
* **K-SIVP<sub>γ</sub>**: A node at the top-right, horizontally aligned with K-SVP<sub>γ</sub>.
* **K-DGS<sub>γ</sub>**: A node at the bottom, connected by arrows from both K-SVP<sub>γ</sub> and K-SIVP<sub>γ</sub>.
* **Text Label**: "iteratively solve K-DGS<sub>γ</sub> using RLWE<sub>q,Ψ≤α</sub> oracle" - This text is positioned horizontally between the K-DGS<sub>γ</sub> node and the right section of the diagram.
**Right Section (enclosed in a rectangle):**
* **K-DGS<sub>γ</sub>**: A node at the top.
* **K-BDD<sub>α</sub>**: A node below K-DGS<sub>γ</sub>, connected by an arrow labeled "quantum".
* **q-BDD<sub>α</sub>**: A node to the right of K-BDD<sub>α</sub>, connected by an arrow.
* **RLWE<sub>q,Ψ≤α</sub>**: A node at the bottom, connected by arrows labeled "classical" from both K-BDD<sub>α</sub> and q-BDD<sub>α</sub>.
### Key Observations
The diagram shows a clear separation between the initial problem formulation (left) and the solution process (right). The iterative solving of K-DGS<sub>γ</sub> utilizes an oracle based on RLWE (Ring Learning With Errors). The right section demonstrates a quantum path (K-DGS<sub>γ</sub> to K-BDD<sub>α</sub>) and a classical path (K-BDD<sub>α</sub> and q-BDD<sub>α</sub> to RLWE<sub>q,Ψ≤α</sub>). The use of subscripts (γ and α) suggests parameters or variations within these components.
### Interpretation
This diagram likely represents a hybrid quantum-classical algorithm for solving a problem related to K-DGS. The initial step involves formulating the problem as K-SVP<sub>γ</sub> or K-SIVP<sub>γ</sub>, which are then reduced to K-DGS<sub>γ</sub>. The core of the solution involves iteratively solving K-DGS<sub>γ</sub> using an oracle based on the RLWE problem, which is a well-known lattice-based cryptographic problem. The quantum component, represented by the transition from K-DGS<sub>γ</sub> to K-BDD<sub>α</sub>, suggests a quantum algorithm is used to solve or approximate the K-DGS problem. The subsequent steps involve classical computations to arrive at a solution based on RLWE. The diagram highlights the interplay between quantum and classical techniques in tackling a potentially complex computational problem. The use of BDDs (Binary Decision Diagrams) suggests a method for representing and manipulating Boolean functions, potentially used in the quantum and classical computations. The subscripts γ and α likely represent parameters controlling the complexity or accuracy of the algorithms.