## Screenshot: PyAutoGUI Tutorial Steps with System Interaction
### Overview
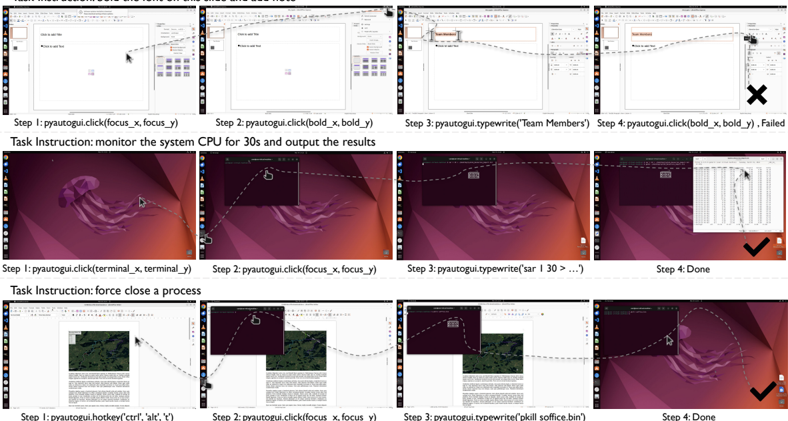
The image shows a tutorial demonstrating the use of PyAutoGUI for automating system interactions. It includes two distinct tasks: (1) monitoring system CPU usage and (2) force-closing a process. Each task is broken into four steps with visual annotations of mouse movements, UI elements, and command execution outcomes.
---
### Components/Axes
- **Task Instructions**: Textual descriptions of objectives (e.g., "monitor the system CPU for 30s and output the results").
- **Step Labels**: Numbered steps (Step 1, Step 2, etc.) with corresponding PyAutoGUI commands.
- **UI Elements**: Screenshots of application windows (e.g., Notepad, Task Manager) with annotated coordinates (e.g., `focus_x`, `focus_y`).
- **Outcome Indicators**: Checkmarks (✓) for successful actions and "X" for failures.
---
### Detailed Analysis
#### Task 1: Monitor System CPU
1. **Step 1**: `pyautogui.click(focus_x, focus_y)`
- Action: Click on a Notepad window at coordinates `(focus_x, focus_y)`.
- Visual: Mouse cursor moves to a Notepad window with a purple background.
2. **Step 2**: `pyautogui.click(bold_x, bold_y)`
- Action: Click on a bolded text element at `(bold_x, bold_y)`.
- Visual: Mouse cursor moves to a bolded text box in Notepad.
3. **Step 3**: `pyautogui.typewrite("Team Members")`
- Action: Type "Team Members" into the Notepad window.
- Visual: Text appears in Notepad, but the window is partially obscured by a Task Manager overlay.
4. **Step 4**: `pyautogui.click(bold_x, bold_y)`
- Action: Repeat the bolded text click.
- Outcome: **Failed** (marked with "X").
#### Task 2: Force Close a Process
1. **Step 1**: `pyautogui.click(terminal_x, terminal_y)`
- Action: Click on a terminal window at `(terminal_x, terminal_y)`.
- Visual: Mouse cursor moves to a terminal window with a purple background.
2. **Step 2**: `pyautogui.click(focus_x, focus_y)`
- Action: Click on a focus element at `(focus_x, focus_y)`.
- Visual: Mouse cursor moves to a focus indicator in the terminal.
3. **Step 3**: `pyautogui.typewrite("kill soffice.bin")`
- Action: Type the command `kill soffice.bin` into the terminal.
- Visual: Command appears in the terminal input field.
4. **Step 4**: `Done`
- Outcome: **Success** (marked with "✓").
---
### Key Observations
- **Coordinate Consistency**: The same coordinates (`focus_x`, `focus_y`) are reused across steps, suggesting a focus on specific UI elements.
- **Failure in Task 1**: The repeated click in Step 4 fails, possibly due to overlapping windows or incorrect coordinates.
- **Success in Task 2**: The terminal command execution completes successfully, indicated by the "Done" label.
---
### Interpretation
This tutorial demonstrates PyAutoGUI's ability to automate repetitive system tasks. The failure in Task 1 highlights the importance of precise coordinate targeting and window management. The successful process termination in Task 2 shows how automation can streamline system maintenance. The use of relative coordinates (`focus_x`, `focus_y`) implies a need for dynamic adjustment based on screen resolution or window positioning.
**Critical Insight**: Automation scripts require careful validation of UI element positions and timing to avoid errors, especially when interacting with overlapping or dynamic windows.