TECHNICAL ASSET FINGERPRINT
4cb92f34bada4b0c40588945
Click to view fullscreen
Press ESC or click to close
FOUND IN PAPERS
EXPERT: healer-alpha-free VERSION 1
RUNTIME: free/openrouter/healer-alpha
INTEL_VERIFIED
\n
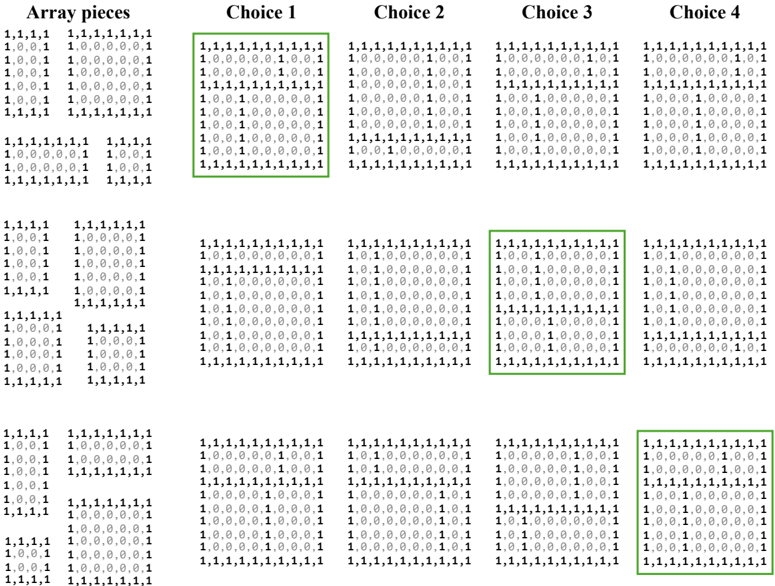
## Diagram: Binary Array Assembly Puzzle
### Overview
The image displays a visual puzzle or test involving the assembly of binary (0 and 1) arrays. It is structured as a grid with three main rows. Each row presents a set of source "Array pieces" on the left and four potential assembled results ("Choice 1" through "Choice 4") on the right. One choice in each row is highlighted with a green border, indicating it is the correct or selected assembly based on the provided pieces.
### Components/Axes
* **Headers:** The top row contains the labels: "Array pieces", "Choice 1", "Choice 2", "Choice 3", "Choice 4".
* **Structure:** The diagram is divided into three horizontal rows. Each row contains:
* **Left Section ("Array pieces"):** Contains two distinct blocks of binary matrices.
* **Right Section (Choices):** Contains four larger binary matrices, each labeled as a choice.
* **Highlighting:** A green rectangular border is used to highlight the correct choice in each row.
* Row 1: Choice 1 is bordered.
* Row 2: Choice 3 is bordered.
* Row 3: Choice 4 is bordered.
### Detailed Analysis
The core content consists of matrices of 0s and 1s. Below is a precise transcription of all visible text and data.
**Row 1:**
* **Array pieces (Left):**
* **Block 1 (Top-left):**
```
1,1,1,1,1
1,0,0,0,1
1,0,0,0,1
1,0,0,0,1
1,0,0,0,1
1,1,1,1,1
```
* **Block 2 (Bottom-left):**
```
1,1,1,1,1,1,1
1,0,0,0,0,0,1
1,0,0,0,0,0,1
1,0,0,0,0,0,1
1,1,1,1,1,1,1
```
* **Choices (Right):**
* **Choice 1 (Green Border):**
```
1,1,1,1,1,1,1,1,1,1,1
1,0,0,0,0,0,0,0,0,0,1
1,0,1,1,1,1,1,1,1,0,1
1,0,1,0,0,0,0,0,1,0,1
1,0,1,0,0,0,0,0,1,0,1
1,0,1,0,0,0,0,0,1,0,1
1,0,1,0,0,0,0,0,1,0,1
1,0,1,1,1,1,1,1,1,0,1
1,0,0,0,0,0,0,0,0,0,1
1,1,1,1,1,1,1,1,1,1,1
```
* **Choice 2:**
```
1,1,1,1,1,1,1,1,1,1,1
1,0,0,0,0,0,0,0,0,0,1
1,0,0,0,0,0,0,0,0,0,1
1,0,0,0,0,0,0,0,0,0,1
1,0,0,0,0,0,0,0,0,0,1
1,0,0,0,0,0,0,0,0,0,1
1,0,0,0,0,0,0,0,0,0,1
1,0,0,0,0,0,0,0,0,0,1
1,0,0,0,0,0,0,0,0,0,1
1,1,1,1,1,1,1,1,1,1,1
```
* **Choice 3:**
```
1,1,1,1,1,1,1,1,1,1,1
1,0,1,1,1,1,1,1,1,0,1
1,0,1,0,0,0,0,0,1,0,1
1,0,1,0,0,0,0,0,1,0,1
1,0,1,0,0,0,0,0,1,0,1
1,0,1,0,0,0,0,0,1,0,1
1,0,1,0,0,0,0,0,1,0,1
1,0,1,1,1,1,1,1,1,0,1
1,0,0,0,0,0,0,0,0,0,1
1,1,1,1,1,1,1,1,1,1,1
```
* **Choice 4:**
```
1,1,1,1,1,1,1,1,1,1,1
1,0,0,0,0,0,0,0,0,0,1
1,0,1,1,1,1,1,1,1,0,1
1,0,1,0,0,0,0,0,1,0,1
1,0,1,0,0,0,0,0,1,0,1
1,0,1,0,0,0,0,0,1,0,1
1,0,1,0,0,0,0,0,1,0,1
1,0,0,0,0,0,0,0,0,0,1
1,0,1,1,1,1,1,1,1,0,1
1,1,1,1,1,1,1,1,1,1,1
```
**Row 2:**
* **Array pieces (Left):**
* **Block 1 (Top-left):** Identical to Row 1, Block 1.
* **Block 2 (Bottom-left):**
```
1,1,1,1,1,1,1
1,0,0,0,0,0,1
1,0,0,0,0,0,1
1,1,1,1,1,1,1
1,0,0,0,0,0,1
1,0,0,0,0,0,1
1,1,1,1,1,1,1
```
* **Choices (Right):**
* **Choice 1:** Same as Row 1, Choice 2.
* **Choice 2:** Same as Row 1, Choice 3.
* **Choice 3 (Green Border):**
```
1,1,1,1,1,1,1,1,1,1,1
1,0,1,1,1,1,1,1,1,0,1
1,0,1,0,0,0,0,0,1,0,1
1,0,1,1,1,1,1,1,1,0,1
1,0,1,0,0,0,0,0,1,0,1
1,0,1,0,0,0,0,0,1,0,1
1,0,1,1,1,1,1,1,1,0,1
1,0,1,0,0,0,0,0,1,0,1
1,0,1,1,1,1,1,1,1,0,1
1,1,1,1,1,1,1,1,1,1,1
```
* **Choice 4:** Same as Row 1, Choice 4.
**Row 3:**
* **Array pieces (Left):**
* **Block 1 (Top-left):** Identical to Row 1, Block 1.
* **Block 2 (Bottom-left):**
```
1,1,1,1,1,1,1
1,0,0,0,0,0,1
1,0,0,0,0,0,1
1,0,0,0,0,0,1
1,0,0,0,0,0,1
1,0,0,0,0,0,1
1,1,1,1,1,1,1
```
* **Choices (Right):**
* **Choice 1:** Same as Row 1, Choice 2.
* **Choice 2:** Same as Row 1, Choice 3.
* **Choice 3:** Same as Row 1, Choice 4.
* **Choice 4 (Green Border):**
```
1,1,1,1,1,1,1,1,1,1,1
1,0,1,1,1,1,1,1,1,0,1
1,0,1,0,0,0,0,0,1,0,1
1,0,1,0,0,0,0,0,1,0,1
1,0,1,0,0,0,0,0,1,0,1
1,0,1,0,0,0,0,0,1,0,1
1,0,1,0,0,0,0,0,1,0,1
1,0,1,0,0,0,0,0,1,0,1
1,0,1,1,1,1,1,1,1,0,1
1,1,1,1,1,1,1,1,1,1,1
```
### Key Observations
1. **Consistent Source:** The first "Array piece" (a 6x5 binary rectangle forming a hollow square) is identical in all three rows.
2. **Variable Source:** The second "Array piece" changes per row, showing different hollow rectangular patterns (7x7, 7x7 with a middle bar, 7x7 simple).
3. **Choice Repetition:** The set of four choices is largely repeated across rows, with only the highlighted correct answer changing position.
4. **Pattern in Correct Answers:** The green-bordered (correct) choice in each row appears to be a composite image. It seems to overlay or combine the patterns from the two source "Array pieces" into a single, larger 11x10 matrix. The first source forms an inner frame, and the second source forms an outer frame or additional structure.
5. **Visual Trend:** The correct assembly results in a nested or layered binary pattern, creating a more complex hollow shape from the simpler component shapes.
### Interpretation
This diagram is likely a test of **spatial reasoning and pattern recognition** within a binary or digital logic context. It demonstrates how simpler binary patterns (the "Array pieces") can be combined to form a more complex, composite pattern (the correct "Choice").
* **What it suggests:** The exercise tests the ability to mentally superimpose or concatenate two 2D arrays. The correct answer is not a simple sum or logical OR of the pieces, but a specific spatial assembly where one pattern is placed within or around the other.
* **Relationship between elements:** The "Array pieces" are the input components. The "Choices" are potential output configurations. The green border provides the ground truth, showing the valid assembly rule.
* **Notable Anomaly/Pattern:** The puzzle is designed with distractors. The incorrect choices are often permutations of the correct pattern (e.g., in Row 1, Choice 3 is similar to the correct Choice 1 but with the inner pattern shifted) or simpler, non-composite patterns (like Choice 2, which is just a large hollow square). This requires careful attention to the exact placement of 1s and 0s from both source pieces.
**In essence, the image documents a visual logic puzzle where the task is to identify how two binary image fragments fit together to create a coherent whole.**
DECODING INTELLIGENCE...