## Diagram: LLM Architectures
### Overview
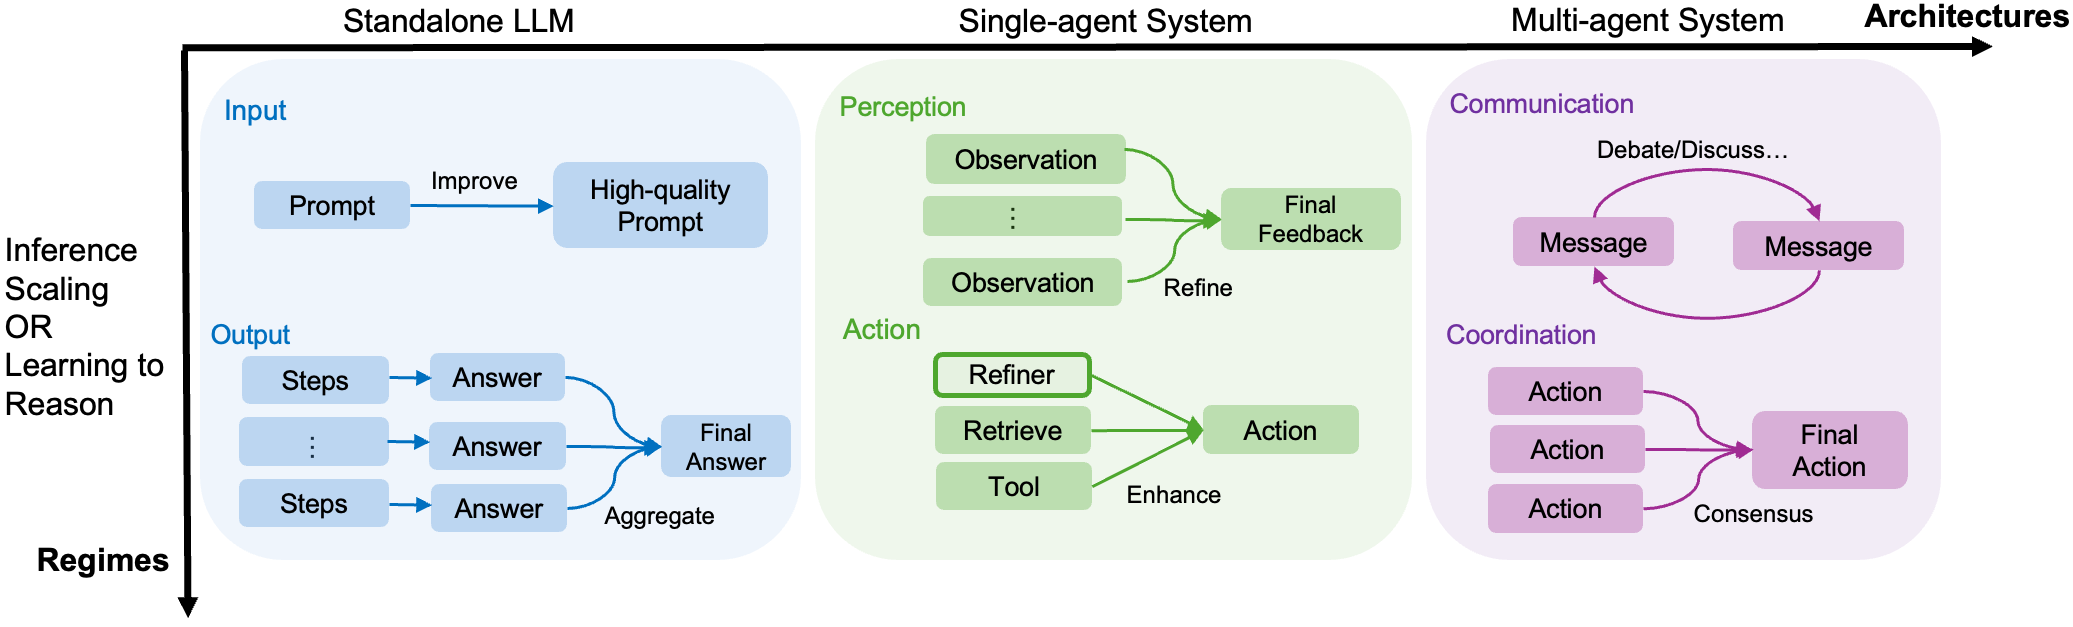
The image presents a diagram illustrating three different architectures for Large Language Models (LLMs): Standalone LLM, Single-agent System, and Multi-agent System. The diagram shows the flow of information and processes within each architecture, highlighting the differences in how they handle input, processing, and output. The diagram also indicates the progression of "Inference Scaling OR Learning to Reason" as one moves from Standalone LLM to Multi-agent System.
### Components/Axes
* **Horizontal Axis:** Represents the different architectures, progressing from Standalone LLM to Single-agent System to Multi-agent System. The axis is labeled "Architectures" and has an arrow indicating the direction of progression.
* **Vertical Axis:** Represents "Inference Scaling OR Learning to Reason" and is labeled "Regimes". An arrow indicates the direction of increasing inference scaling or learning to reason.
* **Standalone LLM:** This section is enclosed in a light blue box and represents the simplest architecture. It is divided into "Input" and "Output" sections.
* **Single-agent System:** This section is enclosed in a light green box and is divided into "Perception" and "Action" sections.
* **Multi-agent System:** This section is enclosed in a light purple box and is divided into "Communication" and "Coordination" sections.
### Detailed Analysis
**1. Standalone LLM (Left Section - Light Blue):**
* **Input:** A "Prompt" leads to a "High-quality Prompt" via an "Improve" arrow.
* **Output:** Multiple "Steps" lead to "Answer" blocks. These "Answer" blocks then lead to a "Final Answer" block via an "Aggregate" arrow. There is an elipsis between the steps indicating that there are more steps than shown.
**2. Single-agent System (Middle Section - Light Green):**
* **Perception:** Multiple "Observation" blocks lead to a "Final Feedback" block via "Refine" arrows. There is an elipsis between the observations indicating that there are more observations than shown.
* **Action:** "Refiner", "Retrieve", and "Tool" blocks lead to an "Action" block via "Enhance" arrows.
**3. Multi-agent System (Right Section - Light Purple):**
* **Communication:** Two "Message" blocks are connected by a circular arrow labeled "Debate/Discuss...".
* **Coordination:** Three "Action" blocks lead to a "Final Action" block via a "Consensus" arrow.
### Key Observations
* The diagram illustrates a progression from simple to complex LLM architectures.
* The Standalone LLM focuses on direct input and output.
* The Single-agent System introduces perception and action loops.
* The Multi-agent System incorporates communication and coordination between multiple agents.
### Interpretation
The diagram suggests that as LLMs evolve, they move from simple standalone models to more complex systems that incorporate perception, action, communication, and coordination. This progression reflects an increase in the ability of LLMs to reason, learn, and interact with their environment. The Multi-agent System represents a more sophisticated architecture that allows for collaborative problem-solving and decision-making. The diagram highlights the key components and processes involved in each architecture, providing a framework for understanding the different approaches to building and deploying LLMs.