\n
## Bar Chart: Solve Rate Comparison
### Overview
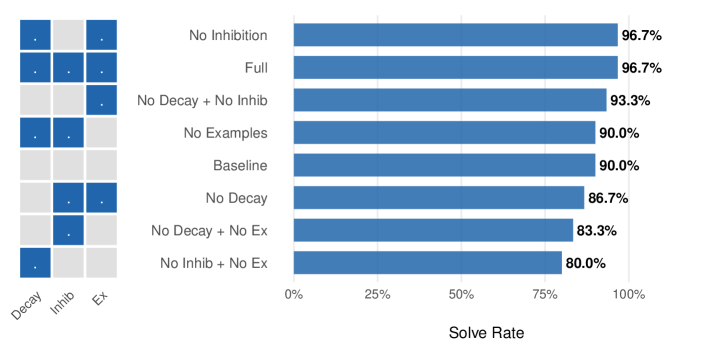
This is a horizontal bar chart comparing the solve rates of different conditions, likely in a problem-solving or learning context. The conditions are variations involving "Decay", "Inhibition" ("Inhib"), and "Examples" ("Ex"). A legend on the right side of the chart labels each condition, and the x-axis represents the solve rate as a percentage. A small matrix of squares is present on the left side of the chart, representing the conditions.
### Components/Axes
* **X-axis:** "Solve Rate" ranging from 0% to 100%, with tick marks at 0%, 25%, 50%, 75%, and 100%.
* **Y-axis:** Represents the different conditions being compared. The conditions are listed vertically, from top to bottom: "No Inhibition", "Full", "No Decay + No Inhib", "No Examples", "Baseline", "No Decay", "No Decay + No Ex", "No Inhib + No Ex".
* **Legend:** Located on the right side of the chart, corresponding to the bars.
* **Matrix:** A 3x3 matrix of squares on the left side of the chart, labeled "Decay", "Inhib", and "Ex" along the bottom. The squares are colored to indicate the presence or absence of each factor. Dark blue indicates presence, light gray indicates absence.
### Detailed Analysis
The chart displays the solve rate for each condition as a horizontal bar. The length of each bar corresponds to the solve rate percentage.
* **No Inhibition:** Solve Rate = 96.7%
* **Full:** Solve Rate = 96.7%
* **No Decay + No Inhib:** Solve Rate = 93.3%
* **No Examples:** Solve Rate = 90.0%
* **Baseline:** Solve Rate = 90.0%
* **No Decay:** Solve Rate = 86.7%
* **No Decay + No Ex:** Solve Rate = 83.3%
* **No Inhib + No Ex:** Solve Rate = 80.0%
The bars generally decrease in length as you move down the chart, indicating a decreasing solve rate.
The matrix on the left side of the chart shows the following conditions:
* Top Row: Decay present, Inhibition present, Examples present (dark blue squares)
* Middle Row: Decay absent, Inhibition present, Examples present (light gray, dark blue, dark blue)
* Bottom Row: Decay absent, Inhibition absent, Examples present (light gray, light gray, dark blue)
### Key Observations
* The highest solve rates are achieved with "No Inhibition" and "Full" conditions, both at 96.7%.
* The lowest solve rate is observed in the "No Inhib + No Ex" condition, at 80.0%.
* The "No Decay + No Inhib" condition has a solve rate of 93.3%, slightly lower than the top two.
* The "No Examples" and "Baseline" conditions have the same solve rate of 90.0%.
* There is a clear trend of decreasing solve rate as factors are removed (decay, inhibition, examples).
### Interpretation
The data suggests that both inhibition and examples positively impact the solve rate. Removing either or both of these factors leads to a decrease in performance. The "Full" condition, which presumably includes all factors (decay, inhibition, and examples), performs as well as the "No Inhibition" condition, suggesting that inhibition may be the most critical factor. The matrix on the left side of the chart visually represents the combinations of factors and their corresponding solve rates. The chart demonstrates the importance of providing examples and managing inhibition to maximize problem-solving success. The "Baseline" condition serves as a reference point for comparison. The consistent decrease in solve rate as factors are removed indicates a synergistic effect between these elements. The data could be used to optimize learning or problem-solving environments by ensuring the presence of examples and minimizing inhibition.