## Textual Instruction Diagram: Causal Relationship Analysis Task
### Overview
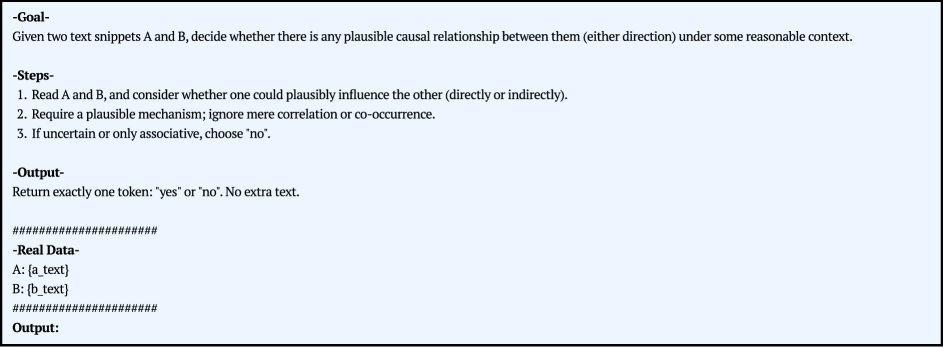
The image is a screenshot or digital document displaying a set of instructions for a text analysis task. The task requires determining if a plausible causal relationship exists between two provided text snippets (A and B). The document is structured with clear section headers and includes a template for data input and output.
### Components/Axes
The image is a single, rectangular panel with a light blue background and black text. It is divided into distinct sections by bolded headers and horizontal lines made of hash symbols (`#`).
**Spatial Layout:**
- **Top Section:** Contains the "Goal" and "Steps" instructions.
- **Middle Section:** Contains the "Output" specification.
- **Bottom Section:** Contains the "Real Data" template and the final "Output:" prompt.
- A horizontal divider line of hash symbols separates the instructional sections from the data template.
### Detailed Analysis / Content Details
All text from the image is transcribed below. The language is English.
**Section 1: Goal**
- **Header:** `-Goal-`
- **Text:** `Given two text snippets A and B, decide whether there is any plausible causal relationship between them (either direction) under some reasonable context.`
**Section 2: Steps**
- **Header:** `-Steps-`
- **Text (numbered list):**
1. `Read A and B, and consider whether one could plausibly influence the other (directly or indirectly).`
2. `Require a plausible mechanism; ignore mere correlation or co-occurrence.`
3. `If uncertain or only associative, choose "no".`
**Section 3: Output**
- **Header:** `-Output-`
- **Text:** `Return exactly one token: "yes" or "no". No extra text.`
**Section 4: Divider**
- A line of 24 hash symbols: `########################`
**Section 5: Real Data Template**
- **Header:** `-Real Data-`
- **Text:**
- `A: {a_text}`
- `B: {b_text}`
- **Note:** `{a_text}` and `{b_text}` are placeholders for the actual text snippets to be analyzed.
**Section 6: Final Divider & Prompt**
- Another line of 24 hash symbols: `########################`
- **Final Prompt:** `Output:`
### Key Observations
1. **Strict Output Format:** The instruction is explicit that the output must be a single token ("yes" or "no") with no additional text, explanation, or formatting.
2. **Causal vs. Correlational:** The steps emphasize distinguishing a "plausible mechanism" for causation from mere correlation or co-occurrence.
3. **Direction Agnostic:** The relationship is considered in "either direction" (A could cause B, or B could cause A).
4. **Template Structure:** The "Real Data" section is a clear template, indicating this is likely a prompt for an automated system or a standardized test format.
5. **Visual Design:** The design is purely functional, using bold headers, numbered lists, and dividers for clarity. The light blue background provides low-contrast readability.
### Interpretation
This image defines a **binary classification task** for natural language processing or logical analysis. The core challenge is to move beyond surface-level textual similarity or topical overlap to infer a potential cause-and-effect link.
- **What it demonstrates:** The document outlines a rigorous, three-step reasoning process: 1) Read for influence, 2) Demand a mechanistic explanation, 3) Default to "no" under uncertainty. This process is designed to minimize false positives in identifying causal relationships.
- **How elements relate:** The "Goal" sets the objective. The "Steps" provide the methodology. The "Output" defines the strict success criterion. The "Real Data" template shows how the task is instantiated with specific inputs.
- **Notable implications:** The instruction to "ignore mere correlation" is a critical guard against common logical fallacies. The requirement for a "plausible mechanism" pushes the analysis towards deeper semantic and world-knowledge understanding. The placeholder format `{a_text}` suggests this is a reusable prompt template for evaluating many pairs of text snippets.