## Diagram: Multi-Agent AI Workflow with Planning, Tool Use, and Summarization
### Overview
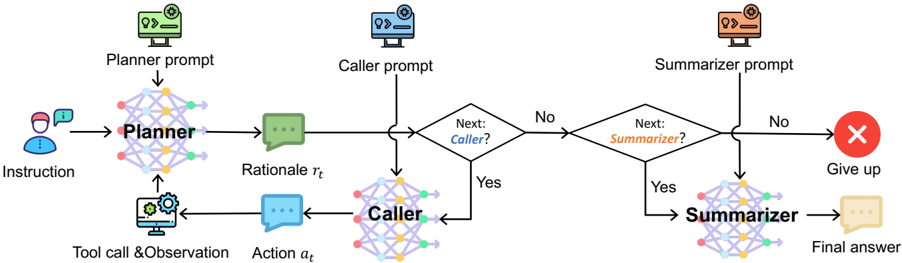
The image is a flowchart diagram illustrating a sequential, multi-stage process for an AI system to handle an instruction. The workflow involves three primary agent components (Planner, Caller, Summarizer) that are activated based on decision points. The process can result in either a "Final answer" or a "Give up" state.
### Components/Axes
The diagram is structured as a left-to-right flowchart with the following key elements:
**Main Components (represented by neural network icons):**
1. **Planner** (Green icon, left side): Receives the initial "Instruction" and a "Planner prompt". Outputs a "Rationale r_t".
2. **Caller** (Blue icon, center): Receives the "Rationale r_t" and a "Caller prompt". It is associated with "Tool call & Observation" and outputs an "Action a_t".
3. **Summarizer** (Orange icon, right side): Receives input from the previous stage and a "Summarizer prompt". Outputs the "Final answer".
**Decision Points (Diamond shapes):**
1. **"Next: Caller?"**: Located after the Planner. If "Yes", flow proceeds to the Caller. If "No", flow proceeds to the next decision.
2. **"Next: Summarizer?"**: Located after the first decision's "No" path. If "Yes", flow proceeds to the Summarizer. If "No", flow proceeds to the "Give up" state.
**Inputs and Outputs:**
* **Input:** "Instruction" (represented by a user icon on the far left).
* **Outputs:** "Final answer" (speech bubble icon) or "Give up" (red 'X' icon).
**Prompt Labels (positioned above each component):**
* "Planner prompt" (above Planner)
* "Caller prompt" (above Caller)
* "Summarizer prompt" (above Summarizer)
**Data/Process Labels (positioned along flow arrows):**
* "Rationale r_t" (output of Planner, input to Caller)
* "Tool call & Observation" (bidirectional arrow connected to Caller)
* "Action a_t" (output of Caller, input to the first decision point)
### Detailed Analysis
The process flow is as follows:
1. **Initiation:** An "Instruction" is provided to the **Planner** component.
2. **Planning Stage:** The Planner, guided by the "Planner prompt", generates a "Rationale r_t".
3. **First Decision:** The system evaluates "Next: Caller?".
* **If Yes:** The "Rationale r_t" is passed to the **Caller**. The Caller, using the "Caller prompt", interacts with "Tool call & Observation" and produces an "Action a_t". The flow then proceeds to the second decision point.
* **If No:** The flow bypasses the Caller and goes directly to the second decision point.
4. **Second Decision:** The system evaluates "Next: Summarizer?".
* **If Yes:** The process (either the original rationale or the action from the Caller) is passed to the **Summarizer**. Guided by the "Summarizer prompt", it generates the "Final answer".
* **If No:** The process terminates at the "Give up" state.
### Key Observations
* **Conditional Tool Use:** The Caller (and its associated tool use) is an optional step, bypassed if the first decision is "No".
* **Fallback Path:** The Summarizer is also optional. If both decision points are "No", the system abandons the task ("Give up").
* **Prompt-Driven Agents:** Each core component (Planner, Caller, Summarizer) is explicitly guided by its own dedicated prompt.
* **Feedback Loop:** The "Tool call & Observation" element has a bidirectional arrow with the Caller, indicating an interactive or iterative process during the action phase.
### Interpretation
This diagram models a sophisticated AI agent architecture designed for complex task completion. It demonstrates a **Peircean investigative** approach:
1. **Abductive Reasoning (Planner):** The Planner forms a hypothesis or plan ("Rationale r_t") about how to address the instruction.
2. **Deductive/Instrumental Action (Caller):** The Caller optionally executes a specific action ("Action a_t") based on the plan, potentially using external tools and observing results. This is the "testing" phase of the hypothesis.
3. **Inductive Synthesis (Summarizer):** The Summarizer consolidates the findings—whether from the initial plan or the executed action—into a coherent final answer.
The decision points act as **gates** that control the flow of reasoning and resource expenditure. The system first decides if external action is needed, then decides if a summarized conclusion is warranted. The "Give up" path is a crucial fail-safe, preventing infinite loops or wasted computation on unsolvable tasks. The architecture emphasizes modularity, where specialized agents handle distinct cognitive functions (planning, acting, summarizing), orchestrated by a logical decision framework.