## Diagram: Pass/Take Decision Tree
### Overview
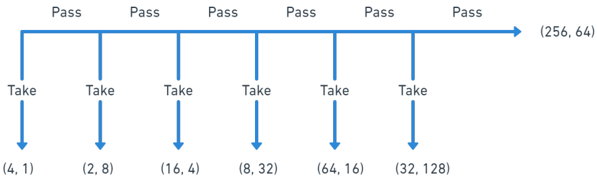
The image is a diagram illustrating a decision tree with "Pass" and "Take" options at each stage. It starts with a single path labeled "Pass" that splits into multiple "Take" paths. Each path ends with a coordinate pair.
### Components/Axes
* **Nodes:** Represented by the points where the paths split or end.
* **Edges:** Represented by the blue lines connecting the nodes.
* **Labels:** "Pass" and "Take" indicate the decision made at each split.
* **Coordinates:** (x, y) pairs at the end of each "Take" path and the final "Pass" path.
### Detailed Analysis
The diagram begins with a horizontal blue line labeled "Pass" above each split. From each "Pass" point, a vertical blue line extends downwards, labeled "Take", ending in a coordinate pair.
* **Initial Pass:** The initial horizontal line starts on the left and extends to the right, ending with the coordinate (256, 64).
* **First Take:** The first vertical line is labeled "Take" and ends at the coordinate (4, 1).
* **Second Take:** The second vertical line is labeled "Take" and ends at the coordinate (2, 8).
* **Third Take:** The third vertical line is labeled "Take" and ends at the coordinate (16, 4).
* **Fourth Take:** The fourth vertical line is labeled "Take" and ends at the coordinate (8, 32).
* **Fifth Take:** The fifth vertical line is labeled "Take" and ends at the coordinate (64, 16).
* **Sixth Take:** The sixth vertical line is labeled "Take" and ends at the coordinate (32, 128).
### Key Observations
* The "Pass" path continues horizontally, while the "Take" paths branch downwards.
* The x and y coordinates at the end of each path vary significantly.
### Interpretation
The diagram represents a series of binary decisions, where at each stage, one can either "Pass" or "Take". The coordinates at the end of each path likely represent the outcome or state resulting from that sequence of decisions. The diagram suggests a branching process where each decision point leads to a different result, as indicated by the varying coordinate values. The "Pass" option continues the process, while the "Take" option terminates it with a specific outcome.