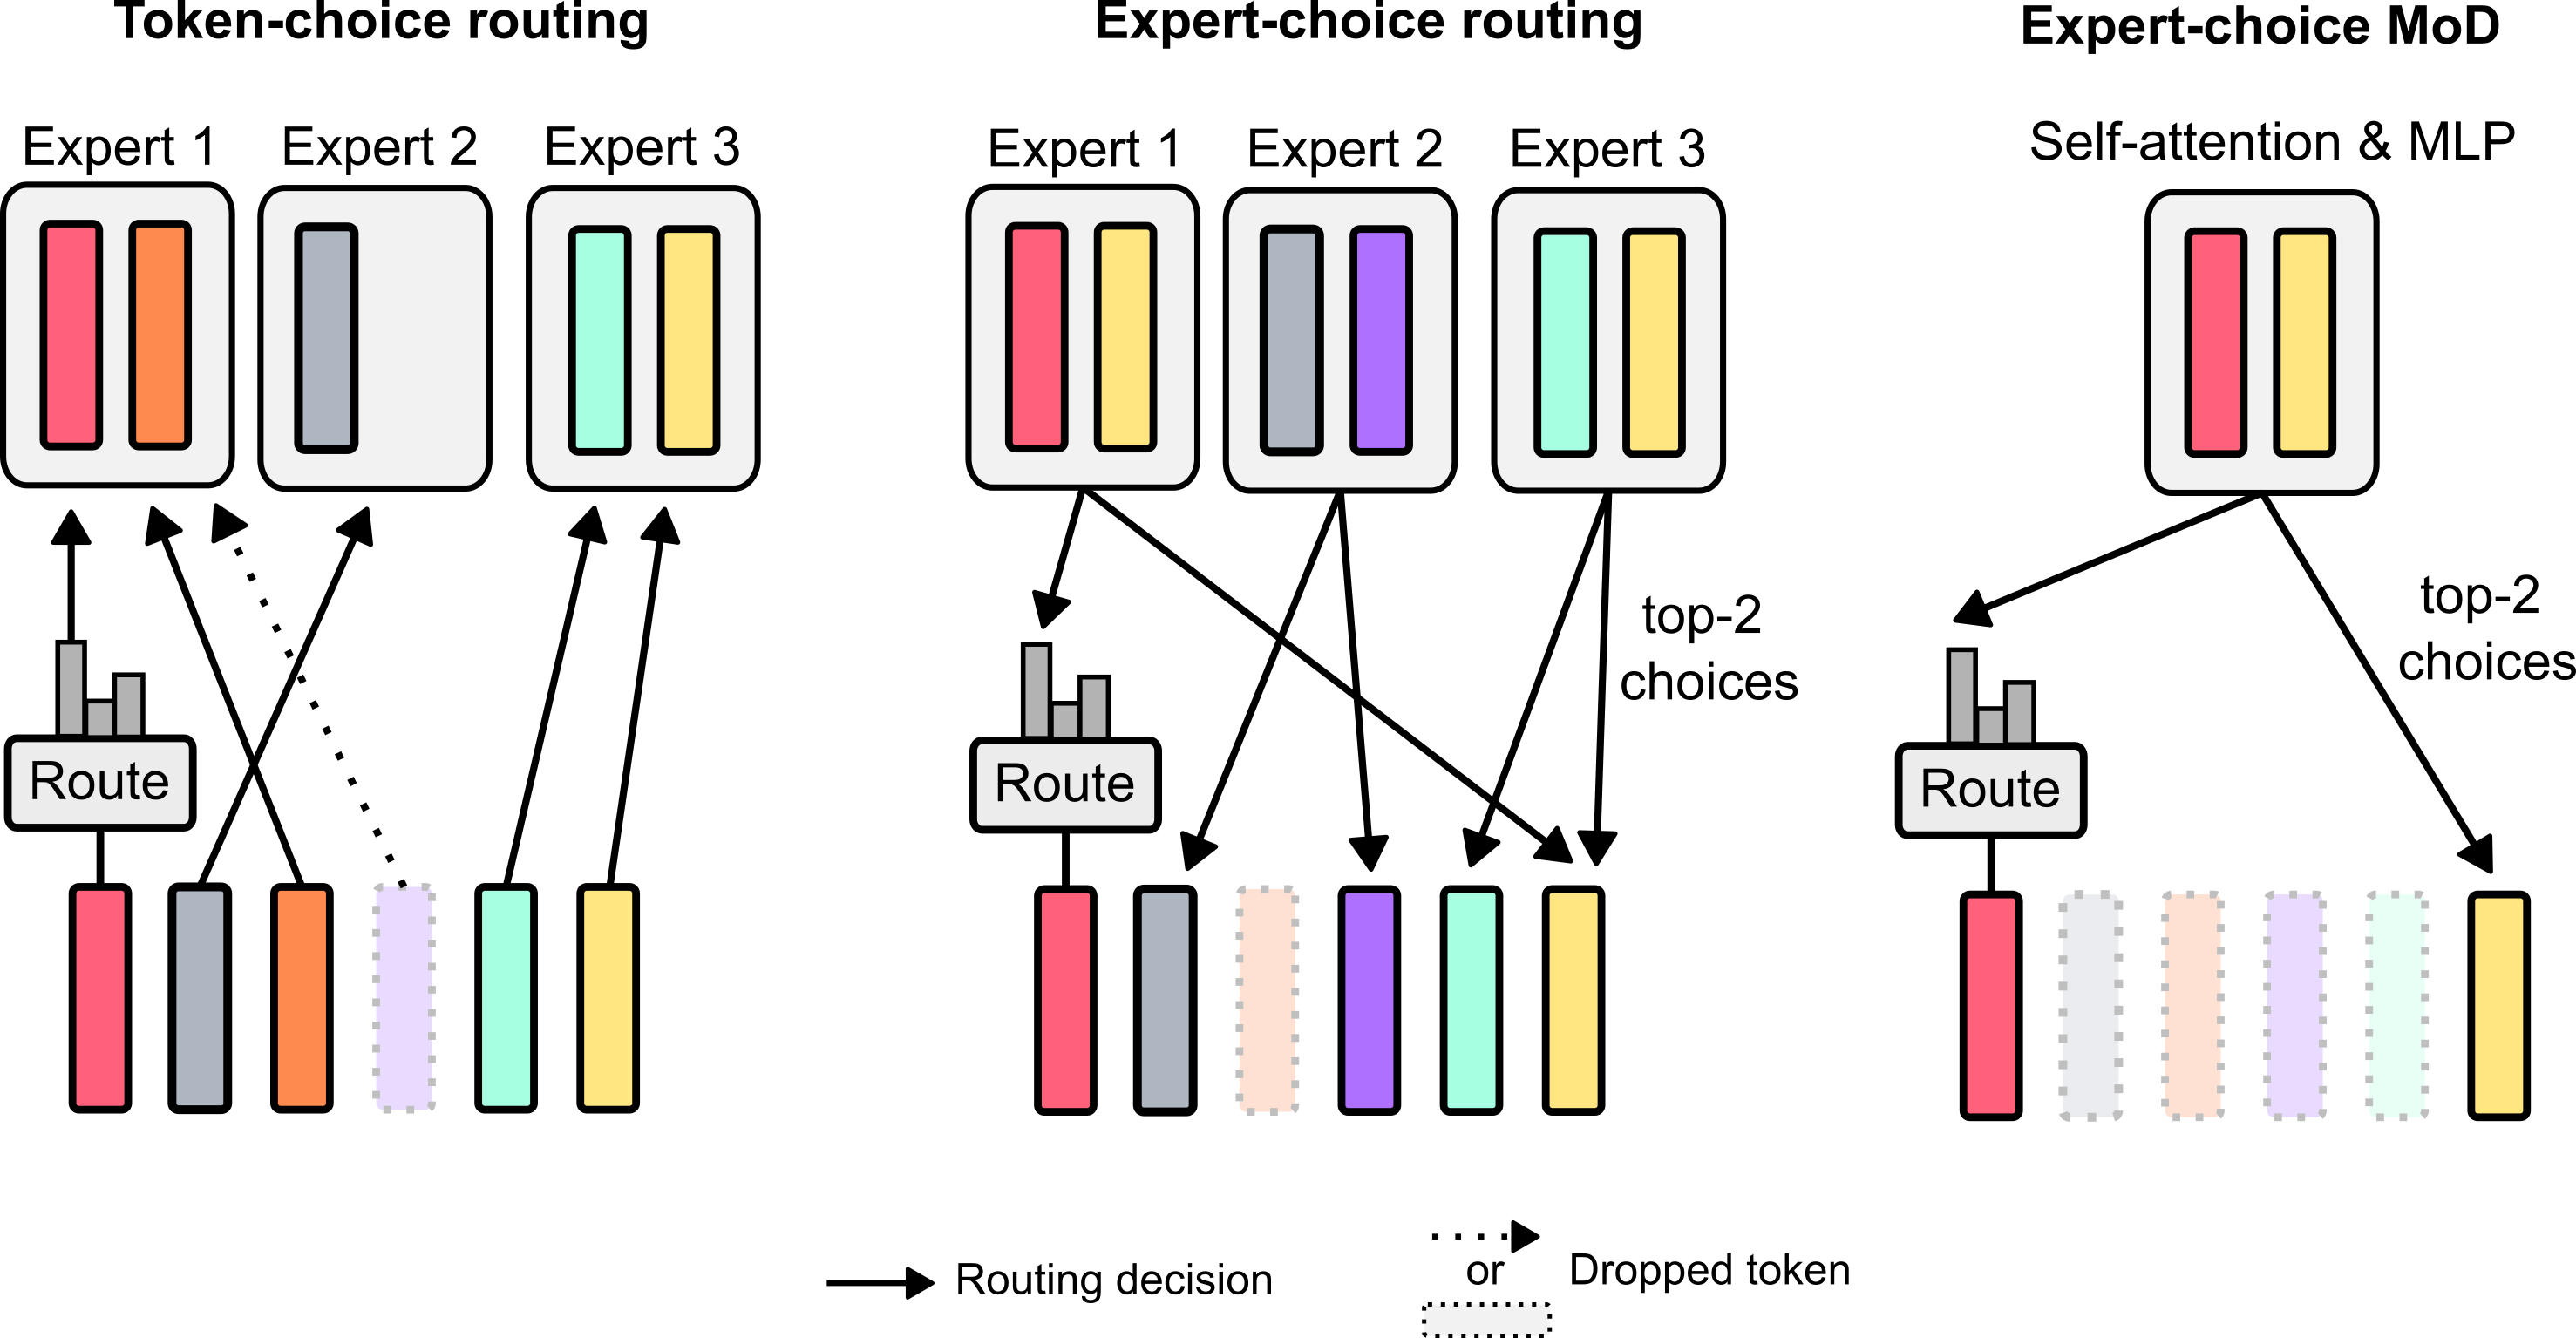
# Technical Diagram Analysis: Routing Mechanisms in Mixture-of-Experts (MoE)
This document describes a technical illustration comparing three different routing strategies for neural network architectures: **Token-choice routing**, **Expert-choice routing**, and **Expert-choice MoD (Mixture-of-Depths)**.
---
## 1. Legend and Global Components
The diagram uses specific visual cues to represent data flow and processing status:
* **Solid Arrow:** Represents a "Routing decision" (active path).
* **Dotted Arrow / Dotted Outline:** Represents a "Dropped token" (inactive or discarded path).
* **Colored Rectangles:** Represent individual tokens.
* **Large Rounded Boxes:** Represent "Experts" or processing units.
* **"Route" Block:** A decision-making component accompanied by a small bar chart representing probability distributions or scores.
---
## 2. Component Analysis by Section
### Section A: Token-choice routing
* **Header:** "Token-choice routing"
* **Structure:**
* **Input:** Six tokens are shown at the bottom (Red, Grey, Orange, Light Purple [dotted], Teal, Yellow).
* **Processing Units:** Three experts labeled **Expert 1**, **Expert 2**, and **Expert 3**.
* **Flow and Logic:**
* Each token "chooses" which expert to go to.
* **Expert 1** receives the Red and Orange tokens.
* **Expert 2** receives the Grey token.
* **Expert 3** receives the Teal and Yellow tokens.
* **Dropped Token:** The Light Purple token (4th from left) has a dotted outline and a dotted arrow pointing toward Expert 1/2, indicating it was not selected for processing by any expert and is dropped.
* **Observation:** Experts have variable workloads (Expert 1 has 2 tokens, Expert 2 has 1, Expert 3 has 2).
### Section B: Expert-choice routing
* **Header:** "Expert-choice routing"
* **Structure:**
* **Input:** Six token slots at the bottom.
* **Processing Units:** Three experts labeled **Expert 1**, **Expert 2**, and **Expert 3**.
* **Flow and Logic:**
* The routing decision originates from the Experts. Each expert selects a fixed number of tokens (top-k).
* **Expert 1** selects the Red and Grey tokens.
* **Expert 2** selects the Grey and Purple tokens.
* **Expert 3** selects the Teal and Yellow tokens.
* **Dropped Token:** The 3rd token (Light Orange with dotted outline) is not selected by any expert and is dropped.
* **Observation:** Experts have a uniform workload (each processes exactly 2 tokens). Some tokens (like Grey) may be processed by multiple experts.
### Section C: Expert-choice MoD (Mixture-of-Depths)
* **Header:** "Expert-choice MoD"
* **Structure:**
* **Input:** Six token slots at the bottom.
* **Processing Unit:** A single block labeled **Self-attention & MLP**.
* **Flow and Logic:**
* The router selects a fixed capacity of tokens to undergo computation.
* The label **"top-2 choices"** indicates that only two tokens are selected for the heavy computation block.
* **Selected Tokens:** The Red token (1st) and the Yellow token (6th) are routed into the Self-attention & MLP block.
* **Dropped Tokens:** The 2nd, 3rd, 4th, and 5th tokens are shown with dotted outlines, indicating they bypass this specific computation layer.
* **Observation:** This mechanism limits the total computation by only allowing a subset of tokens to pass through the layer based on a routing score.
---
## 3. Summary of Key Differences
| Feature | Token-choice routing | Expert-choice routing | Expert-choice MoD |
| :--- | :--- | :--- | :--- |
| **Decision Maker** | Token selects Expert | Expert selects Tokens | Layer selects Tokens |
| **Expert Workload** | Variable (can be unbalanced) | Fixed (balanced) | Fixed (capacity constrained) |
| **Token Processing** | Most tokens processed | Some tokens may be dropped | Significant portion of tokens dropped/bypassed |
| **Primary Goal** | Dynamic allocation | Load balancing | Computational efficiency/Sparsity |