## Diagram Type: Mathematical Commutative Diagram (Cubic)
### Overview
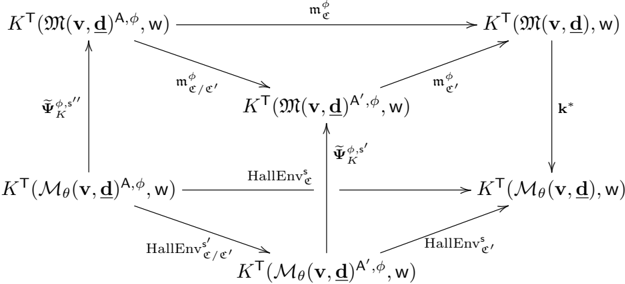
This image displays a complex mathematical commutative diagram arranged in the shape of a cube or prism. It illustrates the relationships and mappings between eight distinct mathematical objects, which appear to be K-theory groups or cohomology groups associated with moduli spaces. The diagram connects a "top plane" of objects involving the moduli space $\mathfrak{M}$ and a "bottom plane" involving the moduli space $\mathcal{M}_\theta$, via vertical maps.
### Components and Flow
The diagram consists of 8 nodes (vertices) and 12 arrows (morphisms/maps).
#### Nodes (Vertices)
The nodes are arranged in two planes, top and bottom.
**Top Plane Nodes (involving $\mathfrak{M}$):**
* **Top-Back-Left:** $K^\top(\mathfrak{M}(\mathbf{v}, \underline{\mathbf{d}})^{A,\phi}, \text{w})$
* **Top-Back-Right:** $K^\top(\mathfrak{M}(\mathbf{v}, \underline{\mathbf{d}}), \text{w})$
* **Top-Front (Center):** $K^\top(\mathfrak{M}(\mathbf{v}, \underline{\mathbf{d}})^{A',\phi}, \text{w})$
**Bottom Plane Nodes (involving $\mathcal{M}_\theta$):**
* **Bottom-Back-Left:** $K^\top(\mathcal{M}_\theta(\mathbf{v}, \underline{\mathbf{d}})^{A,\phi}, \text{w})$
* **Bottom-Back-Right:** $K^\top(\mathcal{M}_\theta(\mathbf{v}, \underline{\mathbf{d}}), \text{w})$
* **Bottom-Front (Center):** $K^\top(\mathcal{M}_\theta(\mathbf{v}, \underline{\mathbf{d}})^{A',\phi}, \text{w})$
#### Arrows (Morphisms/Maps)
The arrows indicate the direction of the mappings between these nodes.
**Horizontal Maps (Top Plane):**
* **Top-Back:** An arrow points from Top-Back-Left to Top-Back-Right, labeled $\text{m}_{\mathfrak{C}}^\phi$.
* **Top-Left-Diagonal:** An arrow points from Top-Back-Left to Top-Front (Center), labeled $\text{m}_{\mathfrak{C}/\mathfrak{C}'}^\phi$.
* **Top-Right-Diagonal:** An arrow points from Top-Front (Center) to Top-Back-Right, labeled $\text{m}_{\mathfrak{C}'}^\phi$.
**Horizontal Maps (Bottom Plane):**
* **Bottom-Back:** An arrow points from Bottom-Back-Left to Bottom-Back-Right, labeled $\text{HallEnv}_{\mathfrak{C}}^s$.
* **Bottom-Left-Diagonal:** An arrow points from Bottom-Back-Left to Bottom-Front (Center), labeled $\text{HallEnv}_{\mathfrak{C}/\mathfrak{C}'}^{s'}$.
* **Bottom-Right-Diagonal:** An arrow points from Bottom-Front (Center) to Bottom-Back-Right, labeled $\text{HallEnv}_{\mathfrak{C}'}^s$.
**Vertical Maps (Connecting Planes):**
* **Back-Left Vertical:** An arrow points **upward** from Bottom-Back-Left to Top-Back-Left, labeled $\widetilde{\Psi}_K^{\phi, s''}$.
* **Front-Center Vertical:** An arrow points **upward** from Bottom-Front (Center) to Top-Front (Center), labeled $\widetilde{\Psi}_K^{\phi, s'}$.
* **Back-Right Vertical:** An arrow points **downward** from Top-Back-Right to Bottom-Back-Right, labeled $\mathbf{k}^*$.
### Content Details (Transcription of Notation)
The notation used is highly specialized:
* **Base Objects:** $K^\top$ (likely equivariant K-theory).
* **Spaces:** $\mathfrak{M}$ (calligraphic M) and $\mathcal{M}_\theta$ (script M with subscript theta).
* **Parameters:** $(\mathbf{v}, \underline{\mathbf{d}})$ (bold v, underlined bold d), and $\text{w}$.
* **Superscripts on Spaces:** $A,\phi$ and $A',\phi$.
* **Map Labels (Top):** $\text{m}_{\mathfrak{C}}^\phi$, $\text{m}_{\mathfrak{C}/\mathfrak{C}'}^\phi$, $\text{m}_{\mathfrak{C}'}^\phi$ (m likely stands for multiplication).
* **Map Labels (Bottom):** $\text{HallEnv}_{\mathfrak{C}}^s$, $\text{HallEnv}_{\mathfrak{C}/\mathfrak{C}'}^{s'}$, $\text{HallEnv}_{\mathfrak{C}'}^s$ (HallEnv likely stands for Hall Envelope).
* **Map Labels (Vertical):** $\widetilde{\Psi}_K^{\phi, s''}$, $\widetilde{\Psi}_K^{\phi, s'}$ (Psi with tilde), and $\mathbf{k}^*$ (bold k with asterisk).
### Interpretation
This diagram asserts the compatibility (commutativity) of various mathematical operations.
1. **Structure Comparison:** It compares a theory based on the space $\mathfrak{M}$ (top plane) with a theory based on the space $\mathcal{M}_\theta$ (bottom plane). $\mathcal{M}_\theta$ is likely a stable locus or a resolution of $\mathfrak{M}$, depending on the parameter $\theta$.
2. **Operations:**
* The top plane involves "multiplication" maps ($\text{m}$), suggesting these objects form an algebra or a module over an algebra.
* The bottom plane involves "Hall Envelope" maps ($\text{HallEnv}$), relating to the theory of Hall algebras, often constructed from quiver representations.
3. **Vertical Connections:**
* The upward maps ($\widetilde{\Psi}_K$) suggest a lifting or comparison map from the $\mathcal{M}_\theta$ theory to the $\mathfrak{M}$ theory.
* The single downward map ($\mathbf{k}^*$) on the right is notable. It breaks the symmetry and suggests a pullback or restriction operation, possibly indicating a duality or a specific property of the objects on the right-hand side of the diagram compared to the left.
4. **Commutativity:** The diagram implies that composing maps along different paths between the same start and end nodes yields the same result. For example, on the back face: applying $\text{HallEnv}_{\mathfrak{C}}^s$ then $\widetilde{\Psi}_K^{\phi, s''}$ (if the target matched) should relate to applying $\mathbf{k}^*$ and then $\text{m}_{\mathfrak{C}}^\phi$. The exact commutative relations depend on which faces of the cube are asserted to commute. Given the structure, it is likely that the side faces and the top/bottom triangles commute.