## Diagram: Abstract Floor Plan / Maze Layout
### Overview
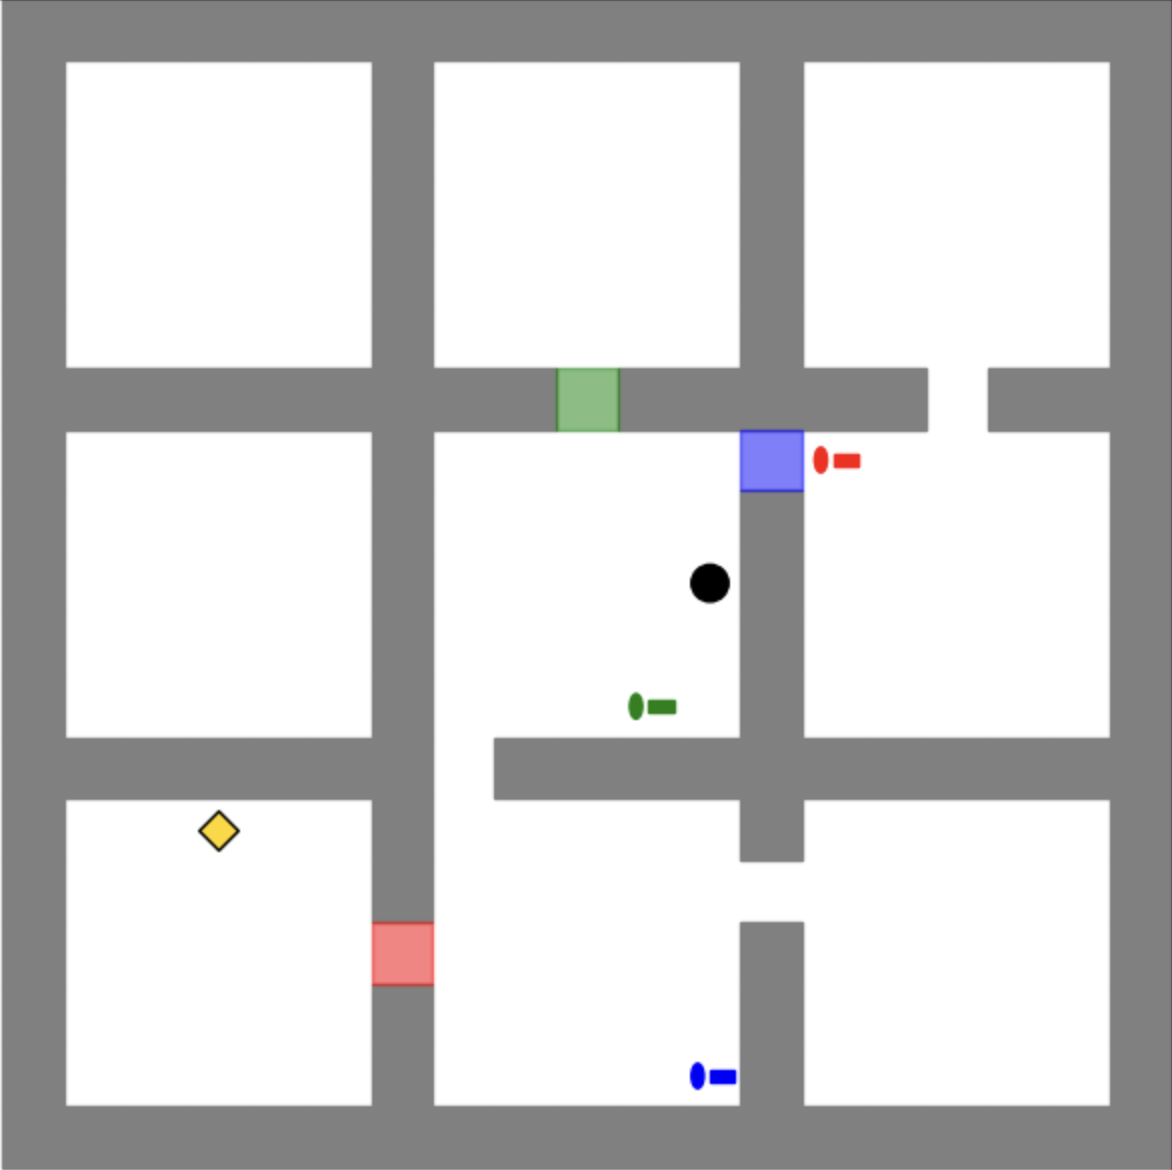
The image displays a top-down, schematic diagram of a floor plan or maze. It consists of a grid of white rectangular "rooms" separated by gray "walls" or corridors. Several colored geometric shapes are placed within specific rooms and on walls, suggesting interactive elements, objects, or agents within the space. There is no textual information, labels, axes, or legends present in the image.
### Components/Axes
* **Structure:** A 3x3 grid of primary white rectangular rooms, with some rooms subdivided or connected by openings in the gray walls.
* **Walls/Corridors:** Represented by solid gray (#808080) lines forming the grid and internal partitions.
* **Colored Elements (Potential Objects/Agents):**
* **Yellow Diamond:** Located in the center of the bottom-left room.
* **Red Rectangle:** Positioned on the vertical wall segment between the bottom-left and bottom-center rooms.
* **Green Rectangle:** Positioned on the horizontal wall segment between the top-center and middle-center rooms.
* **Blue Rectangle:** Positioned on the vertical wall segment between the middle-center and middle-right rooms.
* **Black Circle:** Located in the upper-right quadrant of the large, central room (formed by the merger of the middle-center and bottom-center rooms).
* **Red Oval with Dash:** Located in the middle-right room, near the top wall.
* **Green Oval with Dash:** Located in the large central room, below and to the left of the black circle.
* **Blue Oval with Dash:** Located in the bottom-center room, near the bottom wall.
### Detailed Analysis
**Spatial Grounding & Component Isolation:**
* **Header Region (Top Row):**
* Three white rooms. The top-center and top-right rooms are connected by an opening in the wall between them.
* A **green rectangle** is embedded in the wall separating the top-center room from the large central room below it.
* **Main Chart Region (Middle and Bottom Rows):**
* **Left Column:** Two distinct white rooms (middle-left and bottom-left). The bottom-left room contains a **yellow diamond** at its center. A **red rectangle** is on its right wall, leading to the central area.
* **Center Column:** The middle-center and bottom-center rooms are merged into one large, irregular white space. This space contains:
* A **black circle** in its upper-right area.
* A **green oval with a horizontal dash** to the lower-left of the black circle.
* A **blue oval with a horizontal dash** near its bottom wall.
* A **blue rectangle** is on the wall segment separating this large room from the middle-right room.
* A **green rectangle** is on its top wall (shared with the header region).
* **Right Column:** Two distinct white rooms (middle-right and bottom-right). The middle-right room contains a **red oval with a horizontal dash** near its top wall. The bottom-right room is empty.
* **Footer Region (Bottom Edge):**
* The bottom walls of the bottom-left, bottom-center, and bottom-right rooms form the lower boundary. No unique elements are present here.
### Key Observations
1. **Asymmetrical Layout:** The maze is not perfectly symmetrical. The central column is merged into one large room, while the left and right columns maintain separate rooms.
2. **Color-Coding:** Elements are color-coded in primary colors (red, green, blue, yellow) plus black. The rectangles are placed *on* walls, while the ovals and other shapes are placed *within* rooms.
3. **Potential Functional Grouping:** The colored ovals (red, green, blue) each have a horizontal dash, suggesting they might be of the same class of object (e.g., switches, sensors, or agents). The colored rectangles on walls might represent doors, barriers, or interactive panels.
4. **Isolated Goal/Object:** The yellow diamond is the only element of its shape and color and is isolated in a corner room, often a visual cue for a target or objective in such diagrams.
5. **Central Agent/Entity:** The black circle is centrally located within the largest open space, potentially representing a player character, a robot, or a primary agent.
### Interpretation
This diagram is a **schematic representation of an environment**, likely for a puzzle, game, robotics simulation, or architectural study. The lack of text indicates it is a pure visual model where meaning is derived from spatial relationships and symbolic shapes/colors.
* **What it demonstrates:** It defines a navigable space with obstacles (walls), points of interest (colored shapes), and a starting or central entity (black circle). The layout suggests a pathfinding or exploration challenge.
* **Relationships:** The colored rectangles on walls likely control access between rooms (doors). The colored ovals within rooms could be collectibles, triggers, or secondary agents. The yellow diamond's isolation marks it as a probable end goal.
* **Notable Anomalies:** The connection between the top-center and top-right rooms, and the large merged central room, break the strict grid pattern, creating a more complex navigation path. The placement of the blue rectangle suggests the middle-right room is accessible only from the central area, not from the room above or below it.
* **Underlying Purpose:** The image provides all necessary spatial information for an agent (human or AI) to understand the topology of the environment, locate objects, and plan a path from the black circle's position to the yellow diamond, potentially interacting with the colored elements along the way. It is a functional blueprint, not an artistic rendering.