## Line Chart: Attention over Values, a=64
### Overview
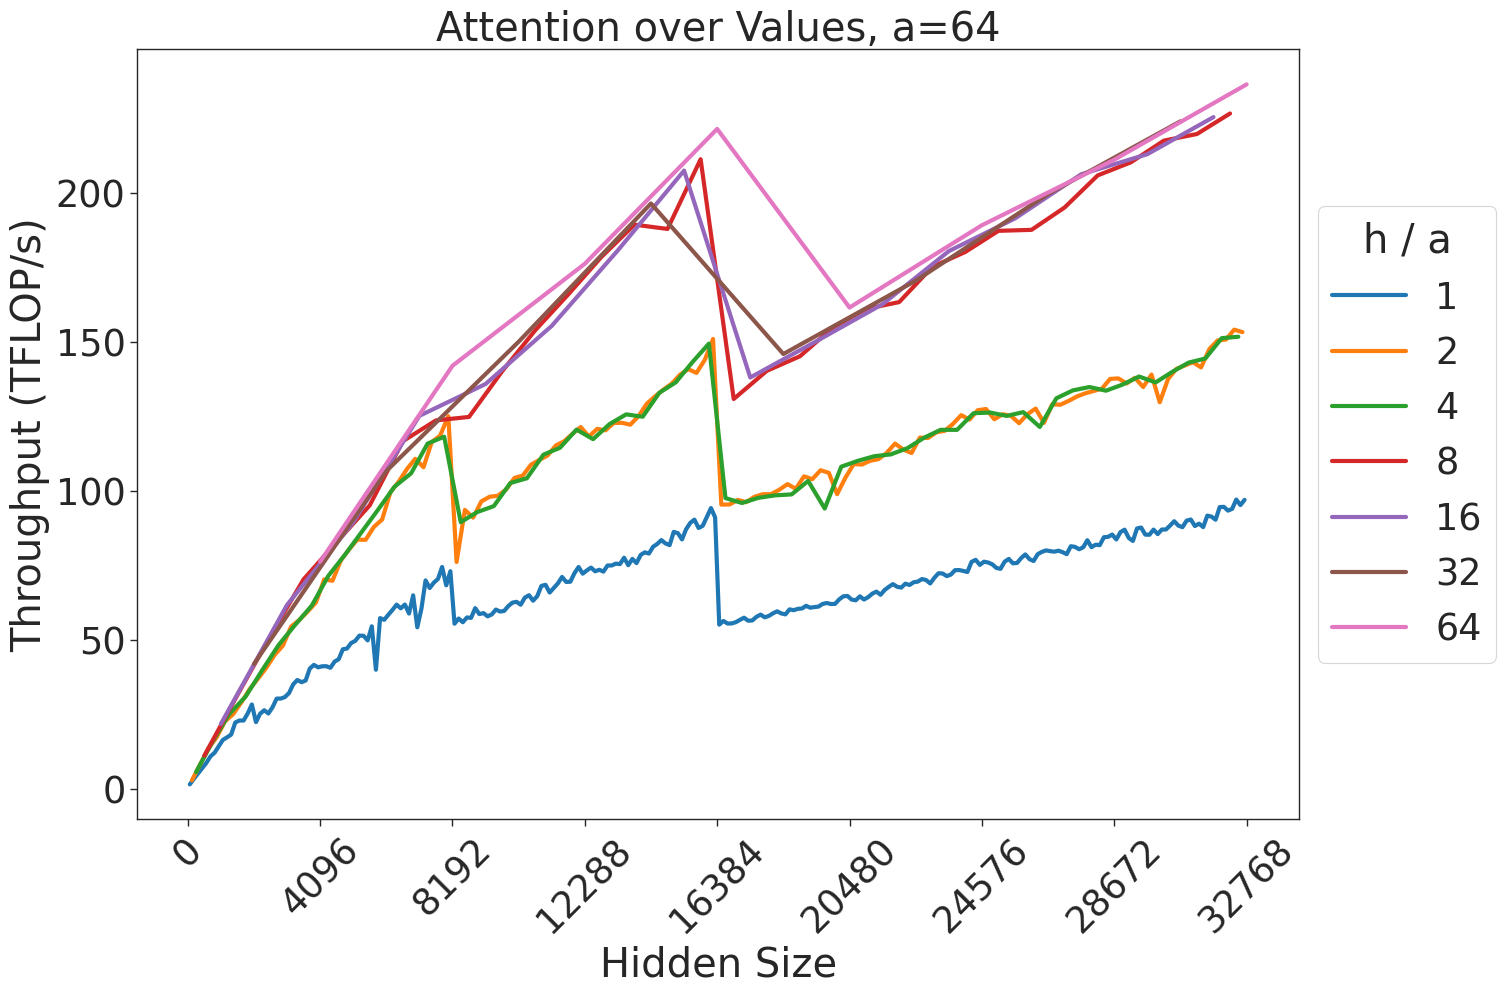
This chart illustrates the performance characteristics of an attention mechanism, specifically measuring "Throughput (TFLOP/s)" against "Hidden Size." The data is segmented by the ratio "h / a" (heads divided by attention dimension). The chart displays a distinct sawtooth pattern, indicating periodic performance drops as the hidden size increases, suggesting hardware or kernel-level memory alignment constraints.
### Components/Axes
* **Title:** "Attention over Values, a=64" (Top center).
* **Y-axis:** "Throughput (TFLOP/s)". The scale ranges from 0 to 200+, with major grid lines at 50, 100, 150, and 200.
* **X-axis:** "Hidden Size". The scale ranges from 0 to 32768, with markers at 4096, 8192, 12288, 16384, 20480, 24576, 28672, and 32768.
* **Legend:** Located on the right side of the chart. It defines the "h / a" ratio for seven distinct data series, color-coded as follows:
* **Blue:** 1
* **Orange:** 2
* **Green:** 4
* **Red:** 8
* **Purple:** 16
* **Brown:** 32
* **Pink:** 64
### Detailed Analysis
The chart displays seven lines representing different "h / a" ratios. All lines exhibit a general upward trend (positive slope) interrupted by sharp, vertical drops (negative spikes) at specific hidden size intervals.
**Trend Verification & Grouping:**
The data series cluster into three distinct performance tiers:
1. **Tier 1 (Lowest Performance):** The **Blue** line (h/a = 1). It consistently maintains the lowest throughput across all hidden sizes.
2. **Tier 2 (Mid Performance):** The **Orange** (h/a = 2) and **Green** (h/a = 4) lines. These two lines are almost perfectly overlapping, showing identical performance characteristics.
3. **Tier 3 (Highest Performance):** The **Red** (8), **Purple** (16), **Brown** (32), and **Pink** (64) lines. These lines are tightly clustered, particularly at higher hidden sizes, showing the highest throughput.
**Data Point Extraction (Approximations):**
* **Performance Drops (The "Cliffs"):**
* **At Hidden Size ~8192:** All lines experience a sharp drop.
* Blue drops from ~60 TFLOP/s to ~50 TFLOP/s.
* Orange/Green drop from ~120 TFLOP/s to ~80 TFLOP/s.
* Higher ratios (Red/Purple/Brown/Pink) drop from ~140 TFLOP/s to ~125 TFLOP/s.
* **At Hidden Size ~16384:** A more severe drop occurs.
* Blue drops from ~95 TFLOP/s to ~55 TFLOP/s.
* Orange/Green drop from ~150 TFLOP/s to ~95 TFLOP/s.
* Higher ratios drop from ~220 TFLOP/s to ~130 TFLOP/s.
* **End-of-Scale Performance (Hidden Size 32768):**
* Blue: ~100 TFLOP/s.
* Orange/Green: ~150 TFLOP/s.
* Higher ratios: ~230 TFLOP/s.
### Key Observations
* **Sawtooth Pattern:** The performance is not linear. The sharp drops at 8192 and 16384 suggest that the underlying kernel implementation hits a memory or tile-size boundary at these specific hidden sizes, forcing a less efficient execution path.
* **Diminishing Returns:** Increasing the "h/a" ratio provides significant throughput gains when moving from 1 to 2, and 2 to 4. However, as the ratio increases from 8 to 64, the performance gains become marginal, with the lines becoming increasingly indistinguishable.
* **Clustering:** The tight grouping of the higher ratios (8, 16, 32, 64) suggests that once a certain level of parallelism or head-count is reached, the hardware becomes compute-bound rather than memory-bound, or the kernel reaches its maximum efficiency.
### Interpretation
This chart is a classic representation of GPU kernel performance benchmarking, likely for an attention mechanism (such as FlashAttention).
* **The "Why":** The "cliffs" at 8192 and 16384 are likely caused by the kernel exceeding the capacity of the GPU's fast on-chip memory (SRAM). When the hidden size exceeds these thresholds, the kernel must spill data to the slower off-chip memory (HBM/VRAM), causing the observed throughput collapse.
* **Strategic Insight:** For developers or engineers optimizing models, this data suggests that "Hidden Size" should be chosen carefully. If a model's hidden size is just above a "cliff" (e.g., 16385), it might be significantly slower than a model with a slightly smaller hidden size (e.g., 16383).
* **Optimization:** The data demonstrates that higher "h/a" ratios are generally superior for throughput, but there is a clear saturation point. Beyond a ratio of 8, the performance benefits of increasing the head-to-dimension ratio are minimal, suggesting that resources might be better allocated elsewhere.