## Diagram: Matrix Reasoning Puzzle (3x3 Dot Pattern Grid)
### Overview
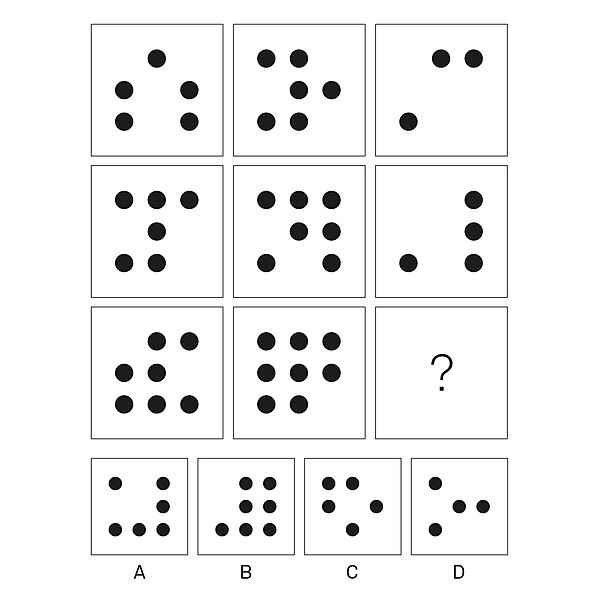
The image displays a visual logic puzzle consisting of a 3x3 main grid of squares. Each square contains a pattern of black dots arranged in a 3x3 sub-grid (like a tic-tac-toe board). The bottom-right square of the main grid contains a question mark, indicating it is the missing element to be solved. Below the main grid, four answer choices (labeled A, B, C, D) are provided, each showing a potential dot pattern to fill the missing square.
### Components/Axes
- **Main Grid**: 3 rows × 3 columns of squares.
- **Sub-grid within each square**: Implicit 3x3 matrix where dots can be placed in 9 possible positions (top-left, top-center, top-right, middle-left, etc.).
- **Answer Choices**: Four squares labeled A, B, C, D, each containing a unique dot pattern.
- **Text Labels**: The letters "A", "B", "C", "D" are printed below the respective answer choices in a sans-serif font.
### Detailed Analysis
Each square's dot pattern can be described by the positions filled in its 3x3 sub-grid. Below is a transcription of each square's pattern, using coordinates (row, column) where (1,1) is top-left and (3,3) is bottom-right.
**Row 1 (Top Row of Main Grid):**
- **Column 1**: Dots at (1,2), (2,1), (2,3), (3,1), (3,3). Total dots: 5.
- **Column 2**: Dots at (1,1), (1,2), (2,2), (2,3), (3,1), (3,2). Total dots: 6.
- **Column 3**: Dots at (1,2), (1,3), (2,1). Total dots: 3.
**Row 2 (Middle Row of Main Grid):**
- **Column 1**: Dots at (1,1), (1,2), (1,3), (2,2), (3,1), (3,2). Total dots: 6.
- **Column 2**: Dots at (1,1), (1,2), (1,3), (2,2), (2,3), (3,1), (3,2). Total dots: 7.
- **Column 3**: Dots at (1,3), (2,3), (3,1), (3,3). Total dots: 4.
**Row 3 (Bottom Row of Main Grid):**
- **Column 1**: Dots at (1,2), (1,3), (2,1), (2,2), (3,1), (3,2), (3,3). Total dots: 7.
- **Column 2**: Dots at (1,1), (1,2), (1,3), (2,1), (2,2), (2,3), (3,1), (3,2). Total dots: 8.
- **Column 3**: Question mark (missing pattern).
**Answer Choices:**
- **A**: Dots at (1,1), (1,3), (2,3), (3,1), (3,2), (3,3). Total dots: 6.
- **B**: Dots at (1,2), (1,3), (2,2), (2,3), (3,1), (3,2), (3,3). Total dots: 7.
- **C**: Dots at (1,1), (1,2), (2,1), (2,3), (3,2). Total dots: 5.
- **D**: Dots at (1,1), (2,2), (2,3), (3,1). Total dots: 4.
### Key Observations
1. **Dot Count Pattern by Column**:
- Column 1: 5 dots (Row 1) → 6 dots (Row 2) → 7 dots (Row 3). Increases by 1 per row.
- Column 2: 6 dots → 7 dots → 8 dots. Increases by 1 per row.
- Column 3: 3 dots → 4 dots → ? dots. Following the pattern, the missing square should have **5 dots**.
2. **Dot Count Pattern by Row**:
- Row 1: 5, 6, 3 dots. No simple arithmetic progression.
- Row 2: 6, 7, 4 dots. Similar to Row 1 but shifted.
- Row 3: 7, 8, ? dots. Consistent with the column-wise increase.
3. **Visual Pattern Complexity**: The dot arrangements do not follow an obvious superposition (e.g., XOR, OR) or rotational rule between adjacent squares. The primary logical pattern appears to be numerical (dot count) rather than positional.
### Interpretation
This puzzle tests inductive reasoning through pattern recognition. The consistent increase of one dot per row within each column suggests a simple arithmetic rule governing the grid. The missing square must satisfy this rule for Column 3, requiring a pattern with exactly 5 dots. Among the choices, only option C has 5 dots. Therefore, **C is the most likely solution** based on the numerical pattern.
The puzzle emphasizes quantitative analysis over complex spatial transformations. It may be designed to assess the ability to isolate variables (here, dot count) and identify incremental trends across a structured matrix. The absence of a clear positional rule reinforces that the core challenge is numerical deduction.