## Diagram: Argument Graph and Descriptive Logic Representation
### Overview
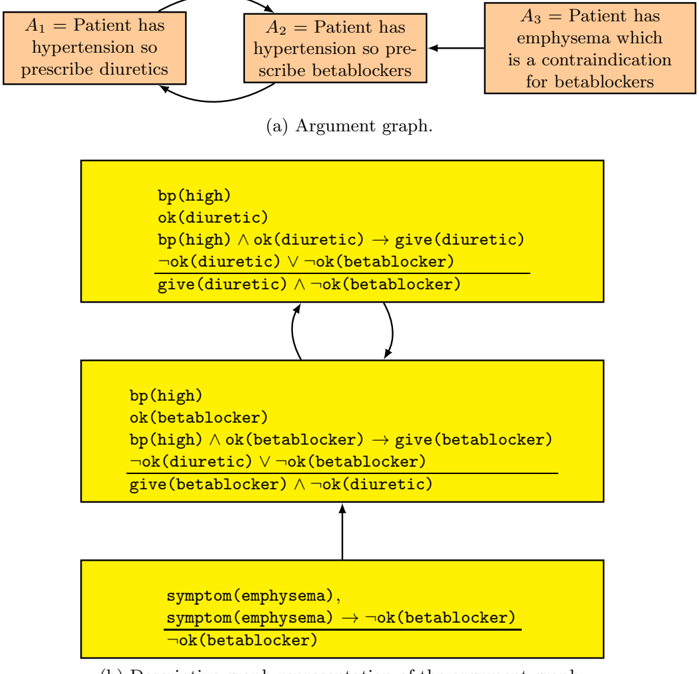
The image presents two diagrams. The first, labeled "(a) Argument graph," illustrates a high-level argument flow related to patient conditions and prescriptions. The second, labeled "(b) Descriptive logic representation of the argument graph," provides a more detailed, logic-based representation of the same arguments.
### Components/Axes
#### (a) Argument Graph
* **Nodes:** Three rectangular nodes, labeled A1, A2, and A3.
* A1: "Patient has hypertension so prescribe diuretics"
* A2: "Patient has hypertension so prescribe betablockers"
* A3: "Patient has emphysema which is a contraindication for betablockers"
* **Edges:** Arrows indicating relationships between the nodes.
* A curved arrow points from A1 to A2.
* A straight arrow points from A3 to A2.
#### (b) Descriptive Logic Representation
* **Nodes:** Three yellow rectangular nodes, stacked vertically.
* **Edges:** Arrows indicating relationships between the nodes.
* A double-headed curved arrow connects the top two nodes.
* A straight arrow points from the bottom node to the middle node.
### Detailed Analysis
#### (a) Argument Graph
* **Node A1:** States that if a patient has hypertension, diuretics should be prescribed.
* **Node A2:** States that if a patient has hypertension, betablockers should be prescribed.
* **Node A3:** States that if a patient has emphysema, betablockers are contraindicated.
* **Relationship A1 -> A2:** Suggests a potential conflict or consideration between prescribing diuretics versus betablockers for hypertension.
* **Relationship A3 -> A2:** Indicates that emphysema influences the decision to prescribe betablockers.
#### (b) Descriptive Logic Representation
* **Top Node:**
* `bp(high)`
* `ok(diuretic)`
* `bp(high) ∧ ok(diuretic) → give(diuretic)`
* `¬ok(diuretic) ∨ ¬ok(betablocker)`
* `give(diuretic) ∧ ¬ok(betablocker)`
* **Middle Node:**
* `bp(high)`
* `ok(betablocker)`
* `bp(high) ∧ ok(betablocker) → give(betablocker)`
* `¬ok(diuretic) ∨ ¬ok(betablocker)`
* `give(betablocker) ∧ ¬ok(diuretic)`
* **Bottom Node:**
* `symptom(emphysema)`
* `symptom(emphysema) → ¬ok(betablocker)`
* `¬ok(betablocker)`
### Key Observations
* The argument graph provides a simplified view of the relationships between patient conditions and prescriptions.
* The descriptive logic representation offers a more formal and detailed breakdown of the reasoning behind these relationships.
* The logic representation uses predicates like `bp(high)` (blood pressure high), `ok(diuretic)` (diuretic is okay), and `give(diuretic)` (give diuretic) to express the conditions and actions.
* The negation symbol `¬` is used to indicate contraindications or negative conditions.
* The symbols `∧` and `∨` represent logical AND and OR, respectively.
* The symbol `→` represents logical implication.
### Interpretation
The image illustrates how clinical decision-making can be represented using both a high-level argument graph and a more detailed descriptive logic framework. The argument graph provides a quick overview of the key considerations, while the logic representation allows for a more rigorous and formal analysis of the reasoning process. The connection between the two representations highlights how abstract arguments can be translated into concrete logical statements, enabling automated reasoning and decision support systems in healthcare. The presence of contradictions and considerations (e.g., hypertension treated with either diuretics or beta-blockers, and the contraindication of beta-blockers in emphysema patients) demonstrates the complexity of medical decision-making and the need for careful consideration of multiple factors.