\n
## Logical Argumentation Diagram: Medical Prescription Reasoning
### Overview
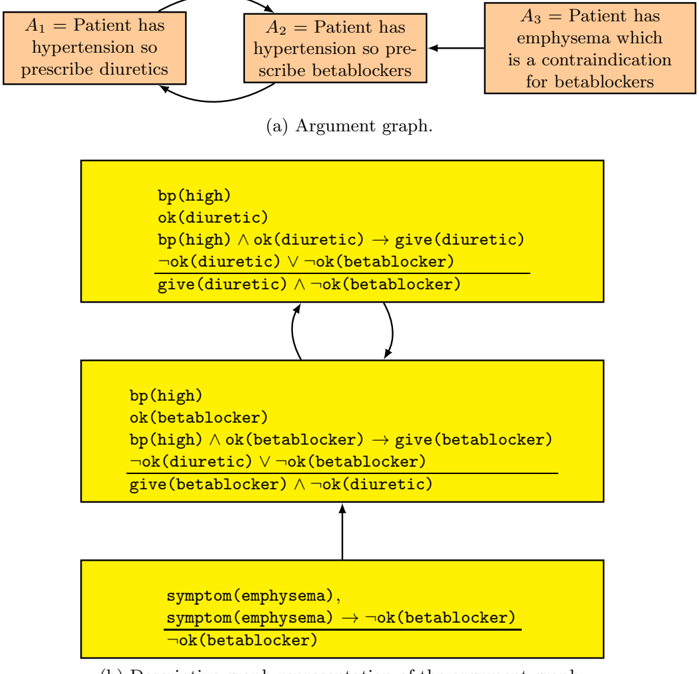
The image presents a two-part diagram illustrating a logical argument about medical prescriptions for a patient with hypertension and emphysema. The top section is a high-level argument graph showing conflicting recommendations. The bottom section provides a formal deductive argumentation structure using predicate logic to analyze and resolve the conflict.
### Components/Axes
The diagram is divided into two distinct, labeled sections:
1. **Top Section (a):** Labeled "(a) Argument graph." It consists of three rectangular boxes (peach/orange color) connected by arrows, representing a flow of reasoning.
2. **Bottom Section (b):** Labeled "(b) Deductive argumentation of the argument graph." It consists of three rectangular boxes (yellow color) containing formal logical statements, connected by arrows indicating logical dependency.
### Detailed Analysis
#### **Part (a): Argument Graph**
This section contains three argument nodes:
* **Box A1 (Top-Left):**
* **Text:** `A₁ = Patient has hypertension so prescribe diuretics`
* **Position:** Top-left of the argument graph.
* **Flow:** An arrow points from this box to Box A2.
* **Box A2 (Top-Center):**
* **Text:** `A₂ = Patient has hypertension so prescribe betablockers`
* **Position:** Top-center of the argument graph.
* **Flow:** Receives an arrow from A1. An arrow points from this box back to A1, indicating a conflict or cycle. An arrow also points from Box A3 to this box.
* **Box A3 (Top-Right):**
* **Text:** `A₃ = Patient has emphysema which is a contraindication for betablockers`
* **Position:** Top-right of the argument graph.
* **Flow:** An arrow points from this box to Box A2, attacking or providing a counter-argument to the recommendation in A2.
#### **Part (b): Deductive Argumentation**
This section formalizes the arguments from part (a) using logical notation. The boxes are arranged vertically.
* **Top Yellow Box (Formalization of A1):**
* **Content:**
```
bp(high)
ok(diuretic)
bp(high) ∧ ok(diuretic) → give(diuretic)
¬ok(diuretic) ∨ ¬ok(betablocker)
_________________________
give(diuretic) ∧ ¬ok(betablocker)
```
* **Position:** Top of the deductive argumentation stack.
* **Flow:** Connected by a double-headed arrow to the middle yellow box, indicating mutual conflict or attack.
* **Middle Yellow Box (Formalization of A2):**
* **Content:**
```
bp(high)
ok(betablocker)
bp(high) ∧ ok(betablocker) → give(betablocker)
¬ok(diuretic) ∨ ¬ok(betablocker)
_________________________
give(betablocker) ∧ ¬ok(diuretic)
```
* **Position:** Center of the deductive argumentation stack.
* **Flow:** Connected by a double-headed arrow to the top yellow box. Receives an arrow from the bottom yellow box.
* **Bottom Yellow Box (Formalization of A3):**
* **Content:**
```
symptom(emphysema),
symptom(emphysema) → ¬ok(betablocker)
_________________________
¬ok(betablocker)
```
* **Position:** Bottom of the deductive argumentation stack.
* **Flow:** An arrow points from this box to the middle yellow box, providing the logical basis for attacking the `ok(betablocker)` premise.
**Logical Symbol Key (Inferred):**
* `bp(high)`: Predicate meaning "blood pressure is high."
* `ok(X)`: Predicate meaning "treatment X is medically acceptable/safe."
* `give(X)`: Predicate meaning "prescribe/give treatment X."
* `symptom(Y)`: Predicate meaning "patient exhibits symptom/condition Y."
* `∧`: Logical AND.
* `∨`: Logical OR.
* `→`: Logical implication (if...then).
* `¬`: Logical NOT.
### Key Observations
1. **Core Conflict:** The argument graph (a) visually depicts a conflict between two treatments (diuretics and betablockers) for the same condition (hypertension), with a third fact (emphysema contraindication) attacking the betablocker recommendation.
2. **Formal Resolution:** The deductive structure (b) translates the natural language arguments into formal logic. It shows that the conclusion `¬ok(betablocker)` derived from the emphysema premise (bottom box) is used to attack the `ok(betablocker)` premise in the middle box (A2's formalization).
3. **Mutual Exclusivity:** The line `¬ok(diuretic) ∨ ¬ok(betablocker)` in both the top and middle boxes formally encodes the contraindication or mutual exclusivity between the two treatments in this context. The derivation in the top box concludes `¬ok(betablocker)`, while the derivation in the middle box concludes `¬ok(diuretic)`.
4. **Spatial Layout:** The legend/labels `(a)` and `(b)` are placed directly below their respective diagram sections. The flow arrows are critical for understanding the direction of argument and attack.
### Interpretation
This diagram is a formal representation of **defeasible reasoning** or **argumentation theory** applied to a medical decision-making scenario. It demonstrates how conflicting recommendations can be structured and analyzed logically.
* **What it demonstrates:** The data shows a classic case of treatment contraindication. While both diuretics and betablockers are valid first-line treatments for hypertension, the presence of emphysema makes betablockers unsafe (`¬ok(betablocker)`). The logical structure formally justifies rejecting the betablocker recommendation (A2) in favor of the diuretic recommendation (A1).
* **Relationships:** The argument graph (a) provides an intuitive, high-level view of the debate. The deductive argumentation (b) provides the underlying logical machinery, showing how premises lead to conclusions and how one argument (A3) defeats another (A2) by invalidating a key premise.
* **Significance:** This type of modeling is crucial for developing **explainable AI systems** in healthcare. It moves beyond a simple "black box" recommendation to show the *reasons* for a decision, including counter-arguments and their resolution. The outlier here is the emphysema condition, which acts as the critical piece of evidence that breaks the symmetry between the two hypertension treatments and dictates the final, safe clinical path: prescribe diuretics.