# Technical Data Extraction: Expert Load Heatmaps
## Overview
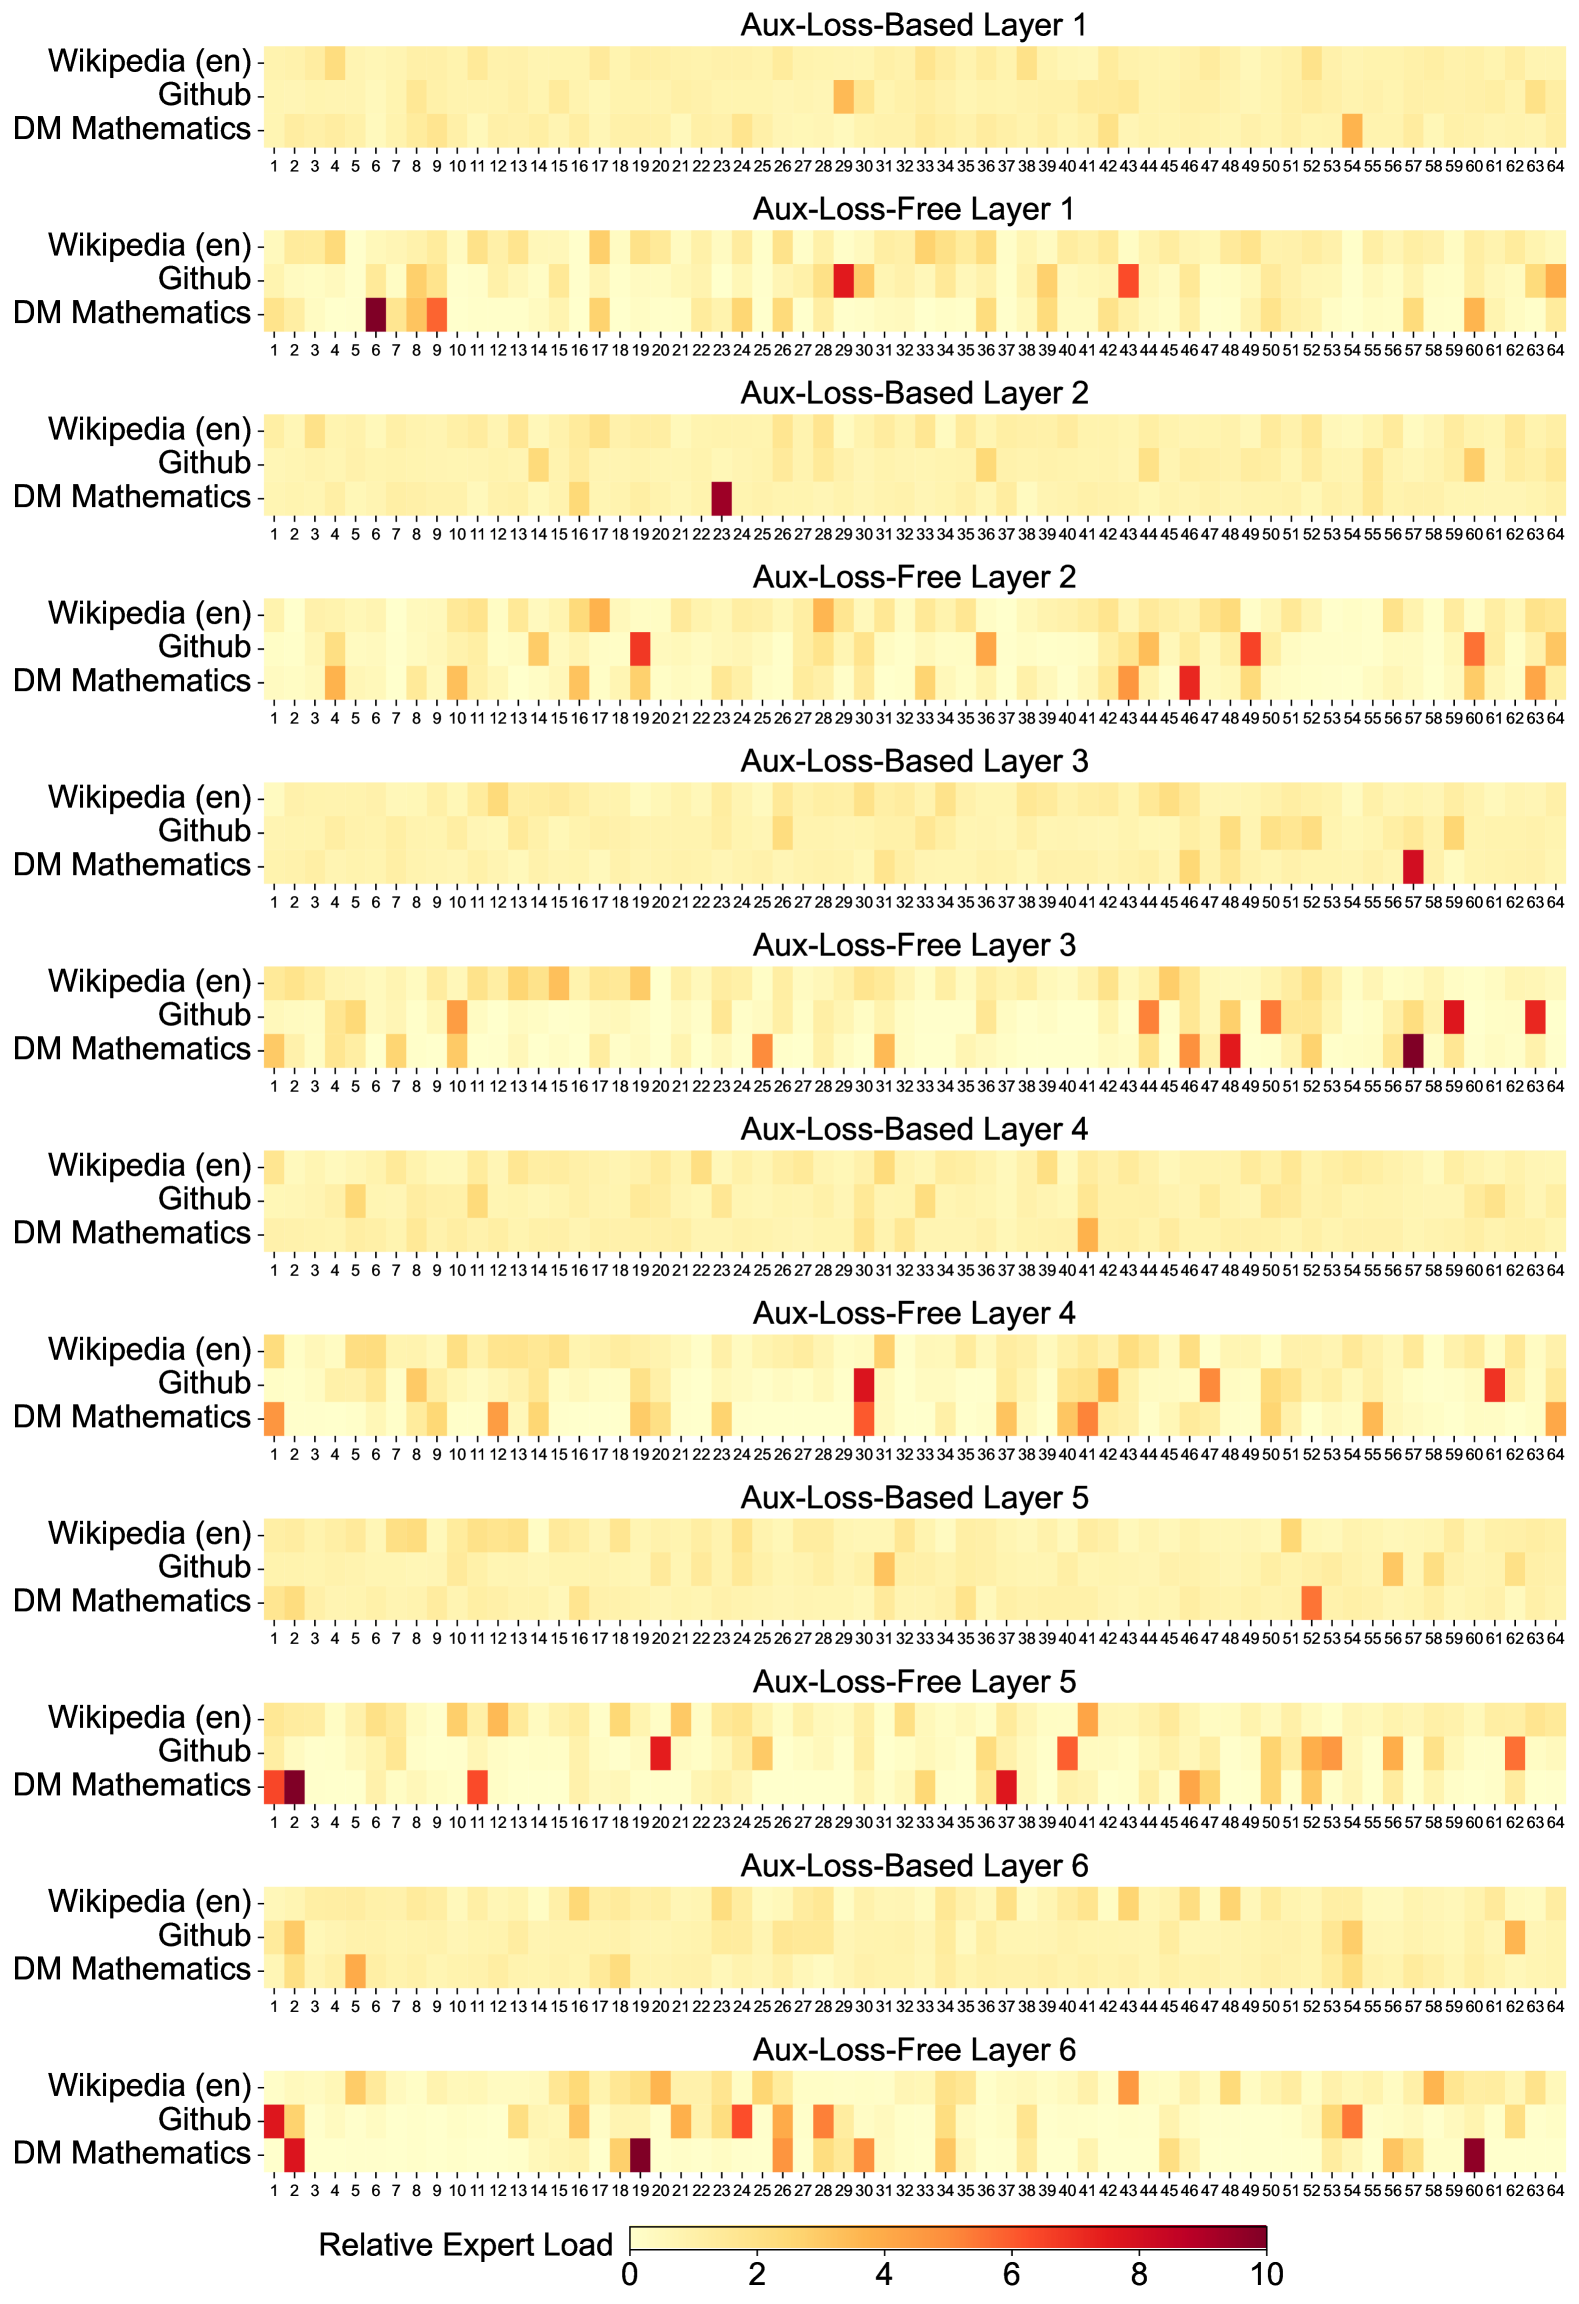
This document contains a series of 12 heatmaps organized in pairs, comparing "Aux-Loss-Based" and "Aux-Loss-Free" routing mechanisms across six layers (Layer 1 through Layer 6) of a Mixture-of-Experts (MoE) neural network. The charts visualize the **Relative Expert Load** across three distinct datasets.
## Metadata and Legend
* **Language:** English (en)
* **Metric:** Relative Expert Load
* **Scale:** 0 to 10 (Linear gradient)
* **0 (Light Yellow):** Low load/utilization.
* **10 (Dark Red/Maroon):** High load/utilization.
* **X-Axis (Experts):** 64 discrete experts, labeled 1 through 64.
* **Y-Axis (Datasets):**
1. Wikipedia (en)
2. Github
3. DM Mathematics
---
## Comparative Analysis by Layer
### Layer 1
* **Aux-Loss-Based Layer 1:** Shows a highly uniform, low-intensity distribution (mostly light yellow). Expert 29 (Github) and Expert 54 (DM Mathematics) show slightly higher activation.
* **Aux-Loss-Free Layer 1:** Shows significantly higher variance and "hotspots."
* **DM Mathematics:** High load on Experts 6, 8, and 9.
* **Github:** High load on Experts 29 and 43.
* **Wikipedia:** Generally uniform but slightly higher intensity than the loss-based counterpart.
### Layer 2
* **Aux-Loss-Based Layer 2:** Very uniform distribution. The only significant outlier is **DM Mathematics** at Expert 23 (Dark Red).
* **Aux-Loss-Free Layer 2:** Increased specialization.
* **Github:** High load on Experts 19, 49, and 60.
* **DM Mathematics:** High load on Experts 4, 43, 46, and 64.
### Layer 3
* **Aux-Loss-Based Layer 3:** Extremely uniform across Wikipedia and Github. **DM Mathematics** shows a single high-load point at Expert 57.
* **Aux-Loss-Free Layer 3:**
* **Github:** High load on Experts 43, 45, 50, 59, and 64.
* **DM Mathematics:** High load on Experts 46, 47, and 57.
### Layer 4
* **Aux-Loss-Based Layer 4:** Uniform distribution with very minor intensity increases for DM Mathematics around Expert 41.
* **Aux-Loss-Free Layer 4:**
* **Github:** Significant hotspot at Expert 30.
* **DM Mathematics:** High load at Experts 1, 41, 42, 47, and 64.
### Layer 5
* **Aux-Loss-Based Layer 5:** Uniform distribution. Minor intensity for DM Mathematics at Expert 52.
* **Aux-Loss-Free Layer 5:**
* **Github:** High load at Experts 20, 40, 52, and 62.
* **DM Mathematics:** High load at Experts 1, 2, 11, 36, 40, and 46.
### Layer 6
* **Aux-Loss-Based Layer 6:** Uniform distribution. Minor intensity for DM Mathematics at Expert 6 and Expert 52.
* **Aux-Loss-Free Layer 6:**
* **Github:** High load at Expert 1.
* **DM Mathematics:** High load at Experts 2, 19, 25, 30, and 61.
---
## Key Trends and Observations
1. **Routing Mechanism Contrast:**
* **Aux-Loss-Based:** These layers exhibit a "load balancing" effect. The distribution is consistently pale, indicating that the auxiliary loss is successfully forcing the model to spread the computational load across all 64 experts relatively evenly.
* **Aux-Loss-Free:** These layers exhibit "Expert Specialization." Without the auxiliary loss constraint, specific experts become highly specialized for specific datasets (Github or DM Mathematics), resulting in dark red hotspots (high load) and many experts with near-zero load.
2. **Dataset Specificity:**
* **Wikipedia (en):** Consistently shows the most uniform and lowest relative load across all layers and both routing types. It appears to be the "baseline" data that is processed by a wide variety of experts.
* **DM Mathematics & Github:** These datasets consistently trigger high-load hotspots in the Aux-Loss-Free models, suggesting they require more specialized computation that the router naturally gravitates toward when unconstrained.
3. **Expert Utilization:**
* In the **Aux-Loss-Free** configuration, the "hot" experts change from layer to layer, suggesting that the model develops a hierarchical specialization strategy. For example, Expert 1 is a major hub for DM Mathematics in Layer 4 and 5, but shifts to Github in Layer 6.