## Diagram: State Transition Diagram for a Puzzle
### Overview
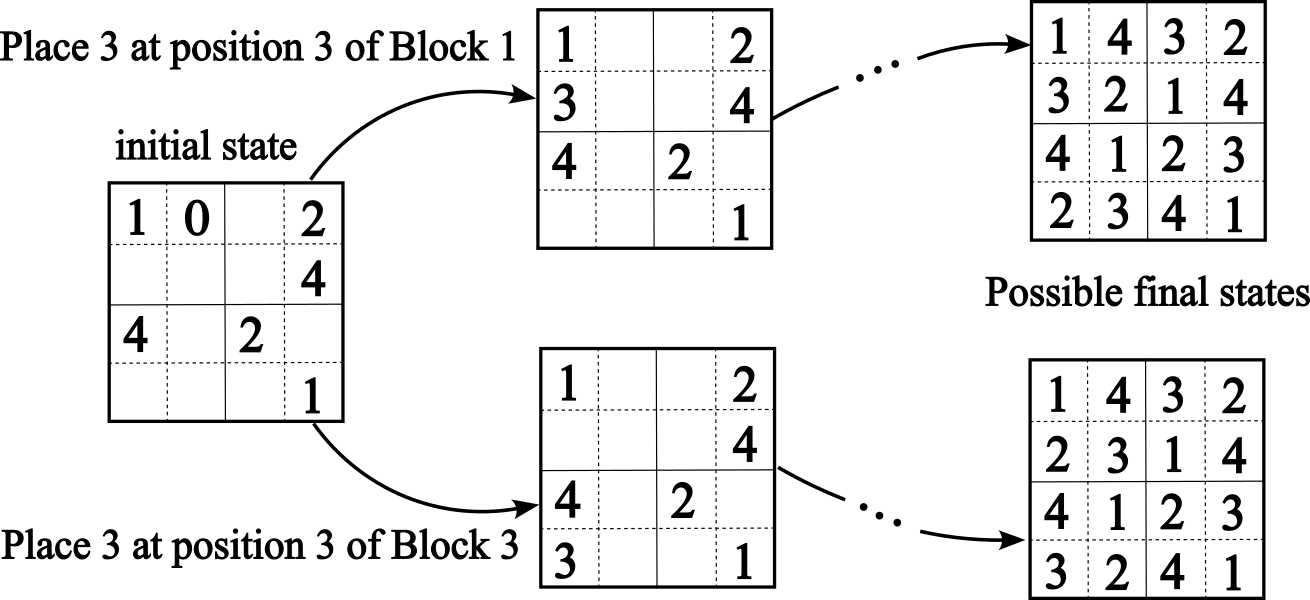
The image depicts a state transition diagram for a puzzle, showing an initial state and two possible transitions to final states. The puzzle appears to involve arranging numbers within a 4x4 grid. The diagram illustrates how placing a specific number (3) in a particular position within a smaller block of the grid leads to different configurations.
### Components/Axes
* **Nodes:** The nodes represent states of the puzzle, visualized as 4x4 grids with numbers in each cell.
* **Edges:** The edges represent transitions between states, labeled with the action taken to cause the transition.
* **Labels:**
* "initial state": Indicates the starting configuration of the puzzle.
* "Possible final states": Indicates the resulting configurations after a series of transitions.
* "Place 3 at position 3 of Block 1": Describes the action taken for the top transition.
* "Place 3 at position 3 of Block 3": Describes the action taken for the bottom transition.
### Detailed Analysis or ### Content Details
**Initial State:**
* The initial state is represented by a 4x4 grid.
* Row 1: 1, 0, 2
* Row 2: Empty, 4
* Row 3: 4, 2
* Row 4: Empty, 1
**Transition 1 (Top): "Place 3 at position 3 of Block 1"**
* Intermediate State: A 2x2 grid is shown.
* Row 1: 1, 2
* Row 2: 3, 4
* Row 3: 4, 2
* Row 4: Empty, 1
* Final State: A 4x4 grid representing one possible final state.
* Row 1: 1, 4, 3, 2
* Row 2: 3, 2, 1, 4
* Row 3: 4, 1, 2, 3
* Row 4: 2, 3, 4, 1
**Transition 2 (Bottom): "Place 3 at position 3 of Block 3"**
* Intermediate State: A 2x2 grid is shown.
* Row 1: 1, 2
* Row 2: Empty, 4
* Row 3: 4, 2
* Row 4: 3, 1
* Final State: A 4x4 grid representing another possible final state.
* Row 1: 1, 4, 3, 2
* Row 2: 2, 3, 1, 4
* Row 3: 4, 1, 2, 3
* Row 4: 3, 2, 4, 1
### Key Observations
* The initial state has empty cells, represented by "0" or blank spaces.
* The transitions involve placing the number "3" in a specific location within a 2x2 block.
* The "Block 1" and "Block 3" references likely indicate specific 2x2 subgrids within the larger 4x4 grid.
* The final states are fully populated 4x4 grids with numbers 1 through 4.
* The intermediate states between the initial and final states are not fully defined.
### Interpretation
The diagram illustrates a simplified model of a puzzle-solving process. It demonstrates how a single action (placing the number 3) can lead to different outcomes depending on the initial state and the specific block where the action is performed. The diagram suggests that the puzzle involves rearranging numbers within a grid, and the goal is likely to reach a final state where the grid satisfies certain conditions (e.g., each row and column contains all numbers from 1 to 4). The "Block" references suggest a hierarchical structure or a specific strategy for solving the puzzle. The diagram provides a high-level overview of the state transitions involved in solving the puzzle, but it does not provide the complete set of rules or the optimal solution strategy.