\n
## Diagram: State Transition of a Block Arrangement
### Overview
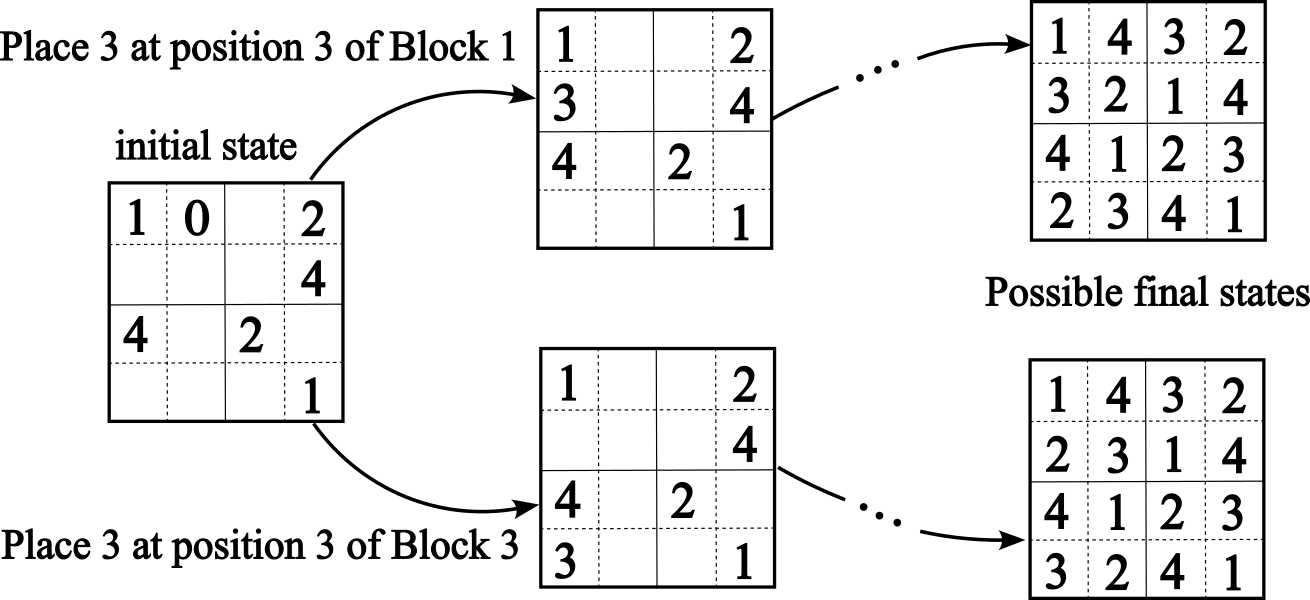
This diagram illustrates the possible state transitions of a 2x2 block arrangement, starting from an initial state and moving towards possible final states by manipulating the position of the number '3'. The diagram shows two possible paths for moving the '3' and the resulting arrangements.
### Components/Axes
The diagram consists of:
* **Initial State:** A 2x2 grid with the numbers 1, 0, 2, 4, 1, and 2 arranged within it. Note that '0' appears in the initial state, which is unusual for a block arrangement typically containing numbers 1-4.
* **Intermediate States:** Two 2x2 grids showing the arrangement after moving the '3' to position 3 of Block 1.
* **Final States:** Two 2x2 grids representing possible final arrangements after the manipulation.
* **Arrows:** Curved arrows indicating the direction of the state transition.
* **Text Labels:** "initial state", "Place 3 at position 3 of Block 1", "Possible final states".
### Detailed Analysis / Content Details
**Initial State:**
The initial state grid contains the following values:
* Row 1: 1, 0, 2
* Row 2: 4, 2, 1
**First Transition:**
The first transition involves placing '3' at position 3 of Block 1. The intermediate grid shows:
* Row 1: 1, 2, 4
* Row 2: 3, 4, 2
* Row 3: 1
This is followed by an arrow leading to a possible final state:
* Row 1: 1, 4, 3, 2
* Row 2: 3, 2, 1, 4
* Row 3: 4, 1, 2, 3
* Row 4: 2, 3, 4, 1
**Second Transition:**
The second transition also involves placing '3' at position 3 of Block 1, but from a different intermediate arrangement. The intermediate grid shows:
* Row 1: 1, 2, 4
* Row 2: 4, 2, 1
* Row 3: 3
This is followed by an arrow leading to another possible final state:
* Row 1: 1, 4, 3, 2
* Row 2: 2, 3, 1, 4
* Row 3: 4, 1, 2, 3
* Row 4: 3, 2, 4, 1
### Key Observations
* The diagram focuses on the manipulation of the number '3' within the block arrangement.
* The initial state contains a '0', which is not part of the typical 1-4 range.
* The final states are 4x4 grids, while the initial and intermediate states are 2x2. This suggests an expansion or rearrangement process.
* There are multiple possible final states depending on the path taken.
### Interpretation
The diagram demonstrates a state transition process where a 2x2 block arrangement is transformed into a 4x4 arrangement by strategically placing the number '3'. The presence of multiple final states indicates that the process is not deterministic and can lead to different outcomes. The initial state containing '0' is an anomaly and might represent a starting condition or a placeholder value. The diagram could be illustrating a puzzle, a game mechanic, or a simplified model of a more complex system involving rearrangement and state changes. The arrows suggest a sequential process, and the diagram highlights the importance of the initial conditions and the specific manipulation step (placing '3') in determining the final outcome. The expansion from a 2x2 to a 4x4 grid suggests a potential doubling or expansion operation.