\n
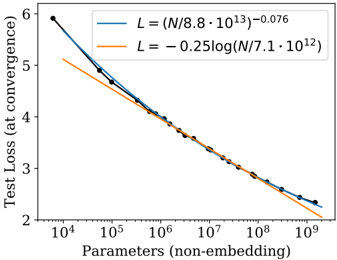
## Chart: Test Loss vs. Parameters
### Overview
The image presents a line chart illustrating the relationship between the number of parameters in a model (non-embedding) and the test loss achieved at convergence. Two different loss functions, represented by blue and orange lines, are compared. The x-axis is on a logarithmic scale.
### Components/Axes
* **X-axis Title:** Parameters (non-embedding)
* **X-axis Scale:** Logarithmic scale, ranging from approximately 10<sup>4</sup> to 10<sup>9</sup>. Markers are present at 10<sup>4</sup>, 10<sup>5</sup>, 10<sup>6</sup>, 10<sup>7</sup>, 10<sup>8</sup>, and 10<sup>9</sup>.
* **Y-axis Title:** Test Loss (at convergence)
* **Y-axis Scale:** Linear scale, ranging from approximately 2 to 6. Markers are present at 2, 3, 4, 5, and 6.
* **Legend:** Located in the top-right corner.
* **Blue Line:** L = (N/8.8 * 10<sup>13</sup>)<sup>-0.076</sup>
* **Orange Line:** L = -0.25log(N/7.1 * 10<sup>12</sup>)
* **Data Points:** Black circular markers are plotted along both lines, indicating specific data points.
### Detailed Analysis
**Blue Line (L = (N/8.8 * 10<sup>13</sup>)<sup>-0.076</sup>):**
The blue line exhibits a decreasing trend, indicating that as the number of parameters increases, the test loss decreases.
* At approximately 10<sup>4</sup> parameters, the test loss is around 5.8.
* At approximately 10<sup>5</sup> parameters, the test loss is around 5.1.
* At approximately 10<sup>6</sup> parameters, the test loss is around 4.4.
* At approximately 10<sup>7</sup> parameters, the test loss is around 3.8.
* At approximately 10<sup>8</sup> parameters, the test loss is around 3.2.
* At approximately 10<sup>9</sup> parameters, the test loss is around 2.7.
**Orange Line (L = -0.25log(N/7.1 * 10<sup>12</sup>)):**
The orange line also shows a decreasing trend, but it appears to be slightly steeper than the blue line, especially at lower parameter counts.
* At approximately 10<sup>4</sup> parameters, the test loss is around 5.4.
* At approximately 10<sup>5</sup> parameters, the test loss is around 4.7.
* At approximately 10<sup>6</sup> parameters, the test loss is around 4.0.
* At approximately 10<sup>7</sup> parameters, the test loss is around 3.4.
* At approximately 10<sup>8</sup> parameters, the test loss is around 2.8.
* At approximately 10<sup>9</sup> parameters, the test loss is around 2.3.
The black data points closely follow both lines, suggesting a strong correlation between the model and the predicted loss functions.
### Key Observations
* Both loss functions demonstrate diminishing returns as the number of parameters increases. The rate of loss reduction slows down as the model size grows.
* The orange loss function appears to predict slightly lower test losses than the blue loss function, particularly at lower parameter counts.
* The data points are very close to the lines, indicating a good fit between the model's performance and the theoretical loss functions.
### Interpretation
The chart illustrates the scaling behavior of test loss with respect to model size (number of parameters). The two loss functions provide theoretical predictions for how the loss should decrease as the model becomes larger. The close alignment between the lines and the data points suggests that these loss functions are reasonable approximations of the model's actual performance.
The logarithmic scale on the x-axis highlights the importance of considering relative changes in parameter count. The diminishing returns observed at higher parameter counts suggest that simply increasing model size indefinitely may not lead to significant improvements in performance. The difference between the two loss functions could indicate different assumptions about the model's capacity or the complexity of the data. The chart provides valuable insights for model design and optimization, helping to determine the appropriate model size for a given task.