## Diagram: Reidemeister Move R1a
### Overview
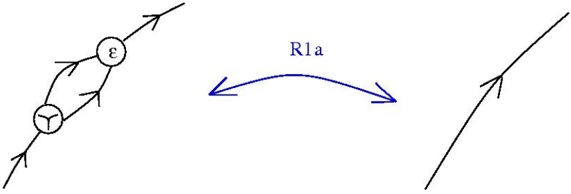
The image depicts a diagram illustrating the Reidemeister move of type 1a (R1a). It shows a transformation of a knot diagram where a loop is added to or removed from a strand.
### Components/Axes
* **Left Side:** A strand with two circular nodes labeled "ε" (epsilon) and "Y" (gamma). The strand has arrows indicating direction. A loop connects the two nodes.
* **Center:** A blue curved arrow labeled "R1a" indicating the transformation. The arrow points from left to right.
* **Right Side:** A single strand with an arrow indicating direction.
### Detailed Analysis
* **Left Side:**
* The strand enters from the bottom-left, passes through a node labeled "Y", then forms a loop connecting back to a node labeled "ε", and continues upward.
* The loop consists of two curved lines, each with an arrow indicating direction. The arrows on the loop point in opposite directions.
* The main strand has arrows pointing upwards.
* **Center:**
* The blue curved arrow labeled "R1a" indicates the transformation from the left side to the right side.
* **Right Side:**
* A single strand enters from the bottom-right and continues upwards.
* The strand has an arrow pointing upwards.
### Key Observations
* The diagram illustrates the Reidemeister move R1a, which involves adding or removing a loop from a strand.
* The left side shows a strand with a loop, while the right side shows the same strand without the loop.
* The blue arrow labeled "R1a" indicates the transformation.
### Interpretation
The diagram demonstrates the Reidemeister move R1a, a fundamental concept in knot theory. This move shows that a knot diagram with a loop can be simplified to a diagram without the loop, and vice versa, without changing the underlying knot. The labels "ε" and "Y" on the nodes are likely related to the specific type of crossing or twist in the knot diagram. The diagram illustrates the equivalence between the two knot diagrams, highlighting the invariance of knots under Reidemeister moves.