# Technical Document Extraction: WebShop Success Rate Chart
## 1. Header Information
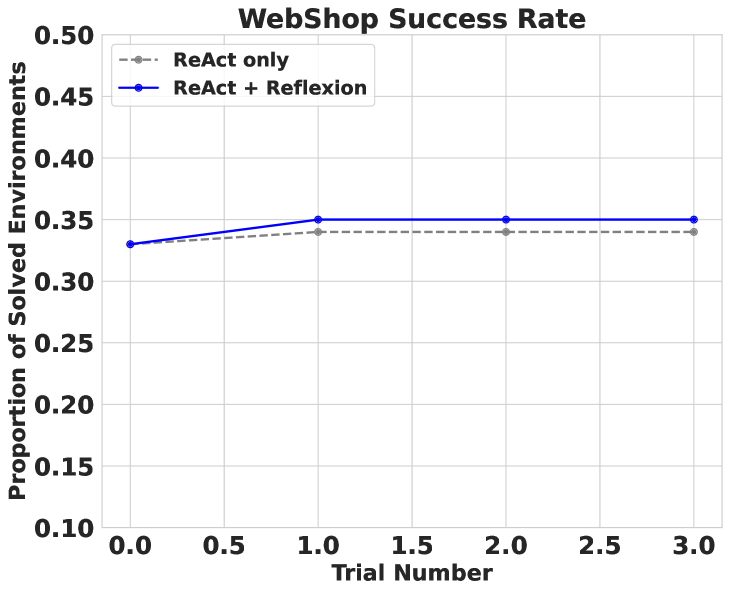
* **Title:** WebShop Success Rate
* **Chart Type:** Line Graph with markers
## 2. Axis Specifications
* **Y-Axis Label:** Proportion of Solved Environments
* **Y-Axis Range:** 0.10 to 0.50
* **Y-Axis Markers:** 0.10, 0.15, 0.20, 0.25, 0.30, 0.35, 0.40, 0.45, 0.50
* **X-Axis Label:** Trial Number
* **X-Axis Range:** 0.0 to 3.0
* **X-Axis Markers:** 0.0, 0.5, 1.0, 1.5, 2.0, 2.5, 3.0
## 3. Legend Information
* **Location:** Top-left quadrant (approximate [x, y] coordinates relative to plot area: [0.05, 0.95])
* **Series 1:** `ReAct only` (Represented by a grey dashed line with circular markers)
* **Series 2:** `ReAct + Reflexion` (Represented by a solid blue line with circular markers)
## 4. Data Series Analysis
### Series 1: ReAct only (Grey Dashed Line)
* **Visual Trend:** The line shows a very slight upward slope from Trial 0 to Trial 1, after which it plateaus and remains perfectly horizontal through Trial 3.
* **Data Points:**
* **Trial 0.0:** ~0.33
* **Trial 1.0:** ~0.34
* **Trial 2.0:** ~0.34
* **Trial 3.0:** ~0.34
### Series 2: ReAct + Reflexion (Solid Blue Line)
* **Visual Trend:** The line starts at the same point as the baseline, slopes upward more sharply than the baseline between Trial 0 and Trial 1, and then plateaus at a higher level, remaining horizontal through Trial 3.
* **Data Points:**
* **Trial 0.0:** ~0.33 (Coincides with ReAct only)
* **Trial 1.0:** 0.35
* **Trial 2.0:** 0.35
* **Trial 3.0:** 0.35
## 5. Key Findings and Comparisons
* **Initial State:** Both methods start with an identical success rate of approximately 0.33 at Trial 0.
* **Improvement:** Both methods show their total improvement within the first trial.
* **Performance Gap:** The "ReAct + Reflexion" method outperforms the "ReAct only" method by a consistent margin of approximately 0.01 (1 percentage point) from Trial 1.0 through Trial 3.0.
* **Stability:** Both systems reach a performance ceiling quickly, with no further changes in the success rate observed between Trial 1 and Trial 3.