## Line Chart: Satisfied Clauses Comparison
### Overview
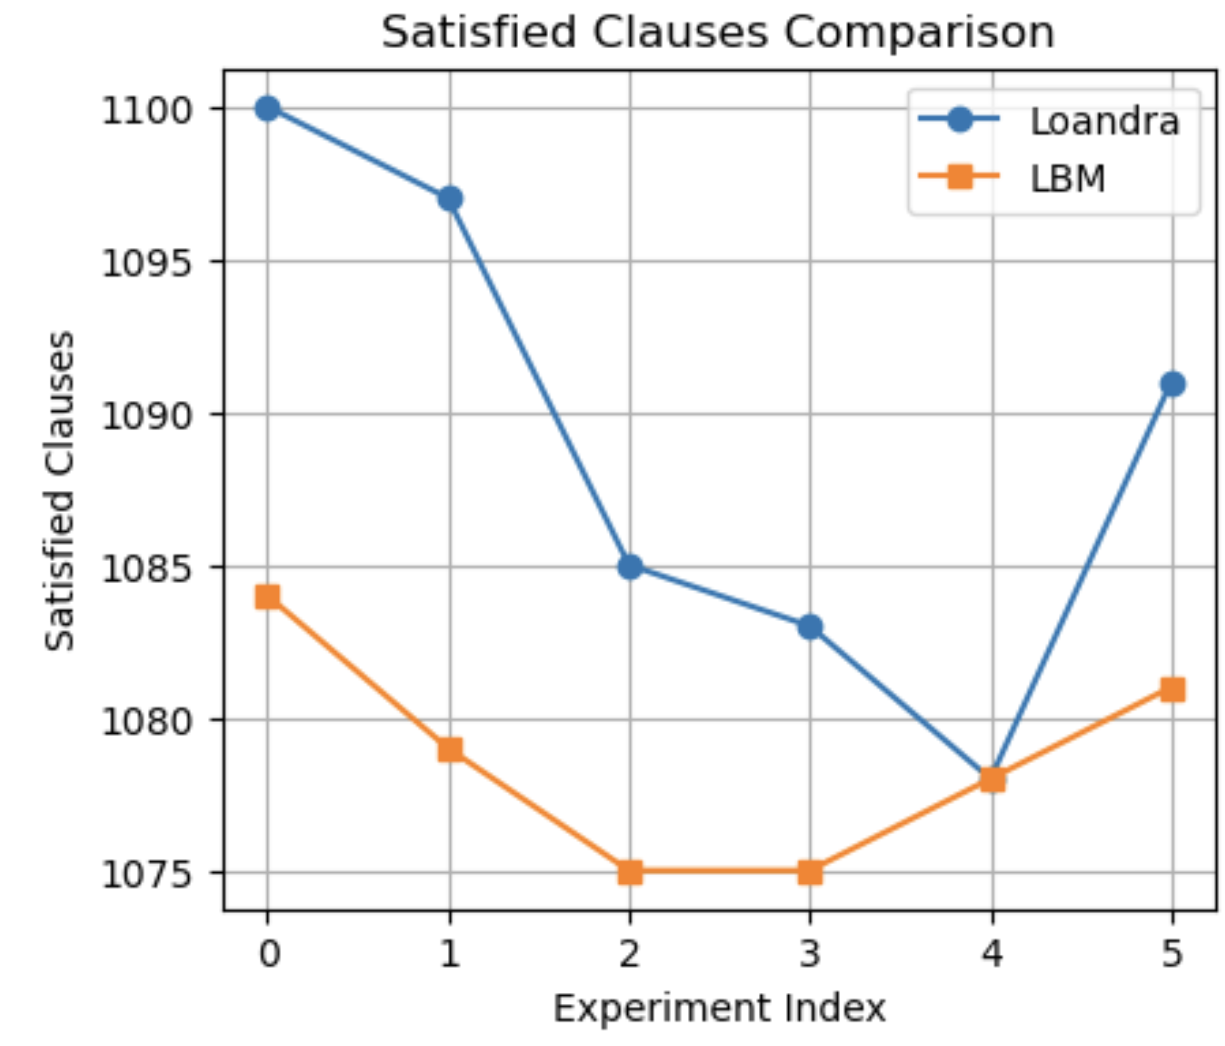
The chart compares the performance of two methods, **Loandra** (blue line with circles) and **LBM** (orange line with squares), across six experiment indices (0–5). The y-axis measures "Satisfied Clauses" on a scale from 1075 to 1100, while the x-axis represents discrete experiment indices. The legend is positioned in the top-right corner, with distinct colors and markers for each method.
---
### Components/Axes
- **X-axis (Horizontal)**: Labeled "Experiment Index," with integer values 0 to 5.
- **Y-axis (Vertical)**: Labeled "Satisfied Clauses," with increments of 5 units (1075, 1080, ..., 1100).
- **Legend**: Located in the top-right corner, associating:
- **Blue line with circles**: Loandra
- **Orange line with squares**: LBM
---
### Detailed Analysis
#### Loandra (Blue Line)
- **Trend**: Starts at 1100 (index 0), sharply declines to 1097 (index 1), then gradually decreases to 1085 (index 2), 1083 (index 3), and 1078 (index 4), before recovering to 1091 (index 5).
- **Key Data Points**:
- Index 0: 1100
- Index 1: 1097
- Index 2: 1085
- Index 3: 1083
- Index 4: 1078
- Index 5: 1091
#### LBM (Orange Line)
- **Trend**: Starts at 1084 (index 0), declines to 1079 (index 1), stabilizes at 1075 (indices 2–3), rises to 1078 (index 4), and peaks at 1081 (index 5).
- **Key Data Points**:
- Index 0: 1084
- Index 1: 1079
- Index 2: 1075
- Index 3: 1075
- Index 4: 1078
- Index 5: 1081
---
### Key Observations
1. **Loandra's Volatility**:
- Sharp initial drop (1100 → 1097) followed by a gradual decline until index 4, then a recovery at index 5.
- Final value (1091) exceeds LBM's final value (1081) despite mid-experiment dips.
2. **LBM's Stability**:
- Minimal fluctuation, with a flatline at 1075 (indices 2–3) and a modest recovery by index 5.
3. **Y-Axis Scale**:
- Increment of 5 units per gridline, emphasizing small performance differences between methods.
---
### Interpretation
- **Performance Dynamics**:
- Loandra demonstrates higher initial performance but experiences mid-experiment instability, potentially due to methodological adjustments or external factors. Its recovery at index 5 suggests resilience or adaptive mechanisms.
- LBM maintains consistent performance, indicating robustness but lower overall effectiveness compared to Loandra.
- **Outliers**:
- Loandra's sharp drop at index 1 and recovery at index 5 are notable anomalies, possibly reflecting experimental interventions or data collection artifacts.
- **Practical Implications**:
- Loandra may be preferable for scenarios prioritizing peak performance, while LBM suits applications requiring stability. The final divergence at index 5 highlights the importance of longitudinal evaluation in method selection.