\n
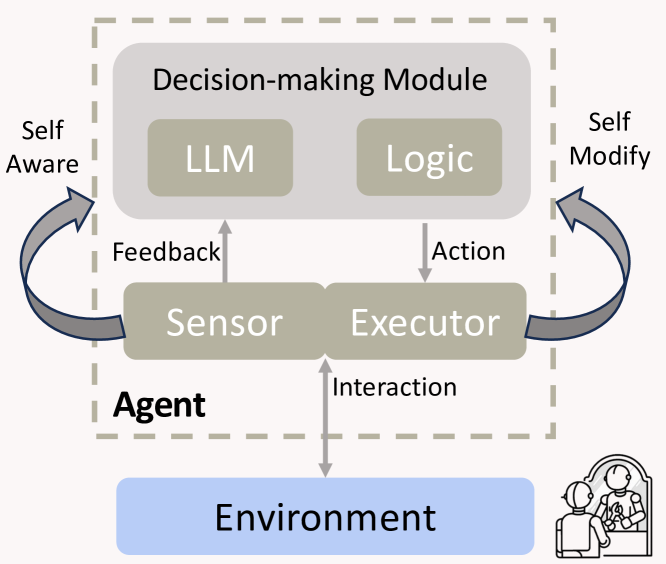
## Diagram: Agent Architecture
### Overview
The image depicts a diagram illustrating the architecture of an agent, likely an AI agent, with a focus on its decision-making process and interaction with an environment. The agent is composed of several modules, including a Decision-making Module, a Sensor, and an Executor, all operating within a feedback loop. The environment is represented at the bottom of the diagram, with human figures suggesting interaction with people.
### Components/Axes
The diagram consists of the following key components:
* **Agent:** Enclosed within a dashed grey rectangle, representing the overall agent system.
* **Decision-making Module:** A light-brown rectangle containing two sub-components: "LLM" and "Logic".
* **Sensor:** A light-grey rectangle.
* **Executor:** A light-grey rectangle.
* **Environment:** A blue oval at the bottom of the diagram, containing stylized human figures.
* **Arrows:** Curved arrows indicating the flow of information and control between the components. These arrows are labeled with terms like "Feedback", "Action", "Interaction", "Self Aware", and "Self Modify".
### Detailed Analysis or Content Details
The diagram shows a cyclical process:
1. The **Environment** interacts with the **Agent**.
2. The **Sensor** receives information from the **Environment** via an "Interaction" arrow.
3. The **Sensor** provides "Feedback" to the **Decision-making Module**.
4. The **Decision-making Module** processes information using both an "LLM" and "Logic" component.
5. The **Decision-making Module** sends "Action" commands to the **Executor**.
6. The **Executor** acts upon the **Environment**.
7. The **Agent** is also shown to be "Self Aware" and capable of "Self Modify", with arrows looping back to the **Decision-making Module**.
The labels on the arrows are crucial to understanding the flow:
* "Feedback" (from Sensor to Decision-making Module)
* "Action" (from Decision-making Module to Executor)
* "Interaction" (from Environment to Agent)
* "Self Aware" (loop from Decision-making Module to itself)
* "Self Modify" (loop from Decision-making Module to itself)
### Key Observations
The diagram emphasizes the closed-loop nature of the agent's operation. The inclusion of both "LLM" and "Logic" within the Decision-making Module suggests a hybrid approach to decision-making, combining the capabilities of large language models with more traditional logical reasoning. The "Self Aware" and "Self Modify" loops indicate the agent's ability to learn and adapt over time. The presence of human figures in the environment suggests the agent is designed to interact with and potentially assist humans.
### Interpretation
This diagram illustrates a sophisticated agent architecture designed for complex tasks. The agent isn't simply reacting to its environment; it's actively learning from feedback, making decisions based on both data-driven insights (LLM) and logical reasoning, and adapting its behavior over time. The cyclical nature of the process highlights the importance of continuous learning and improvement. The inclusion of "Self Aware" and "Self Modify" suggests the agent is intended to be autonomous and capable of evolving its capabilities without constant external intervention. The agent's interaction with a human-populated environment implies a focus on human-computer interaction and potentially collaborative problem-solving. The diagram doesn't provide specific data or numerical values, but rather a conceptual framework for understanding how such an agent might function.