\n
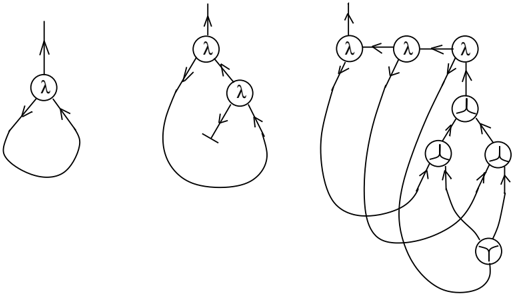
## Diagram: Lambda Calculus Reduction Steps
### Overview
The image presents a series of diagrams illustrating the reduction steps in lambda calculus. It shows how a lambda expression is simplified through beta reduction, starting with a simple self-application and progressing to a more complex nested structure. The diagrams are arranged horizontally, representing sequential steps in the reduction process.
### Components/Axes
The diagrams consist of circular and Y-shaped nodes connected by arrows. Each node contains the symbol "λ" (lambda). The arrows indicate the direction of reduction or application. There are no explicit axes or scales. The diagrams are purely structural, representing the transformation of lambda expressions.
### Detailed Analysis or Content Details
**Diagram 1 (Leftmost):**
* A single circular node labeled "λ".
* An arrow originates from the top of the node and curves back down to the node itself, indicating self-application.
* A curved arrow originates from the bottom of the node and curves back up to the node itself.
**Diagram 2 (Middle):**
* A circular node labeled "λ".
* An arrow originates from the top of the node and points downwards.
* A second circular node labeled "λ" is positioned below the first.
* An arrow originates from the second node and points upwards to the first node.
* A small vertical line is present below the second node.
**Diagram 3 (Rightmost):**
* Three circular nodes labeled "λ" are positioned horizontally.
* The leftmost "λ" node has an arrow pointing to the middle "λ" node.
* The middle "λ" node has an arrow pointing back to the leftmost "λ" node.
* The middle "λ" node also has two arrows pointing downwards.
* Each of these downward arrows connects to a Y-shaped node.
* Each Y-shaped node has three branches, with arrows pointing from the central point of the Y to each branch.
* The bottom-most Y-shaped node has arrows pointing upwards to the two Y-shaped nodes above it.
### Key Observations
The diagrams demonstrate a progression from a simple lambda expression to a more complex, nested structure. The introduction of the Y-shaped nodes suggests the creation of a fixed-point combinator, likely representing the Y combinator. The diagrams show how self-application and recursion are represented in lambda calculus.
### Interpretation
The image illustrates the process of beta reduction in lambda calculus, specifically demonstrating how a lambda expression can be reduced to its normal form. The first diagram represents a simple lambda abstraction. The second diagram shows a basic application. The third diagram demonstrates the construction of a recursive function using the Y combinator. The Y combinator allows for the definition of recursive functions in a purely functional setting without explicit recursion. The diagrams are a visual representation of the mathematical operations involved in lambda calculus, highlighting the power and elegance of this formal system. The diagrams are not providing numerical data, but rather a structural representation of a computational process. The diagrams are a visual aid for understanding the core concepts of lambda calculus and functional programming.