## Chart: Energy to Solution vs. Saturation Parameter
### Overview
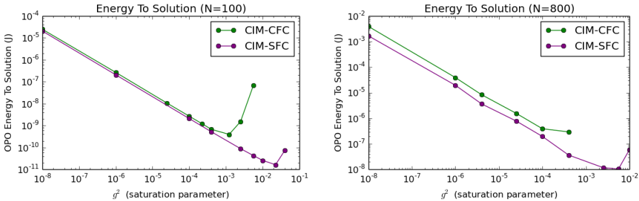
The image presents two line charts comparing the energy to solution for two different computational methods, CIM-CFC and CIM-SFC, across varying saturation parameters. The chart on the left represents data for N=100, while the chart on the right represents data for N=800. Both charts have a logarithmic scale on both axes.
### Components/Axes
* **Titles:**
* Left Chart: "Energy To Solution (N=100)"
* Right Chart: "Energy To Solution (N=800)"
* **Y-axis (both charts):**
* Label: "OPO Energy To Solution (J)"
* Scale: Logarithmic, ranging from 10<sup>-11</sup> to 10<sup>-4</sup> on the left chart, and from 10<sup>-8</sup> to 10<sup>-2</sup> on the right chart.
* **X-axis (both charts):**
* Label: "σ<sup>2</sup> (saturation parameter)"
* Scale: Logarithmic, ranging from 10<sup>-8</sup> to 10<sup>-1</sup>.
* **Legend (both charts, located in the top-center):**
* Green line with circular markers: "CIM-CFC"
* Purple line with circular markers: "CIM-SFC"
### Detailed Analysis
**Left Chart (N=100):**
* **CIM-CFC (Green):**
* Trend: Initially decreases sharply, then flattens out, and finally increases at higher saturation parameter values.
* Data Points:
* At σ<sup>2</sup> ≈ 10<sup>-8</sup>, Energy ≈ 10<sup>-4</sup> J
* At σ<sup>2</sup> ≈ 10<sup>-4</sup>, Energy ≈ 10<sup>-9</sup> J
* At σ<sup>2</sup> ≈ 10<sup>-2</sup>, Energy ≈ 10<sup>-8</sup> J
* **CIM-SFC (Purple):**
* Trend: Decreases sharply, then flattens out at higher saturation parameter values.
* Data Points:
* At σ<sup>2</sup> ≈ 10<sup>-8</sup>, Energy ≈ 10<sup>-4</sup> J
* At σ<sup>2</sup> ≈ 10<sup>-4</sup>, Energy ≈ 10<sup>-9</sup> J
* At σ<sup>2</sup> ≈ 10<sup>-2</sup>, Energy ≈ 10<sup>-10</sup> J
* At σ<sup>2</sup> ≈ 10<sup>-1</sup>, Energy ≈ 10<sup>-10</sup> J
**Right Chart (N=800):**
* **CIM-CFC (Green):**
* Trend: Decreases sharply, then flattens out at higher saturation parameter values.
* Data Points:
* At σ<sup>2</sup> ≈ 10<sup>-8</sup>, Energy ≈ 10<sup>-2.5</sup> J
* At σ<sup>2</sup> ≈ 10<sup>-4</sup>, Energy ≈ 10<sup>-5</sup> J
* At σ<sup>2</sup> ≈ 10<sup>-2</sup>, Energy ≈ 10<sup>-6</sup> J
* **CIM-SFC (Purple):**
* Trend: Decreases sharply, then increases sharply at higher saturation parameter values.
* Data Points:
* At σ<sup>2</sup> ≈ 10<sup>-8</sup>, Energy ≈ 10<sup>-3</sup> J
* At σ<sup>2</sup> ≈ 10<sup>-4</sup>, Energy ≈ 10<sup>-5.5</sup> J
* At σ<sup>2</sup> ≈ 10<sup>-2</sup>, Energy ≈ 10<sup>-7</sup> J
### Key Observations
* For both N=100 and N=800, both CIM-CFC and CIM-SFC initially show a significant decrease in energy to solution as the saturation parameter increases.
* At N=100, CIM-SFC consistently requires less energy than CIM-CFC across the range of saturation parameters.
* At N=800, CIM-SFC requires less energy than CIM-CFC until σ<sup>2</sup> ≈ 10<sup>-2</sup>, where the energy required by CIM-SFC increases sharply.
* The energy scales are different between the two charts, with the N=800 chart showing higher energy values overall.
### Interpretation
The charts illustrate the relationship between the saturation parameter (σ<sup>2</sup>) and the energy required to reach a solution for two different computational methods (CIM-CFC and CIM-SFC) at two different problem sizes (N=100 and N=800). The initial decrease in energy with increasing saturation parameter suggests that a certain level of saturation is beneficial for both methods. However, at higher saturation levels, the behavior diverges. For N=100, CIM-SFC consistently outperforms CIM-CFC. For N=800, CIM-SFC initially outperforms CIM-CFC, but its performance degrades significantly at higher saturation levels. This suggests that the optimal saturation parameter and the relative performance of the two methods are dependent on the problem size (N). The sharp increase in energy for CIM-SFC at N=800 and high saturation levels could indicate a point where the method becomes unstable or inefficient.