## Diagram: T-Shape with Square Attachment and Configurations
### Overview
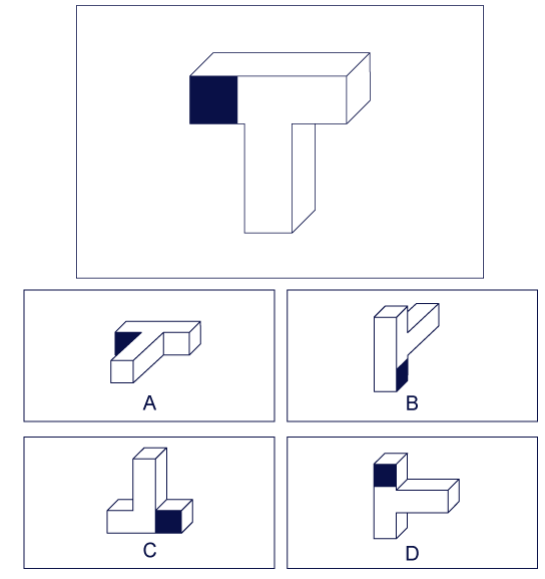
The image depicts a 3D spatial diagram featuring a primary structure labeled as a "T-shape with a square attachment" at the top, followed by four distinct configurations (A, B, C, D) below. Each configuration represents a variation in the placement of a small square relative to the main T-shape structure.
### Components/Axes
- **Primary Structure**:
- A vertical rectangular prism (dark blue) attached to the left side of a horizontal rectangular prism (light blue), forming a T-shape.
- A smaller square (dark blue) is positioned at the top-left corner of the vertical prism.
- **Configurations (A-D)**:
- **A**: Square attached to the left side of the horizontal prism.
- **B**: Square attached to the right side of the horizontal prism.
- **C**: Square attached to the bottom of the vertical prism.
- **D**: Square attached to the top-left corner of the horizontal prism.
### Detailed Analysis
- **Primary Structure**:
- The T-shape consists of two orthogonal rectangular prisms: one vertical (height > width) and one horizontal (width > height).
- The square attachment is consistently dark blue, matching the vertical prism's color.
- **Configurations**:
- **A**: Square is offset to the left of the horizontal prism, creating an asymmetrical extension.
- **B**: Square is offset to the right of the horizontal prism, mirroring the asymmetry of A but in the opposite direction.
- **C**: Square is positioned at the base of the vertical prism, extending downward.
- **D**: Square is placed at the top-left corner of the horizontal prism, overlapping slightly with the vertical prism.
### Key Observations
1. **Spatial Relationships**:
- The square's position varies across configurations, altering the overall geometry of the T-shape.
- Configurations A and B are horizontally mirrored, while C and D occupy unique vertical/horizontal positions.
2. **Color Consistency**:
- All squares are dark blue, matching the vertical prism's color, suggesting a shared material or functional property.
3. **Symmetry**:
- No configuration exhibits perfect symmetry; all introduce asymmetry through square placement.
### Interpretation
The diagram likely illustrates a spatial reasoning problem, such as determining the correct assembly of components based on positional constraints. The primary structure serves as a reference, while the configurations (A-D) test understanding of spatial relationships. For example:
- **A vs. B**: Tests recognition of left/right orientation.
- **C vs. D**: Tests vertical vs. horizontal placement logic.
- **D**: Combines horizontal and vertical alignment, requiring multi-axis reasoning.
The absence of numerical data or explicit rules implies the focus is on geometric intuition rather than quantitative analysis. This type of diagram is common in puzzles, engineering blueprints, or cognitive tests evaluating spatial awareness.