\n
## Diagram: Response Categorization
### Overview
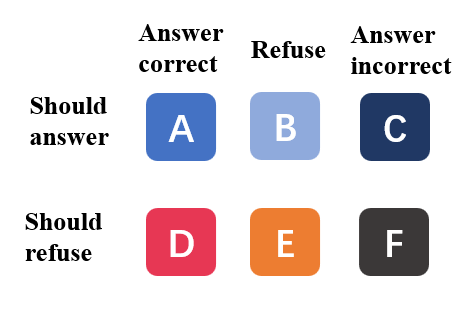
The image presents a 2x3 grid categorizing responses based on correctness and whether a response should be provided. The grid uses color-coding and letter labels to denote different categories.
### Components/Axes
The diagram is organized into two main axes:
* **Rows:** "Should answer" and "Should refuse". These represent the action to be taken regarding a potential response.
* **Columns:** "Answer correct", "Refuse", and "Answer incorrect". These represent the quality or validity of a potential response.
The grid cells are color-coded as follows:
* **A (Blue):** Answer correct, Should answer
* **B (Light Blue):** Refuse, Should answer
* **C (Dark Blue):** Answer incorrect, Should answer
* **D (Red):** Answer correct, Should refuse
* **E (Orange):** Refuse, Should refuse
* **F (Black):** Answer incorrect, Should refuse
Each cell contains a single letter (A-F) in white text.
### Detailed Analysis or Content Details
The diagram categorizes responses into six distinct scenarios:
1. **A (Blue):** A correct answer that should be provided.
2. **B (Light Blue):** A refusal that should be provided (potentially a refusal to answer an inappropriate question).
3. **C (Dark Blue):** An incorrect answer that should be provided (perhaps a demonstration of a wrong approach).
4. **D (Red):** A correct answer that should *not* be provided.
5. **E (Orange):** A refusal that should *not* be provided.
6. **F (Black):** An incorrect answer that should *not* be provided.
### Key Observations
The diagram highlights a seemingly counterintuitive categorization where incorrect answers and refusals can sometimes be appropriate to provide (C, B) and correct answers can sometimes be inappropriate (D). The color scheme is used to visually distinguish the different categories.
### Interpretation
This diagram likely represents a set of rules or guidelines for a system or agent that handles questions or requests. It suggests that the decision to provide a response isn't solely based on its correctness, but also on the context and whether a response is appropriate. For example, a system might be programmed to provide an incorrect answer as a teaching example, or to refuse to answer questions that are outside its scope. The diagram implies a nuanced approach to response handling, going beyond simple correctness checks. The use of "Should refuse" suggests a deliberate action of withholding information, rather than simply being unable to provide a correct answer. This could be related to safety protocols, privacy concerns, or limitations of the system's knowledge.