\n
## Diagram: State Transition Diagram
### Overview
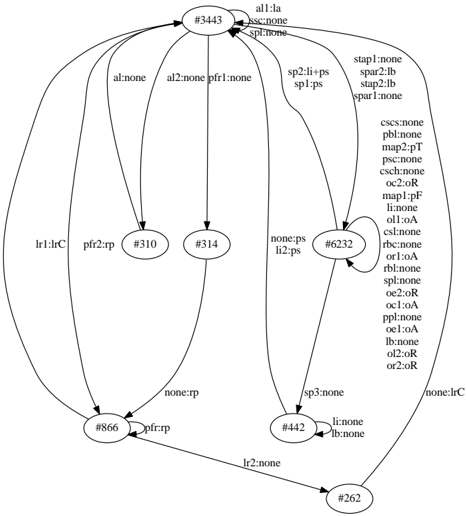
The image depicts a state transition diagram with several interconnected nodes representing states, and directed edges representing transitions between those states. Each transition is labeled with conditions or events that trigger the change. The nodes are numbered with hash symbols (#) followed by a numerical identifier. Each transition is labeled with a condition, formatted as "variable:value".
### Components/Axes
The diagram consists of the following nodes (states): #3443, #310, #314, #6232, #866, #442, #262.
The diagram consists of the following transitions (edges) with associated conditions:
* al1:la
* al2:none
* pfl:none
* sp1:ps
* sp2:li+ps
* stap1:none
* spar2:lb
* stap2:lb
* spar1:none
* lr1:C
* pfr2:rp
* none:ps
* li2:ps
* sp3:none
* none:rp
* lr2:none
* cscs:none
* pbl:none
* map1:pT
* psc:none
* csch:none
* oc2:oR
* li:none
* ol1:oA
* csl:none
* rbc:none
* or1:oA
* rbl:none
* spl:none
* oe2:oR
* oc1:oA
* ppln:none
* oe1:oA
* lb:none
* ol2:oR
* or2:oR
* none:lrC
* li:none
* lb:none
### Detailed Analysis / Content Details
The diagram can be described as follows:
1. **#3443** is the starting node. It has outgoing transitions to #310 (labeled "al1:la", "al2:none", "pfl:none"), and #6232 (labeled "sp1:ps", "sp2:li+ps").
2. **#310** has outgoing transitions to #314 (labeled "lr1:C", "pfr2:rp") and #866 (labeled "none:rp").
3. **#314** has outgoing transitions to #6232 (labeled "none:ps", "li2:ps").
4. **#6232** has outgoing transitions to #442 (labeled "sp3:none") and #262 (labeled "none:lrC").
5. **#866** has outgoing transitions to #310 (labeled "none:rp") and #262 (labeled "lr2:none").
6. **#442** has outgoing transitions to #262 (labeled "li:none", "lb:none").
7. **#262** is a terminal node.
The transitions from #6232 are further annotated with multiple conditions:
* cscs:none
* pbl:none
* map1:pT
* psc:none
* csch:none
* oc2:oR
* li:none
* ol1:oA
* csl:none
* rbc:none
* or1:oA
* rbl:none
* spl:none
* oe2:oR
* oc1:oA
* ppln:none
* oe1:oA
* lb:none
* ol2:oR
* or2:oR
### Key Observations
The diagram shows a complex flow with loops (e.g., #310 to itself via #866). Node #6232 appears to be a central hub, receiving transitions from multiple nodes and branching out to others. The conditions on the transitions are diverse, suggesting a system with many possible states and transitions. The multiple conditions associated with the transitions from #6232 suggest a complex decision-making process at that state.
### Interpretation
This diagram likely represents a finite state machine or a similar model of a system with discrete states and transitions. The conditions on the transitions represent the events or criteria that must be met for the system to move from one state to another. The diagram could be used to model a variety of systems, such as a communication protocol, a control system, or a software application. The complexity of the diagram suggests that the system being modeled is relatively complex. The presence of loops indicates that the system can revisit previous states. The detailed conditions on the transitions from #6232 suggest that this state is a critical decision point in the system. The diagram is a visual representation of the system's behavior, and can be used to analyze and understand its dynamics. The labels "lr", "sp", "pf", "al", "li", "lb", "oc", "ol", "or", "rb", "cs", "pp", "map", "psc", "csch" likely represent different variables or parameters within the system. The values "la", "none", "ps", "li+ps", "C", "rp", "oR", "oA", "pT" represent the possible values for those variables.