## Diagram: Proof Tactics with and without Backtracking
### Overview
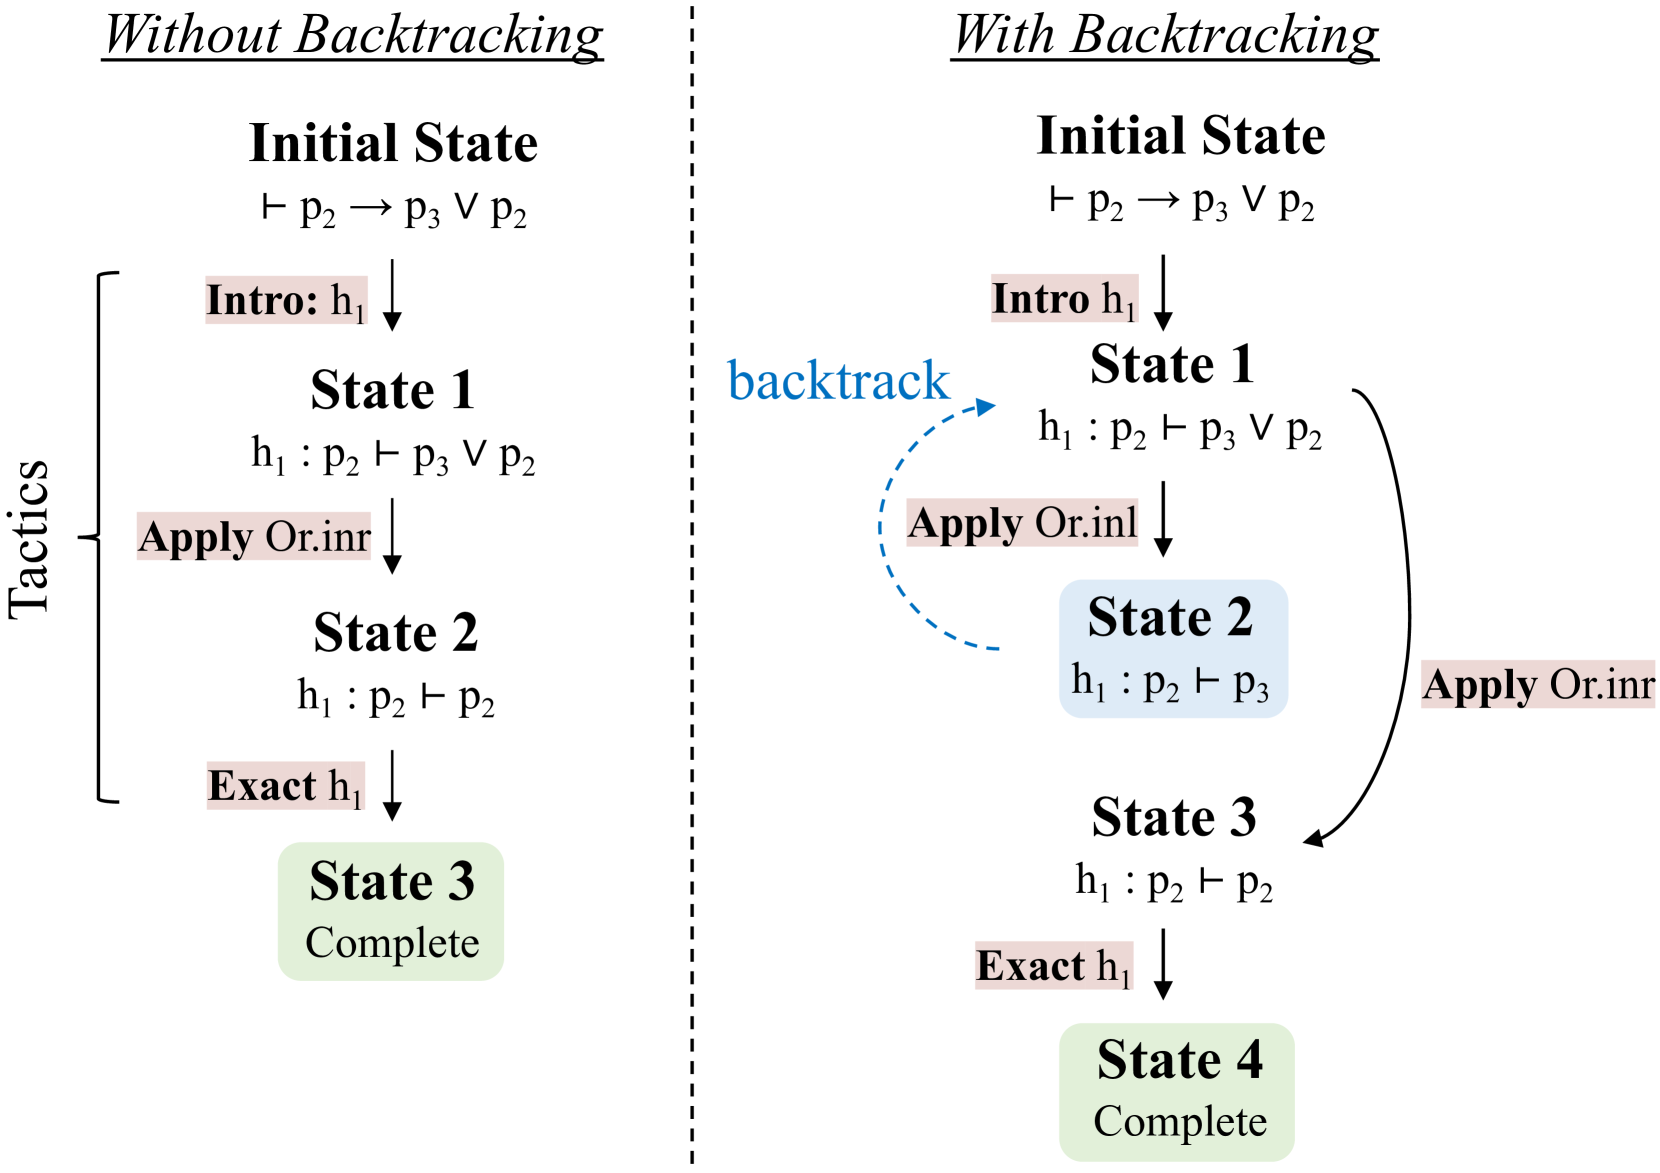
The image presents two diagrams illustrating proof tactics, one "Without Backtracking" and the other "With Backtracking." Each diagram shows a sequence of states and the tactics applied to transition between them, demonstrating how a proof can be completed. The diagram on the right shows a backtracking step.
### Components/Axes
* **Titles:** "Without Backtracking" (left), "With Backtracking" (right)
* **States:** "Initial State", "State 1", "State 2", "State 3", "State 4"
* **Tactics:** "Intro: h₁", "Apply Or.inr", "Apply Or.inl", "Exact h₁"
* **Logic Statements:**
* ⊢ p₂ → p₃ ∨ p₂
* h₁ : p₂ ⊢ p₃ ∨ p₂
* h₁ : p₂ ⊢ p₂
* h₁ : p₂ ⊢ p₃
* **Arrows:** Indicate the flow of applying tactics.
* **Backtrack Arrow:** A dashed blue arrow labeled "backtrack" indicates a return to a previous state.
* **Tactics Bracket:** A bracket on the left side of the "Without Backtracking" diagram is labeled "Tactics".
### Detailed Analysis
**Left Diagram: Without Backtracking**
* **Initial State:** ⊢ p₂ → p₃ ∨ p₂
* **Intro: h₁:** Applied to the Initial State.
* **State 1:** h₁ : p₂ ⊢ p₃ ∨ p₂
* **Apply Or.inr:** Applied to State 1.
* **State 2:** h₁ : p₂ ⊢ p₂
* **Exact h₁:** Applied to State 2.
* **State 3:** Complete
**Right Diagram: With Backtracking**
* **Initial State:** ⊢ p₂ → p₃ ∨ p₂
* **Intro h₁:** Applied to the Initial State.
* **State 1:** h₁ : p₂ ⊢ p₃ ∨ p₂
* **Apply Or.inl:** Applied to State 1.
* **State 2:** h₁ : p₂ ⊢ p₃
* **Apply Or.inr:** Applied to State 2, resulting in a loop back to State 1.
* **State 3:** h₁ : p₂ ⊢ p₂
* **Exact h₁:** Applied to State 3.
* **State 4:** Complete
* **Backtrack:** A blue dashed arrow points from "Apply Or.inl" back to "State 1", labeled "backtrack".
### Key Observations
* The "Without Backtracking" diagram shows a direct path to completing the proof.
* The "With Backtracking" diagram demonstrates a scenario where applying a tactic ("Apply Or.inl") leads to a state from which the proof cannot be directly completed, necessitating a return to a previous state ("State 1") and the application of a different tactic ("Apply Or.inr").
### Interpretation
The diagrams illustrate the concept of backtracking in proof tactics. In the "Without Backtracking" scenario, the correct sequence of tactics is applied directly, leading to a completed proof. However, in the "With Backtracking" scenario, an initial tactic choice leads to a dead end, requiring the system to "backtrack" to a previous state and try a different tactic. This highlights the search process involved in automated theorem proving, where multiple paths may be explored before a successful proof is found. The "backtrack" arrow visually represents this process of undoing a step and trying an alternative.