## Diagram: Comparison of Proof Tactics with/Without Backtracking
### Overview
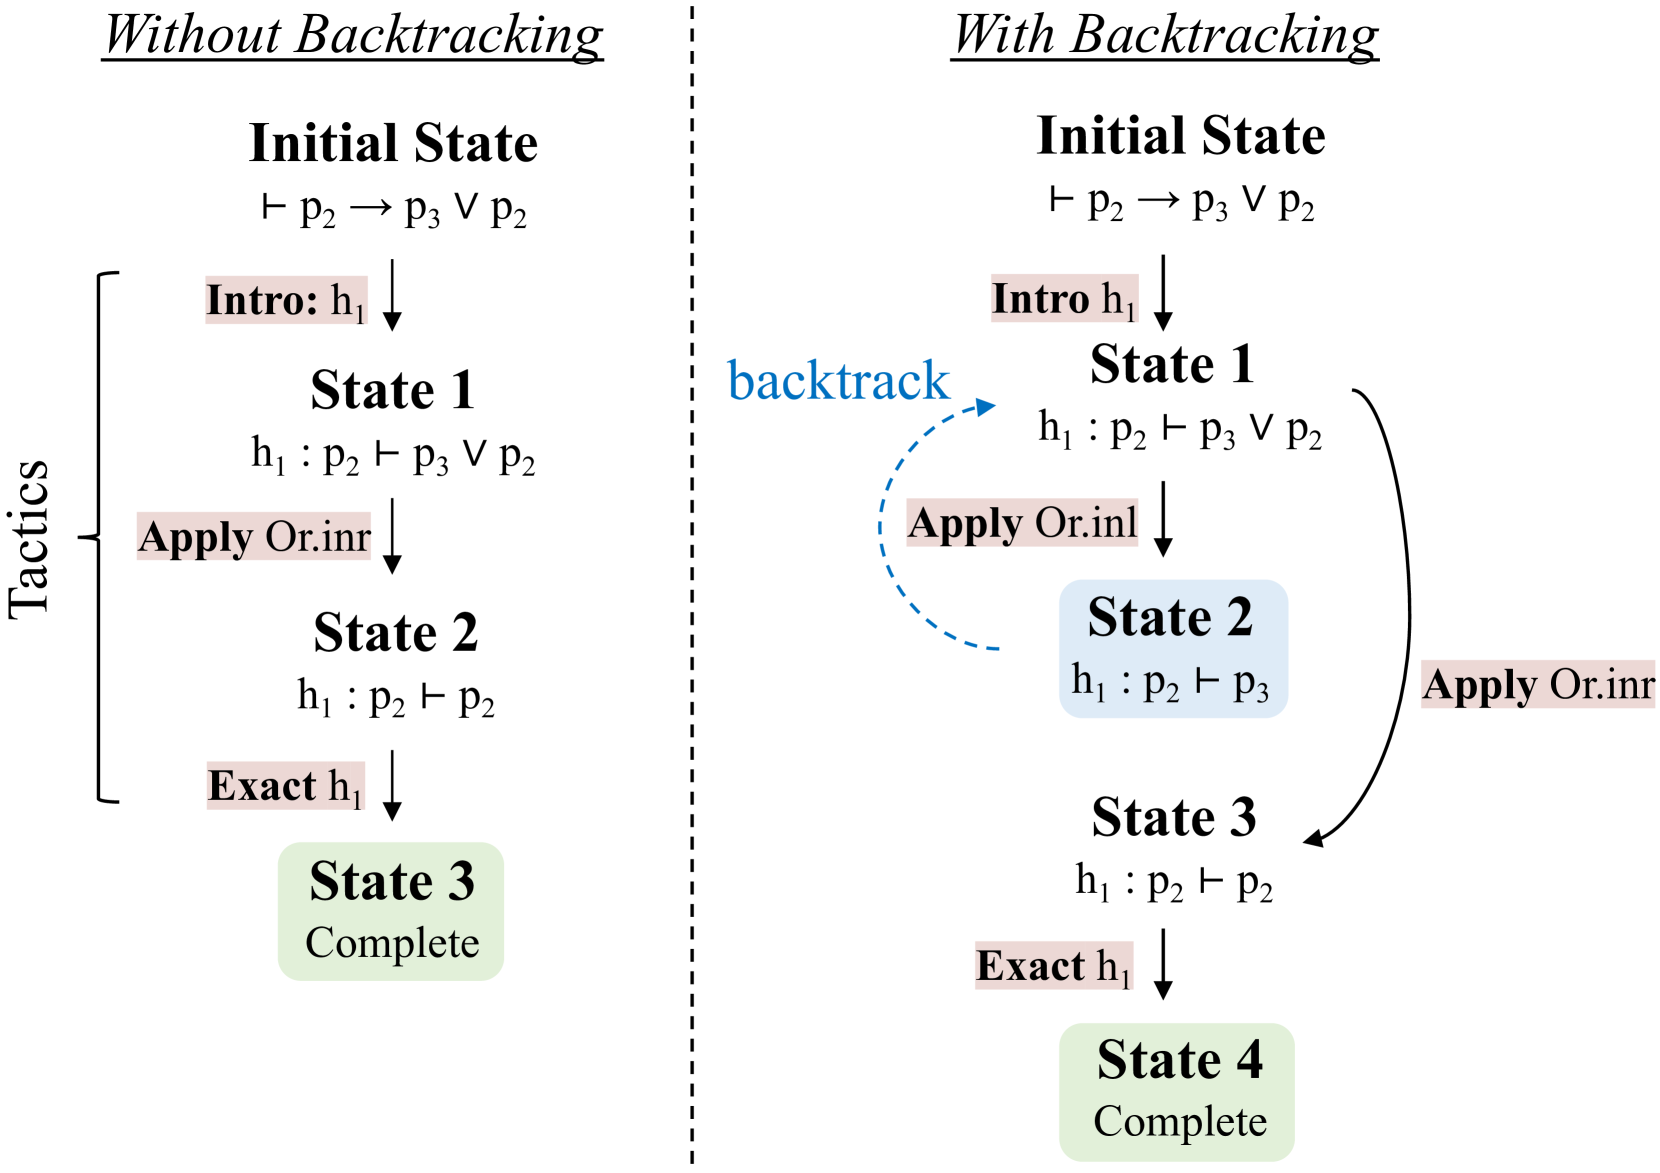
The diagram illustrates two parallel proof processes: one without backtracking (left) and one with backtracking (right). Both processes start from the same initial state but diverge in their handling of logical operations and state transitions. The "With Backtracking" side includes a feedback loop, enabling revisiting previous states.
---
### Components/Axes
- **Left Side (Without Backtracking)**:
- **Initial State**: `p2 → p3 ∨ p2`
- **Tactics**:
- `Intro h1` → **State 1**: `h1 : p2 ∨ p3 ∨ p2`
- `Apply Or.inr` → **State 2**: `h1 : p2 ∨ p2`
- `Exact h1` → **State 3**: `Complete`
- **Flow**: Linear progression from State 1 → State 2 → State 3.
- **Right Side (With Backtracking)**:
- **Initial State**: `p2 → p3 ∨ p2` (identical to left)
- **Tactics**:
- `Intro h1` → **State 1**: `h1 : p2 ∨ p3 ∨ p2`
- `Apply Or.inl` → **State 2**: `h1 : p2 ∨ p3`
- `Apply Or.inr` (backtrack) → **State 2** (revisited)
- `Apply Or.inr` → **State 3**: `h1 : p2 ∨ p2`
- `Exact h1` → **State 4**: `Complete`
- **Flow**: Non-linear with a feedback loop from State 2 → State 1 via `Apply Or.inl`.
---
### Detailed Analysis
#### Left Side (Without Backtracking)
1. **State 1**: Introduces hypothesis `h1` with disjunction `p2 ∨ p3 ∨ p2`.
2. **State 2**: Applies `Or.inr` (right disjunct) to simplify to `p2 ∨ p2`.
3. **State 3**: Finalizes with `Exact h1`, marking completion.
#### Right Side (With Backtracking)
1. **State 1**: Same as left, but uses `Or.inl` (left disjunct) to transition to **State 2**: `h1 : p2 ∨ p3`.
2. **Backtracking**: From **State 2**, `Apply Or.inr` reverts to **State 1**, enabling exploration of alternative paths.
3. **State 3**: Reapplies `Or.inr` to simplify to `p2 ∨ p2`.
4. **State 4**: Finalizes with `Exact h1`, marked as complete.
---
### Key Observations
1. **Backtracking Mechanism**: The right diagram introduces a feedback loop (`Apply Or.inl` → **State 1**), allowing revisiting of earlier states. This is absent in the left diagram.
2. **State Labeling**: Final states differ (`State 3` vs. `State 4`), suggesting distinct proof paths.
3. **Tactic Usage**:
- Left: Uses `Or.inr` once.
- Right: Uses `Or.inl` and `Or.inr` with backtracking, leading to a different final state.
---
### Interpretation
- **Purpose of Backtracking**: The right diagram demonstrates how backtracking enables exhaustive exploration of proof paths. By revisiting **State 1**, the process can test alternative disjuncts (`Or.inl` vs. `Or.inr`), potentially leading to a more robust or generalized proof.
- **State Completeness**: Both paths terminate in a "Complete" state, but the right diagram’s additional state (`State 4`) implies a more complex or extended proof process.
- **Logical Structure**: The use of `Or.inl`/`Or.inr` reflects handling of disjunctions in proof systems, where backtracking allows revisiting hypotheses to explore all possible cases.
This diagram highlights the trade-off between simplicity (left) and flexibility (right) in proof construction, with backtracking enabling deeper exploration at the cost of increased complexity.