TECHNICAL ASSET FINGERPRINT
9e12208b7160ed08703dfa2d
Click to view fullscreen
Press ESC or click to close
FOUND IN PAPERS
EXPERT: gemini-3.1-pro-preview VERSION 1
RUNTIME: gemini/gemini-3.1-pro-preview
INTEL_VERIFIED
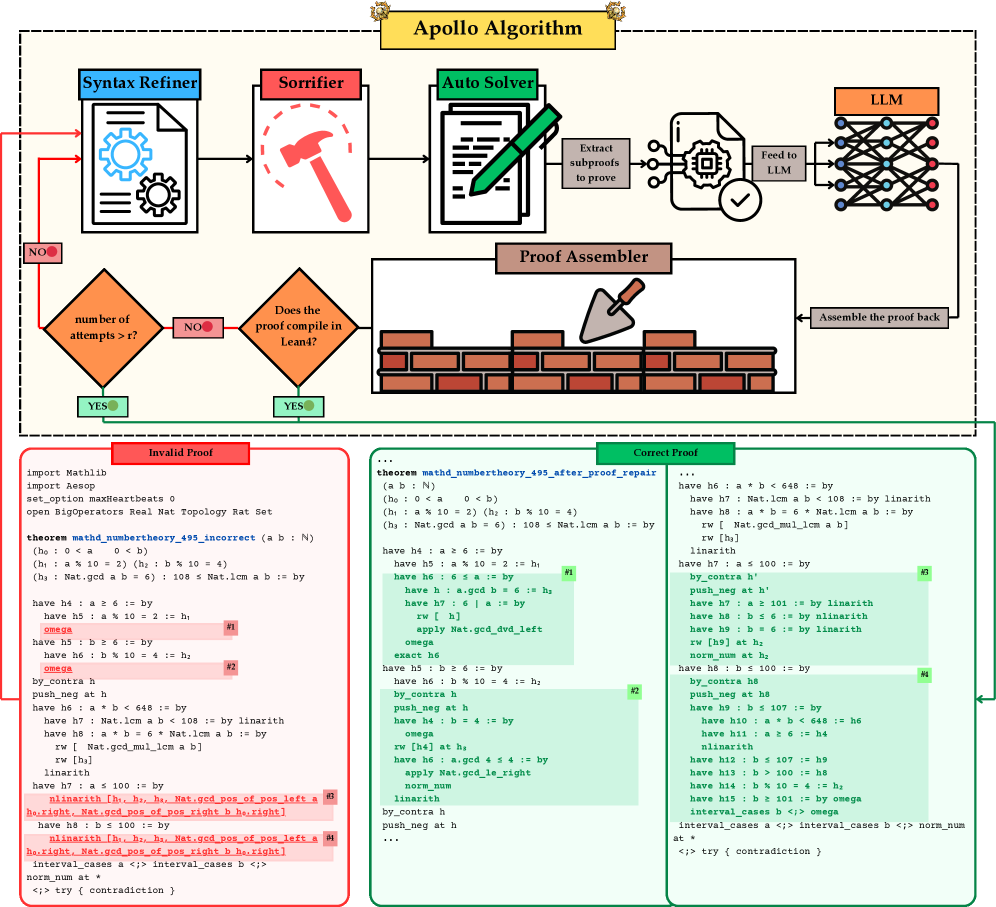
## Diagram: Apollo Algorithm Workflow and Proof Repair
### Overview
This image presents a technical flowchart and code comparison illustrating the "Apollo Algorithm," an automated system designed to repair formal mathematical proofs (specifically in the Lean 4 programming language) using a combination of symbolic tools and Large Language Models (LLMs). The top half displays the iterative workflow of the algorithm, while the bottom half provides a concrete before-and-after example of a Lean 4 proof being repaired.
### Components
The image is divided into three main spatial regions:
1. **Header & Main Flowchart (Top half):** A dashed rectangular border encloses the step-by-step process of the Apollo Algorithm.
2. **Invalid Proof (Bottom-left):** A code block outlined in red, showing a failing mathematical proof with specific errors highlighted.
3. **Correct Proof (Bottom-right):** A code block outlined in green, showing the successfully repaired proof with the corrected sections highlighted.
### Content Details
#### 1. Main Flowchart (Top Section)
The workflow proceeds through several distinct nodes, connected by directional arrows:
* **Syntax Refiner:** Located at the top-left. Represented by a blue box with an icon of a document and gears. An arrow points right to the Sorrifier.
* **Sorrifier:** Represented by a red box with an icon of a hammer breaking a dashed circle. An arrow points right to the Auto Solver.
* **Auto Solver:** Represented by a green box with an icon of a document and a green pen. An arrow points right to a sequence of LLM interactions.
* **LLM Interaction Sequence:**
* A gray box labeled `Extract subproofs to prove` points to an icon of a document with a microchip and checkmark.
* A gray box labeled `Feed to LLM` points to the **LLM** node (orange box, neural network icon).
* An arrow points down from the LLM to a gray box labeled `Assemble the proof back`.
* An arrow points left to the **Proof Assembler** (brown box, icon of a trowel building a brick wall).
* **Decision Loop:** From the Proof Assembler, an arrow points down to a decision diamond.
* **Decision Diamond 1 (Right):** Orange diamond labeled `Does the proof compile in Lean4?`.
* **YES (Green circle):** An arrow points down, exiting the dashed box and pointing to the "Correct Proof" block.
* **NO (Red circle):** An arrow points left to the second decision diamond.
* **Decision Diamond 2 (Left):** Orange diamond labeled `number of attempts > r?`.
* **NO (Red circle):** An arrow loops up and left, returning to the **Syntax Refiner** to start the process over.
* **YES (Green circle):** An arrow points down, exiting the dashed box and pointing to the "Invalid Proof" block.
#### 2. Invalid Proof (Bottom-Left Section)
This section contains Lean 4 code with a red border and a red header labeled "Invalid Proof". Four specific lines/blocks of code are highlighted in red and tagged with numbers `#1` through `#4`.
**Transcription of Invalid Proof Code:**
```lean
import Mathlib
import Aesop
set_option maxHeartbeats 0
open BigOperators Real Nat Topology Rat Set
theorem mathd_numbertheory_495_incorrect (a b : N)
(h₀ : 0 < a 0 < b)
(h₁ : a % 10 = 2) (h₂ : b % 10 = 4)
(h₃ : Nat.gcd a b = 6) : 108 ≤ Nat.lcm a b := by
have h4 : a ≥ 6 := by
have h5 : a % 10 = 2 := h₁
omega #1 (Highlighted Red)
have h5 : b ≥ 6 := by
have h6 : b % 10 = 4 := h₂
omega #2 (Highlighted Red)
by_contra h
push_neg at h
have h6 : a * b < 648 := by
have h7 : Nat.lcm a b < 108 := by linarith
have h8 : a * b = 6 * Nat.lcm a b := by
rw [ Nat.gcd_mul_lcm a b ]
rw [h₃]
linarith
have h7 : a ≤ 100 := by
nlinarith [h₁, h₂, h₃, Nat.gcd_pos_of_pos_left a h₀.right, #3 (Highlighted Red)
h₀.right, Nat.gcd_pos_of_pos_right b h₀.right] (Highlighted Red)
have h8 : b ≤ 100 := by
nlinarith [h₁, h₂, h₃, Nat.gcd_pos_of_pos_left a h₀.right, #4 (Highlighted Red)
h₀.right, Nat.gcd_pos_of_pos_right b h₀.right] (Highlighted Red)
interval_cases a <;> interval_cases b <;>
norm_num at *
<;> try { contradiction }
```
#### 3. Correct Proof (Bottom-Right Section)
This section contains Lean 4 code with a green border and a green header labeled "Correct Proof". It is formatted in two columns. Four specific blocks of code are highlighted in green and tagged with numbers `#1` through `#4`, corresponding directly to the red tags in the invalid proof.
**Transcription of Correct Proof Code (Left Column):**
```lean
...
theorem mathd_numbertheory_495_after_proof_repair
(a b : N)
(h₀ : 0 < a 0 < b)
(h₁ : a % 10 = 2) (h₂ : b % 10 = 4)
(h₃ : Nat.gcd a b = 6) : 108 ≤ Nat.lcm a b := by
have h4 : a ≥ 6 := by
have h5 : a % 10 = 2 := h₁
have h6 : 6 ≤ a := by #1 (Highlighted Green Start)
have h : a.gcd b = 6 := h₃
have h7 : 6 | a := by
rw [ ← h ]
apply Nat.gcd_dvd_left
omega
exact h6 (Highlighted Green End)
have h5 : b ≥ 6 := by
have h6 : b % 10 = 4 := h₂
by_contra h #2 (Highlighted Green Start)
push_neg at h
have h4 : b = 4 := by
omega
rw [h4] at h₃
have h6 : a.gcd 4 ≤ 4 := by
apply Nat.gcd_le_right
norm_num
linarith (Highlighted Green End)
by_contra h
push_neg at h
...
```
**Transcription of Correct Proof Code (Right Column):**
```lean
...
have h6 : a * b < 648 := by
have h7 : Nat.lcm a b < 108 := by linarith
have h8 : a * b = 6 * Nat.lcm a b := by
rw [ Nat.gcd_mul_lcm a b ]
rw [h₃]
linarith
have h7 : a ≤ 100 := by
by_contra h' #3 (Highlighted Green Start)
push_neg at h'
have h7 : a ≥ 101 := by linarith
have h8 : b ≤ 6 := by nlinarith
have h9 : b = 6 := by linarith
rw [h9] at h₂
norm_num at h₂ (Highlighted Green End)
have h8 : b ≤ 100 := by
by_contra h8 #4 (Highlighted Green Start)
push_neg at h8
have h9 : b ≤ 107 := by
have h10 : a * b < 648 := h6
have h11 : a ≥ 6 := h4
nlinarith
have h12 : b ≤ 107 := h9
have h13 : b > 100 := h8
have h14 : b % 10 = 4 := h₂
have h15 : b ≥ 101 := by omega
interval_cases b <;> omega (Highlighted Green End)
interval_cases a <;> interval_cases b <;> norm_num at *
<;> try { contradiction }
```
### Key Observations
* **Direct Substitution:** The tags `#1`, `#2`, `#3`, and `#4` serve as a visual legend connecting the two code blocks. The algorithm identifies failing single-line tactics (like `omega` or `nlinarith` in the red block) and replaces them with expanded, multi-step subproofs (in the green block) that successfully compile.
* **Iterative Loop:** The flowchart explicitly shows that if the LLM's generated proof does not compile in Lean 4, the system does not immediately fail. Instead, it loops back to the "Syntax Refiner" to try again, up to a maximum number of attempts (`r`).
* **Failure State:** If the number of attempts exceeds `r`, the algorithm outputs the "Invalid Proof" (the red path).
* **Success State:** If the proof compiles, it outputs the "Correct Proof" (the green path).
### Interpretation
This diagram illustrates a "neuro-symbolic" approach to automated theorem proving.
1. **The Problem:** Large Language Models (LLMs) are good at generating code but often make logical or syntactic errors in strict formal environments like Lean 4.
2. **The Solution (Apollo):** The Apollo Algorithm uses the strict Lean 4 compiler as a verifiable "ground truth." It isolates broken parts of a proof ("Extract subproofs to prove"), asks the LLM to fix only those specific parts, and then reassembles the proof.
3. **The Loop:** By placing the LLM inside a `while` loop governed by the Lean 4 compiler (`Does the proof compile?`), the system forces the LLM to iteratively refine its output until it is mathematically sound, rather than accepting its first guess. The before-and-after code blocks demonstrate that the LLM is capable of taking a failing, overly-optimistic tactic (like expecting `omega` to solve a complex goal) and breaking it down into rigorous, step-by-step logical deductions that satisfy the compiler.
DECODING INTELLIGENCE...