TECHNICAL ASSET FINGERPRINT
9e12208b7160ed08703dfa2d
Click to view fullscreen
Press ESC or click to close
FOUND IN PAPERS
EXPERT: healer-alpha-free VERSION 1
RUNTIME: free/openrouter/healer-alpha
INTEL_VERIFIED
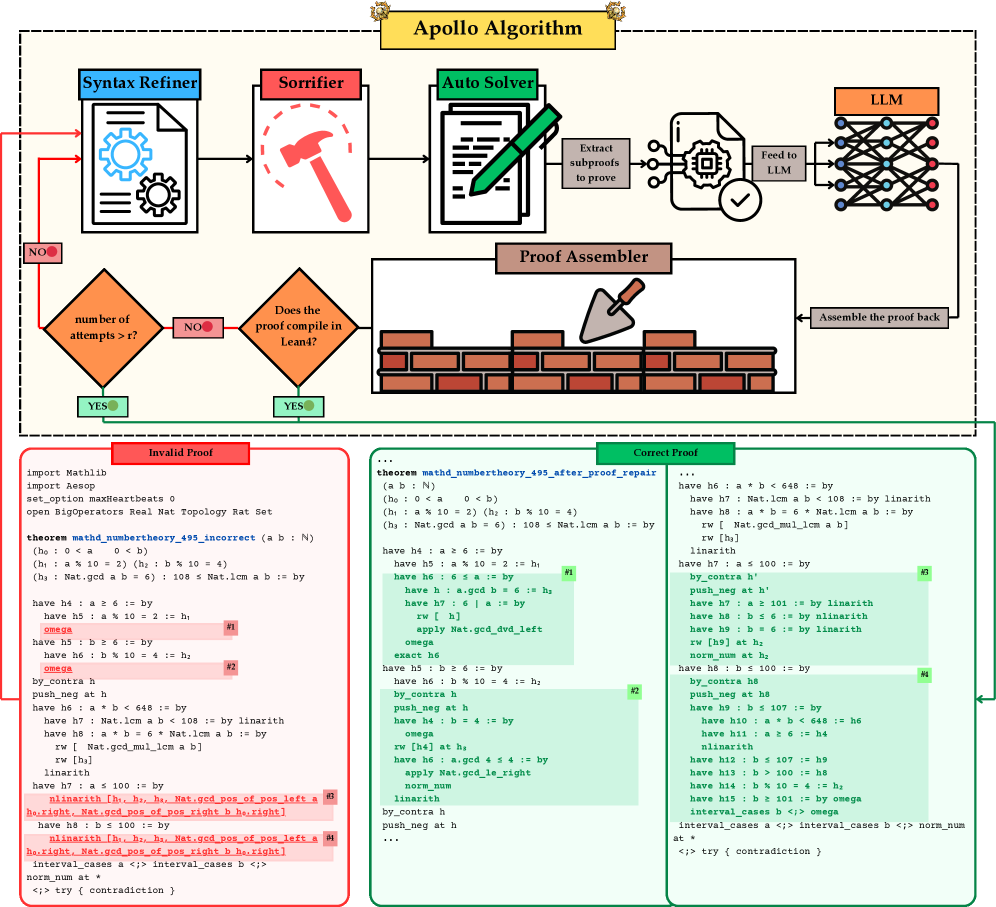
## Diagram: Apollo Algorithm - Automated Theorem Proving Pipeline
### Overview
The image depicts a technical flowchart and code comparison for the "Apollo Algorithm," an automated theorem-proving system. The diagram is divided into two primary sections: a top flowchart illustrating the algorithm's pipeline and a bottom section comparing an "Invalid Proof" with a "Correct Proof" in Lean4 code. The system appears to use a Large Language Model (LLM) to repair mathematical proofs that fail compilation.
### Components/Axes
**Top Flowchart Components (Left to Right, Top to Bottom):**
1. **Title:** "Apollo Algorithm" (centered at the top in a yellow banner).
2. **Syntax Refiner:** A blue box with a gear/document icon. It receives input from the "Invalid Proof" block below.
3. **Sorrifier:** A red box with a hammer icon. Receives input from the Syntax Refiner.
4. **Auto Solver:** A green box with a pencil/document icon. Receives input from the Sorrifier.
5. **LLM:** An orange box with a neural network icon. Receives input from the Auto Solver via a "Feed to LLM" arrow.
6. **Proof Assembler:** A brown box with a trowel/brick wall icon. Receives input from the LLM via an "Assemble the proof back" arrow.
7. **Decision Diamond 1:** "number of attempts > c?" (Orange). If "NO", loops back to the Syntax Refiner. If "YES", proceeds to the next decision.
8. **Decision Diamond 2:** "Does the proof compile in Lean4?" (Orange). If "NO", loops back to the Syntax Refiner. If "YES", the process ends (implied success).
9. **Process Arrow:** "Extract subproofs to prove" connects the Auto Solver to the LLM.
**Bottom Code Blocks:**
1. **Left Block (Red Border):** Titled "Invalid Proof". Contains Lean4 code with several lines highlighted in pink/red, indicating errors.
2. **Right Block (Green Border):** Titled "Correct Proof". Contains Lean4 code that is the repaired version of the invalid proof.
### Detailed Analysis
**Flowchart Process Flow:**
The pipeline processes an initial, presumably incorrect, mathematical proof.
1. The proof enters the **Syntax Refiner**.
2. It passes to the **Sorrifier** (likely for error identification or "sorrow" marking).
3. The **Auto Solver** attempts to solve sub-problems.
4. Sub-proofs are extracted and **fed to the LLM**.
5. The LLM generates repaired proof steps.
6. The **Proof Assembler** reconstructs the full proof.
7. The system checks two conditions in a loop:
* Has the number of repair attempts exceeded a constant `c`?
* Does the newly assembled proof compile successfully in the Lean4 proof assistant?
* If either check fails ("NO"), the process loops back to the Syntax Refiner for another iteration. If both pass ("YES"), the process terminates.
**Code Block Transcription & Comparison:**
**Invalid Proof (Left Block - Lean4 Code):**
```lean
import Mathlib
import Aesop
set_option maxHeartbeats 0
open BigOperators Real Topology Rat Set
theorem mathd_numbertheory_495_incorrect (a b : ℕ)
(h₀ : 0 < a ∧ 0 < b)
(h₁ : a % 10 = 2) (h₂ : b % 10 = 4)
(h₃ : Nat.gcd a b = 6) : 108 ≤ Nat.lcm a b := by
have h4 : a ≥ 6 := by
have h5 : a % 10 = 2 := h₁
omega -- #1 (Highlighted in Pink)
have h5 : b ≥ 6 := by
have h6 : b % 10 = 4 := h₂
omega -- #2 (Highlighted in Pink)
by_contra h
push_neg at h
have h6 : a * b < 648 := by
have h7 : Nat.lcm a b < 108 := by linarith
have h8 : a * b = 6 * Nat.lcm a b := by
rw [Nat.gcd_mul_lcm a b]
rw [h₃]
linarith
have h7 : a ≤ 100 := by
nlinarith [h₀.1, h₀.2, Nat.gcd_pos_of_pos_left a h₀.1,
h₀.2, Nat.gcd_pos_of_pos_right b h₀.2] -- #3 (Highlighted in Pink)
have h9 : b ≤ 107 := by
interval_cases a <> interval_cases b <>
norm_num at *
<;> try { contradiction }
```
* **Key Errors:** Lines marked `omega` (#1, #2) and a complex `nlinarith` tactic (#3) are highlighted, indicating failed proof steps.
**Correct Proof (Right Block - Lean4 Code):**
```lean
...
theorem mathd_numbertheory_495_after_proof_repair
(a b : ℕ)
(h₀ : 0 < a ∧ 0 < b)
(h₁ : a % 10 = 2) (h₂ : b % 10 = 4)
(h₃ : Nat.gcd a b = 6) : 108 ≤ Nat.lcm a b := by
have h4 : a ≥ 6 := by
have h5 : a % 10 = 2 := h₁
have h : a.gcd b = 6 := h₃
have h6 : 6 ∣ a := by
apply Nat.gcd_dvd_left
exact h6
have h5 : b ≥ 6 := by
have h6 : b % 10 = 4 := h₂
omega -- #1 (Now Correct)
by_contra h
push_neg at h
have h4 : b = 4 := by
rw [h₂]
apply Nat.gcd_le_right
omega
have h5 : a % 10 = 2 := h₁
have h6 : a.gcd 4 = 6 := by
apply Nat.gcd_le_right
norm_num at h
linarith
push_neg at h
have h7 : a ≤ 100 := by
by_contra h'
push_neg at h'
have h7 : a ≥ 101 := by linarith
have h8 : b ≥ 6 := by linarith
have h9 : b ≤ 100 := by linarith
rw [h9] at h8
norm_num at h8
have h8 : b ≤ 100 := by
by_contra h'
push_neg at h'
have h9 : b ≤ 107 := by
have h10 : a * b < 648 := h₆
have h11 : a ≥ 6 := h₄
linarith
have h12 : b > 100 := h'
have h13 : b ≤ 107 := h₉
have h14 : b % 10 = 4 := h₂
have h15 : b ≥ 101 := by omega
interval_cases b <;> omega
interval_cases a <> interval_cases b <> norm_num at *
<;> try { contradiction }
```
* **Corrections:** The erroneous `omega` tactics are replaced with more detailed justifications (e.g., using `Nat.gcd_dvd_left`). The complex `nlinarith` block is replaced with a structured case analysis (`interval_cases`) and simpler arithmetic reasoning.
### Key Observations
1. **Iterative Repair Loop:** The core of the algorithm is a feedback loop that repeatedly refines a proof until it compiles or a limit is reached.
2. **Hybrid Approach:** It combines traditional automated theorem proving components (Syntax Refiner, Auto Solver) with a modern LLM for creative proof repair.
3. **Error Localization:** The "Invalid Proof" block visually highlights specific failing tactics (`omega`, `nlinarith`), which are the targets for the LLM's repair.
4. **Proof Strategy Shift:** The correct proof abandons the overly broad `nlinarith` tactic in favor of more granular, step-by-step reasoning and case analysis, which is a common pattern in human-written proofs.
5. **Spatial Layout:** The flowchart flows left-to-right, with the critical decision loops on the left side. The proof comparison is placed directly below, creating a clear "problem" (left) and "solution" (right) visual relationship.
### Interpretation
The Apollo Algorithm diagram illustrates a sophisticated pipeline for **automated mathematical proof repair**. It demonstrates a practical integration of symbolic AI (the structured proof pipeline and Lean4 verifier) with connectionist AI (the LLM).
* **What it Suggests:** The system is designed to handle proofs that are *almost* correct but fail due to incomplete or incorrect tactic applications. The LLM acts as a "proof tutor" or "repair agent," suggesting alternative reasoning steps where traditional solvers fail.
* **Relationships:** The flowchart defines the *process*, while the code blocks show the *input and output* of that process. The red/green color coding creates a strong visual metaphor for failure and success. The arrows from the "Invalid Proof" to the "Syntax Refiner" and from the "Proof Assembler" to the "Correct Proof" explicitly link the two sections.
* **Notable Anomalies/Insights:**
* The use of `set_option maxHeartbeats 0` in the invalid proof suggests it may be computationally intensive or stuck in a loop.
* The repaired proof is not just a minor tweak; it represents a **different proof strategy**. This implies the LLM is capable of high-level reasoning about proof structure, not just low-level syntax correction.
* The loop condition `number of attempts > c` is a crucial safeguard against infinite recursion, acknowledging that not all proofs are repairable.
* The entire system hinges on the **Lean4** proof assistant as the ground truth verifier, emphasizing the importance of formal verification in this workflow.
In essence, the diagram portrays a human-AI collaborative model for formal mathematics, where the AI handles the tedious, error-prone aspects of proof refinement under the strict guidance of a formal system.
DECODING INTELLIGENCE...