\n
## Diagram: Lambda Calculus Representations
### Overview
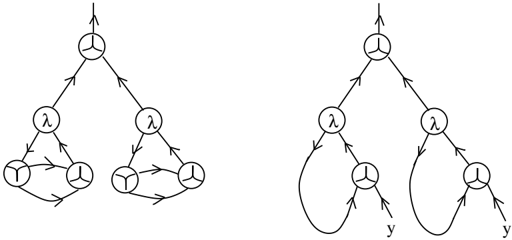
The image presents two diagrams representing lambda calculus expressions. Both diagrams utilize a tree-like structure with nodes labeled with either 'λ' (lambda) or unlabeled circles representing variables. Arrows indicate the flow of substitution or application. The diagrams visually depict the structure of lambda terms.
### Components/Axes
The diagrams consist of nodes (circles) and directed edges (arrows). The nodes are labeled with 'λ', 'y', or are left unlabeled, representing variables. The arrows show the direction of function application or variable substitution. There are no explicit axes or scales.
### Detailed Analysis or Content Details
**Diagram 1 (Left):**
* **Top Node:** An unlabeled circle with an outgoing arrow pointing upwards.
* **Second Layer:** Two nodes labeled 'λ', branching from the top node.
* **Third Layer (Left Branch):** Two unlabeled circles connected by a bidirectional arrow, and an arrow from the first circle to the 'λ' node above.
* **Third Layer (Right Branch):** Two unlabeled circles connected by a bidirectional arrow, and an arrow from the first circle to the 'λ' node above.
* **Overall Structure:** The diagram represents a lambda expression with two branches, each containing a lambda abstraction and a cycle between two variables.
**Diagram 2 (Right):**
* **Top Node:** An unlabeled circle with an outgoing arrow pointing upwards.
* **Second Layer:** Two nodes labeled 'λ', branching from the top node.
* **Third Layer (Left Branch):** An unlabeled circle with a loop back to the 'λ' node above, and an arrow pointing downwards labeled 'y'.
* **Third Layer (Right Branch):** An unlabeled circle with a loop back to the 'λ' node above, and an arrow pointing downwards labeled 'y'.
* **Overall Structure:** The diagram represents a lambda expression with two branches, each containing a lambda abstraction and a self-looping variable, with a 'y' variable as output.
### Key Observations
* Both diagrams share a similar top-level structure: an unlabeled node branching into two lambda abstractions.
* The left diagram features cycles between variables within each lambda branch, while the right diagram uses self-loops and a 'y' variable.
* The diagrams are visually distinct, representing different lambda calculus expressions.
### Interpretation
The diagrams illustrate different lambda calculus terms. The left diagram likely represents a more complex expression involving mutual recursion or a fixed-point computation due to the cycles. The right diagram represents a simpler expression, potentially a lambda abstraction that returns the 'y' variable. The diagrams demonstrate how lambda calculus can be visually represented using a graph-like structure, where nodes represent functions or variables, and edges represent application or substitution. The absence of numerical data means we can only interpret the structural relationships between the components. The diagrams are not providing quantitative data, but rather a qualitative representation of lambda calculus expressions. The 'y' in the right diagram suggests a potential output or argument to the lambda function. The diagrams are likely used to explain or visualize the concepts of lambda calculus, such as abstraction, application, and recursion.