## Bar Chart: Robustness: Stability Across Multiple Runs
### Overview
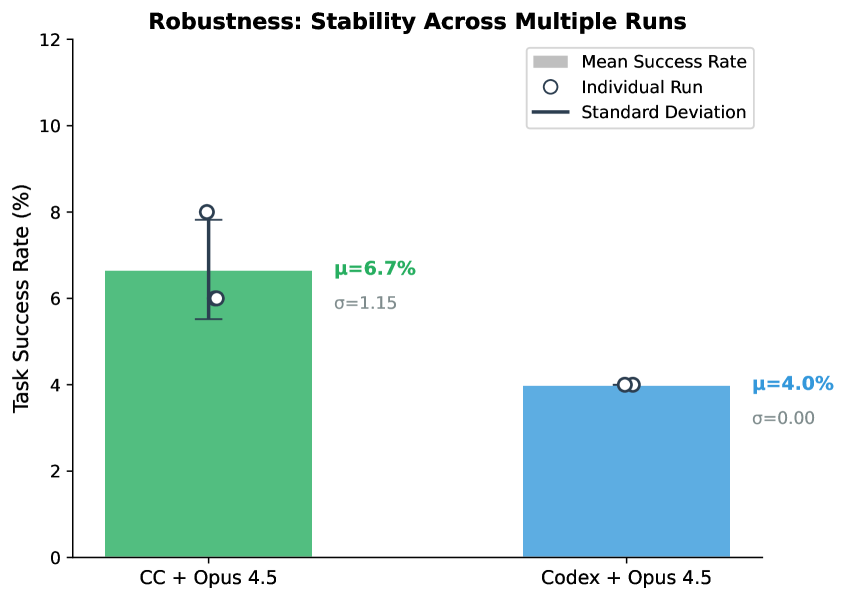
This is a bar chart comparing the task success rate and stability (measured by standard deviation) of two different systems or methods across multiple runs. The chart visually contrasts the mean performance and consistency of "CC + Opus 4.5" versus "Codex + Opus 4.5".
### Components/Axes
* **Title:** "Robustness: Stability Across Multiple Runs" (centered at the top).
* **Y-Axis:** Labeled "Task Success Rate (%)". The scale runs from 0 to 12, with major tick marks at intervals of 2 (0, 2, 4, 6, 8, 10, 12).
* **X-Axis:** Contains two categorical labels:
* Left: "CC + Opus 4.5"
* Right: "Codex + Opus 4.5"
* **Legend:** Located in the top-right corner. It defines three graphical elements:
* A gray filled rectangle: "Mean Success Rate"
* An open circle (○): "Individual Run"
* A dark gray line (—): "Standard Deviation"
* **Data Series:** Two bars, each with associated annotations and markers.
* **Left Bar (Green):** Represents "CC + Opus 4.5".
* **Right Bar (Blue):** Represents "Codex + Opus 4.5".
### Detailed Analysis
**1. CC + Opus 4.5 (Green Bar, Left Side):**
* **Mean Success Rate (μ):** Annotated in green text to the right of the bar as **μ=6.7%**. The bar height corresponds to this value.
* **Standard Deviation (σ):** Annotated in gray text below the mean as **σ=1.15**. A vertical error bar (dark gray line) extends from approximately 5.55% to 7.85% (6.7% ± 1.15%), visually representing this spread.
* **Individual Runs:** Two open circle markers are plotted.
* One circle is positioned at approximately **6.0%** on the y-axis, aligned with the top of the bar.
* A second circle is positioned at approximately **8.0%** on the y-axis, at the top of the error bar.
* **Trend/Verification:** The bar shows a moderate success rate with noticeable variability, as confirmed by the spread of the two individual data points and the non-zero standard deviation.
**2. Codex + Opus 4.5 (Blue Bar, Right Side):**
* **Mean Success Rate (μ):** Annotated in blue text to the right of the bar as **μ=4.0%**. The bar height corresponds to this value.
* **Standard Deviation (σ):** Annotated in gray text below the mean as **σ=0.00**. There is no visible error bar, consistent with a standard deviation of zero.
* **Individual Runs:** Two open circle markers are plotted.
* Both circles are positioned at exactly **4.0%** on the y-axis, overlapping at the top of the bar.
* **Trend/Verification:** The bar shows a lower success rate than the green bar but perfect consistency, as all individual runs achieved the exact same result (4.0%), resulting in zero standard deviation.
### Key Observations
1. **Performance vs. Stability Trade-off:** The system with the higher mean success rate ("CC + Opus 4.5", 6.7%) exhibits variability (σ=1.15). The system with the lower mean ("Codex + Opus 4.5", 4.0%) exhibits perfect stability (σ=0.00).
2. **Individual Run Distribution:** For "CC + Opus 4.5", the two recorded runs are at the extremes of the standard deviation range (one at the mean, one at the upper bound). For "Codex + Opus 4.5", the runs are identical and equal to the mean.
3. **Visual Clarity:** The use of color (green vs. blue) and clear annotations for μ and σ makes the comparison straightforward. The legend accurately maps the graphical elements (bar, circle, line) to their statistical meaning.
### Interpretation
This chart demonstrates a classic engineering or machine learning trade-off between **peak performance** and **reliability/consistency**.
* **"CC + Opus 4.5"** appears to be a more capable system on average, achieving a higher task success rate. However, its performance is not guaranteed; it can vary significantly between runs (from ~6% to 8% in this sample). This suggests it may be sensitive to initial conditions, random seeds, or other stochastic elements in its process.
* **"Codex + Opus 4.5"** is a less capable but highly predictable system. It reliably produces the same, lower success rate every time. This could be desirable in scenarios where consistency and predictability are more critical than achieving the highest possible success rate, or where the cost of a failed run is high.
The data suggests that the choice between these two systems depends entirely on the application's priorities. If maximizing the chance of a high success rate is paramount and some failure is acceptable, "CC + Opus 4.5" is preferable. If guaranteed, predictable performance is required, even at a lower level, "Codex + Opus 4.5" is the better choice. The chart effectively argues that "robustness" (stability) and "performance" (success rate) are distinct metrics that must be evaluated together.