## [Chart Type]: Dual-Panel Performance Analysis of CIM Variants
### Overview
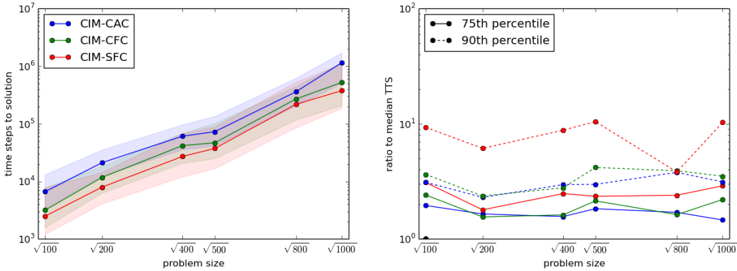
The image contains two side-by-side line charts comparing the performance of three computational methods (CIM-CAC, CIM-CFC, CIM-SFC) across different problem sizes. The left chart plots the absolute time to solution, while the right chart plots the ratio of time to the median Time To Solution (TTS). Both charts use a logarithmic scale on the y-axis.
### Components/Axes
**Left Chart:**
* **Title:** None visible.
* **X-axis:** Label: `problem size`. Ticks: `√100`, `√200`, `√400`, `√500`, `√800`, `√1000`.
* **Y-axis:** Label: `time steps to solution`. Scale: Logarithmic, ranging from `10^3` to `10^7`.
* **Legend:** Located in the top-left corner. Contains three entries:
* `CIM-CAC` (Blue line with circular markers)
* `CIM-CFC` (Green line with circular markers)
* `CIM-SFC` (Red line with circular markers)
* **Data Series:** Three lines, each with a shaded region representing confidence intervals or variance.
**Right Chart:**
* **Title:** None visible.
* **X-axis:** Label: `problem size`. Ticks: `√100`, `√200`, `√400`, `√500`, `√800`, `√1000`.
* **Y-axis:** Label: `ratio to median TTS`. Scale: Logarithmic, ranging from `10^0` to `10^2`.
* **Legend:** Located in the top-left corner. Contains two entries:
* `75th percentile` (Solid line)
* `90th percentile` (Dashed line)
* **Data Series:** Six lines total. The colors (Blue, Green, Red) correspond to the same methods (CIM-CAC, CIM-CFC, CIM-SFC) from the left chart. Each method has a solid line (75th percentile) and a dashed line (90th percentile).
### Detailed Analysis
**Left Chart - Time Steps to Solution:**
* **Trend Verification:** All three lines show a clear, consistent upward trend as problem size increases. The relationship appears roughly linear on this log-log plot, suggesting a power-law relationship between problem size and time steps.
* **Data Points (Approximate):**
* **CIM-CAC (Blue):** Starts at ~7x10^3 (√100), rises to ~1.2x10^7 (√1000). It is consistently the highest (slowest) method.
* **CIM-CFC (Green):** Starts at ~3x10^3 (√100), rises to ~5x10^6 (√1000). It is consistently in the middle.
* **CIM-SFC (Red):** Starts at ~2x10^3 (√100), rises to ~3x10^6 (√1000). It is consistently the lowest (fastest) method.
* **Spatial Grounding:** The shaded confidence bands are widest for the blue line (CIM-CAC) and narrowest for the red line (CIM-SFC), suggesting greater variance in the performance of CIM-CAC.
**Right Chart - Ratio to Median TTS:**
* **Trend Verification:** The trends are more complex and non-monotonic. The 90th percentile lines (dashed) are generally above their corresponding 75th percentile lines (solid), as expected.
* **Data Points & Cross-Referencing (Approximate):**
* **CIM-CAC (Blue):**
* 75th %ile (Solid Blue): Hovers between ~1.5 and ~2.5 across all problem sizes.
* 90th %ile (Dashed Blue): Starts at ~3 (√100), dips to ~2 (√200), then rises to ~3.5 (√1000).
* **CIM-CFC (Green):**
* 75th %ile (Solid Green): Starts at ~2.5 (√100), dips to ~1.5 (√200/√400), then rises to ~2 (√1000).
* 90th %ile (Dashed Green): Starts at ~4 (√100), dips to ~2.5 (√200), peaks at ~4 (√500), ends at ~3 (√1000).
* **CIM-SFC (Red):**
* 75th %ile (Solid Red): Starts at ~2 (√100), dips to ~1.5 (√200), then remains relatively flat around ~1.8.
* 90th %ile (Dashed Red): Shows the most variation. Starts at ~10 (√100), dips to ~6 (√200), peaks at ~12 (√500), dips to ~3 (√800), and ends at ~11 (√1000).
### Key Observations
1. **Performance Hierarchy:** There is a clear and consistent performance hierarchy in absolute time (left chart): CIM-SFC > CIM-CFC > CIM-CAC. CIM-SFC is the fastest method by a significant margin.
2. **Scaling Behavior:** All methods scale similarly with problem size (similar slopes on the left chart), but with different constant factors.
3. **Variability:** The right chart reveals significant differences in performance variability. CIM-SFC (Red) shows extreme variability at the 90th percentile, with ratios spiking above 10x the median at several points (√100, √500, √1000). This indicates that while CIM-SFC is fastest on average, its worst-case performance can be much worse relative to its median.
4. **Percentile Spread:** The gap between the 75th and 90th percentile lines is largest for CIM-SFC, further highlighting its higher performance variance compared to the other two methods.
### Interpretation
This data suggests a classic trade-off between average-case speed and performance consistency. **CIM-SFC is the optimized, high-performance variant**—it delivers the fastest solution times under typical conditions (as shown by the lowest line on the left chart). However, this speed comes at the cost of **predictability and robustness**. The high and volatile 90th percentile ratios (right chart, dashed red line) indicate that CIM-SFC is susceptible to occasional, severe slowdowns where it can take over 10 times longer than its median time.
In contrast, **CIM-CAC is the slower but more predictable method**. Its performance bands are tighter, and its percentile ratios are lower and more stable. **CIM-CFC occupies a middle ground**.
For a user, the choice depends on the application context. If consistent, reliable completion time is critical (e.g., real-time systems), CIM-CAC or CIM-CFC might be preferable despite their slower average speed. If minimizing average time is the primary goal and occasional long runs are acceptable, CIM-SFC is the best choice. The charts effectively visualize not just "which is faster," but the nuanced risk profile associated with each algorithm's performance.