## Bar Charts: Proof Passing Performance Across Attempts
### Overview
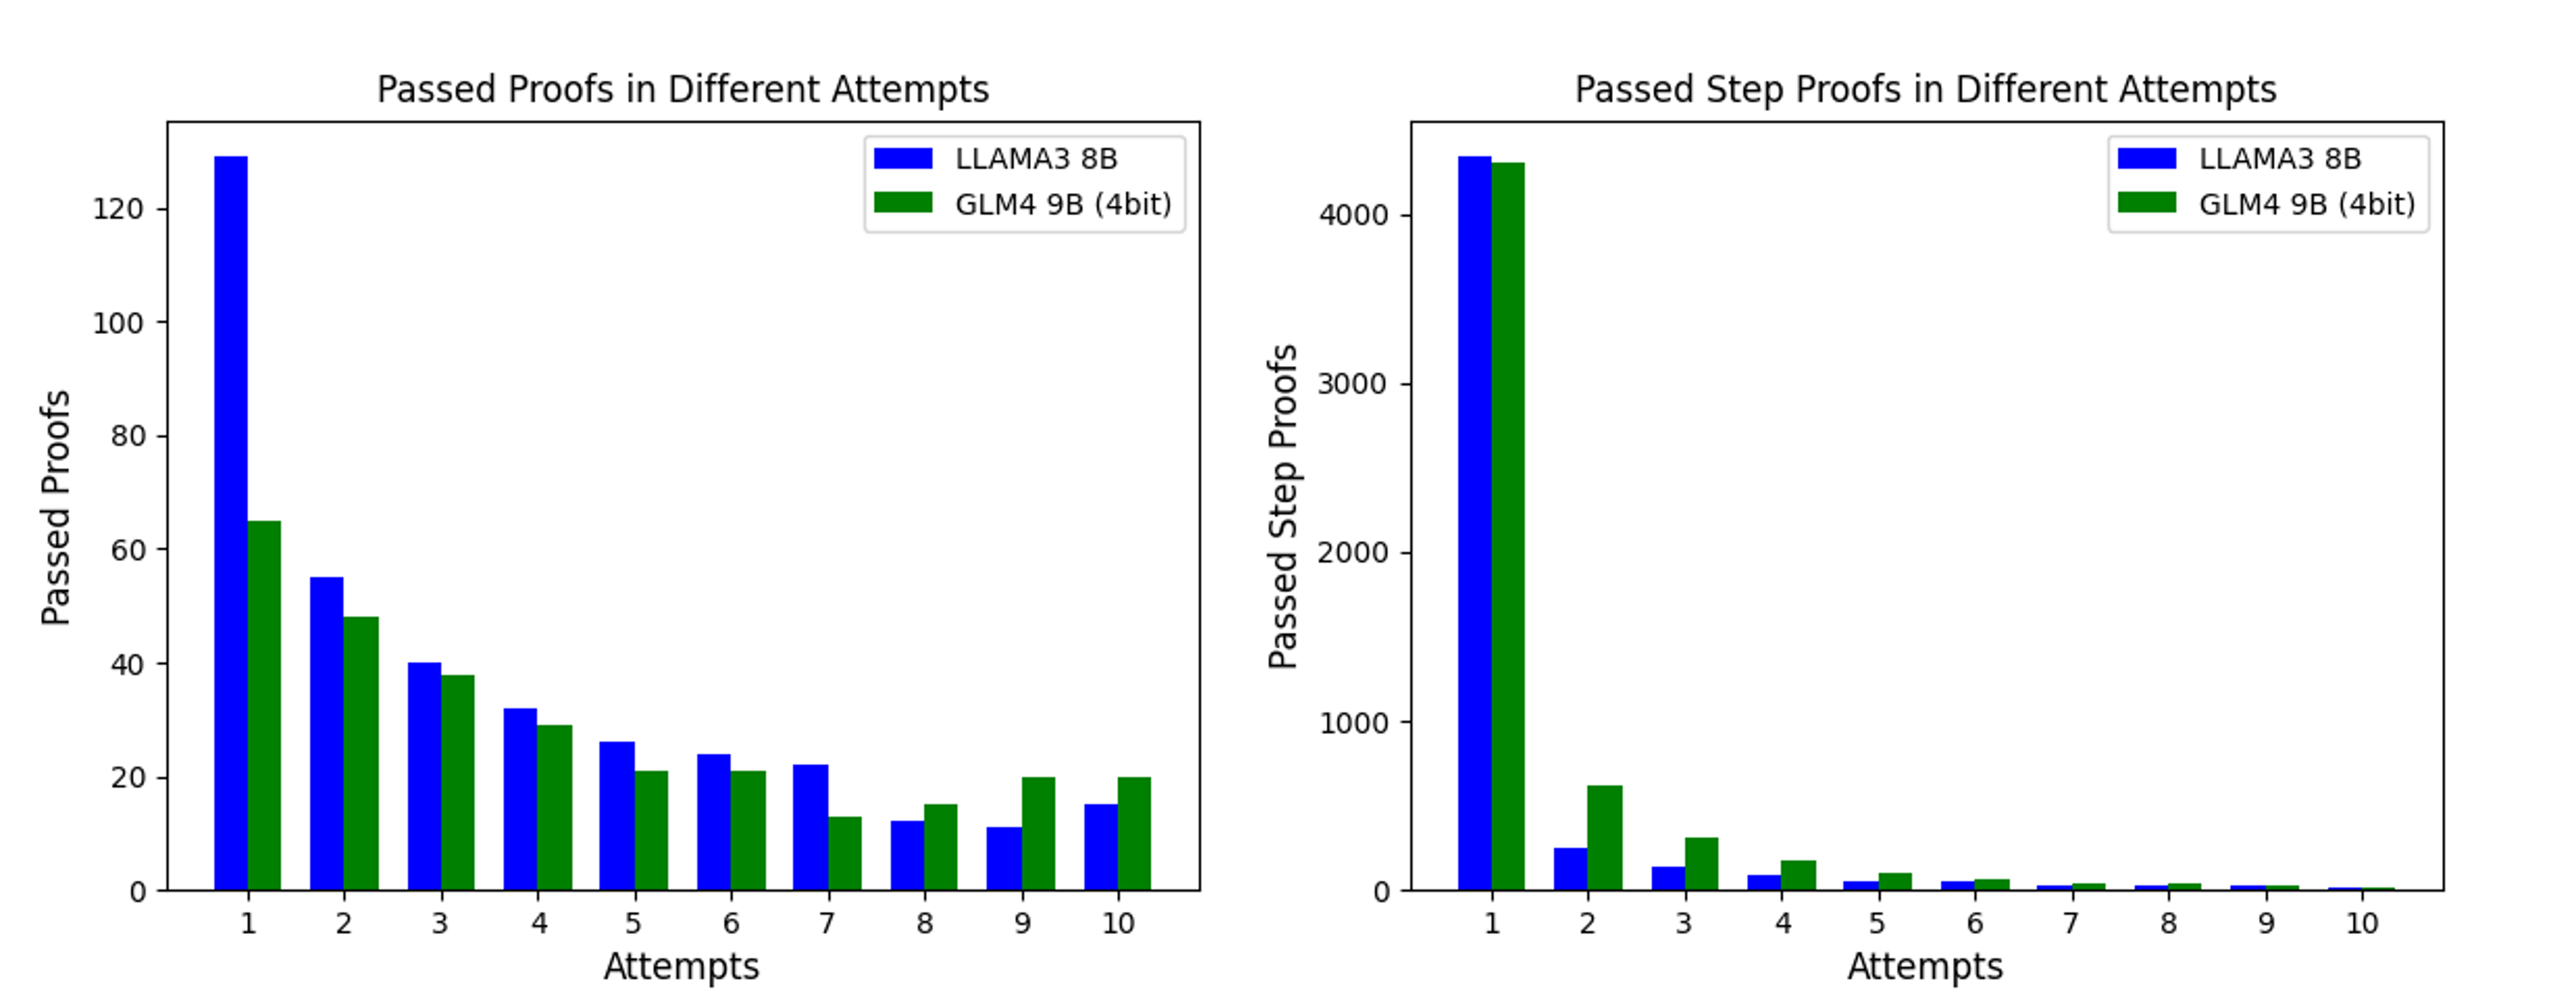
The image displays two side-by-side bar charts comparing the performance of two language models—LLAMA3 8B and GLM4 9B (4bit)—on proof-related tasks over multiple attempts. The left chart tracks the number of complete proofs passed, while the right chart tracks the number of individual proof steps passed. Both charts use a grouped bar format with attempts 1 through 10 on the x-axis.
### Components/Axes
**Common Elements:**
* **X-axis (both charts):** Labeled "Attempts". Contains categorical markers for attempts numbered 1, 2, 3, 4, 5, 6, 7, 8, 9, 10.
* **Legend (both charts):** Located in the top-right corner of each chart's plotting area.
* Blue square: **LLAMA3 8B**
* Green square: **GLM4 9B (4bit)**
**Left Chart: "Passed Proofs in Different Attempts"**
* **Y-axis:** Labeled "Passed Proofs". Linear scale with major tick marks at 0, 20, 40, 60, 80, 100, 120.
* **Data Series:** Two bars per attempt category. The blue bar (LLAMA3 8B) is positioned to the left of the green bar (GLM4 9B (4bit)) for each attempt.
**Right Chart: "Passed Step Proofs in Different Attempts"**
* **Y-axis:** Labeled "Passed Step Proofs". Linear scale with major tick marks at 0, 1000, 2000, 3000, 4000.
* **Data Series:** Two bars per attempt category. The blue bar (LLAMA3 8B) is positioned to the left of the green bar (GLM4 9B (4bit)) for each attempt.
### Detailed Analysis
**Left Chart - Passed Proofs:**
* **Trend Verification:** Both models show a clear, steeply decreasing trend in the number of passed proofs as the attempt number increases. The decline is most dramatic between attempts 1 and 3.
* **Data Points (Approximate Values):**
* **Attempt 1:** LLAMA3 8B ≈ 130, GLM4 9B (4bit) ≈ 65.
* **Attempt 2:** LLAMA3 8B ≈ 55, GLM4 9B (4bit) ≈ 48.
* **Attempt 3:** LLAMA3 8B ≈ 40, GLM4 9B (4bit) ≈ 38.
* **Attempt 4:** LLAMA3 8B ≈ 32, GLM4 9B (4bit) ≈ 29.
* **Attempt 5:** LLAMA3 8B ≈ 26, GLM4 9B (4bit) ≈ 21.
* **Attempt 6:** LLAMA3 8B ≈ 24, GLM4 9B (4bit) ≈ 21.
* **Attempt 7:** LLAMA3 8B ≈ 22, GLM4 9B (4bit) ≈ 13.
* **Attempt 8:** LLAMA3 8B ≈ 12, GLM4 9B (4bit) ≈ 15. *(Note: GLM4 value is slightly higher here)*
* **Attempt 9:** LLAMA3 8B ≈ 11, GLM4 9B (4bit) ≈ 20.
* **Attempt 10:** LLAMA3 8B ≈ 15, GLM4 9B (4bit) ≈ 20.
**Right Chart - Passed Step Proofs:**
* **Trend Verification:** Both models show an extremely sharp decline after the first attempt. The number of passed steps is orders of magnitude higher in attempt 1 compared to all subsequent attempts, which are all very low.
* **Data Points (Approximate Values):**
* **Attempt 1:** LLAMA3 8B ≈ 4300, GLM4 9B (4bit) ≈ 4250. *(Very close in value)*
* **Attempt 2:** LLAMA3 8B ≈ 250, GLM4 9B (4bit) ≈ 600.
* **Attempt 3:** LLAMA3 8B ≈ 150, GLM4 9B (4bit) ≈ 300.
* **Attempt 4:** LLAMA3 8B ≈ 100, GLM4 9B (4bit) ≈ 200.
* **Attempt 5:** LLAMA3 8B ≈ 50, GLM4 9B (4bit) ≈ 100.
* **Attempt 6:** LLAMA3 8B ≈ 50, GLM4 9B (4bit) ≈ 75.
* **Attempt 7:** LLAMA3 8B ≈ 25, GLM4 9B (4bit) ≈ 50.
* **Attempt 8:** LLAMA3 8B ≈ 25, GLM4 9B (4bit) ≈ 50.
* **Attempt 9:** LLAMA3 8B ≈ 25, GLM4 9B (4bit) ≈ 25.
* **Attempt 10:** LLAMA3 8B ≈ 10, GLM4 9B (4bit) ≈ 10.
### Key Observations
1. **Dominance of First Attempt:** The vast majority of successful outcomes (both complete proofs and proof steps) occur on the first attempt for both models. This is especially pronounced for step proofs.
2. **Model Performance Gap:** LLAMA3 8B significantly outperforms GLM4 9B (4bit) on complete proofs for the first seven attempts. The gap narrows and reverses slightly in attempts 8-10.
3. **Step Proof Parity:** For step proofs, the models perform very similarly on the first attempt. From attempts 2-8, GLM4 9B (4bit) consistently passes more steps than LLAMA3 8B, though both numbers are low.
4. **Consistent Decay Pattern:** Both metrics show a roughly exponential decay pattern, where performance drops sharply with each additional attempt required.
### Interpretation
The data suggests a fundamental difference in the nature of the tasks and model capabilities:
* **Task Difficulty:** Passing a complete proof is a much harder task than passing individual steps, as evidenced by the y-axis scales (max ~130 vs. ~4300). The charts likely represent a process where models are given multiple attempts to generate a valid proof, with "Attempts" indicating how many tries were needed.
* **Model Strengths:** LLAMA3 8B appears stronger at generating correct, complete proofs on the first or early tries. GLM4 9B (4bit), while less successful with full proofs initially, shows a relative strength in generating correct individual steps, particularly when given a second or third attempt. This could indicate different underlying capabilities: one model may be better at holistic reasoning (full proofs), while the other might be more reliable at granular, step-by-step logic.
* **Efficiency Implication:** The steep decline after attempt 1 for step proofs implies that if a model doesn't get the steps right initially, it struggles to correct itself in subsequent tries. The more gradual decline for complete proofs suggests that with more attempts, models can eventually piece together a valid proof, albeit with diminishing returns.
* **Anomaly:** The reversal in performance for complete proofs at attempts 8-10 (where GLM4 9B (4bit) slightly leads) is an interesting outlier. It may indicate that GLM4 9B (4bit) has a higher "persistence" or a different failure mode that allows it to eventually succeed on harder problems that stymie LLAMA3 8B after many tries, though the absolute numbers are very low.