## [Diagram Type]: Robotic Arm Simulation Comparison (Good vs. Bad Examples)
### Overview
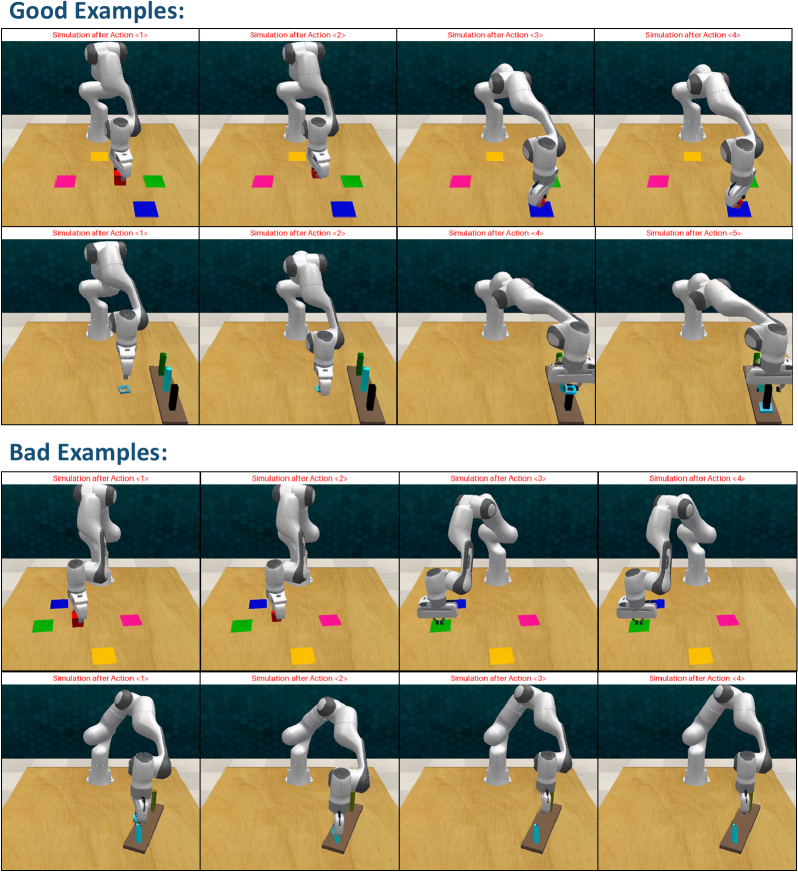
The image compares **successful (Good Examples)** and **unsuccessful (Bad Examples)** robotic arm task executions in a simulated environment. It is divided into two main sections: *Good Examples* (top) and *Bad Examples* (bottom), each containing two rows of 4 frames (labeled "Simulation after Action <1>" to "Simulation after Action <4>"). The robotic arm interacts with colored blocks (pink, yellow, green, blue, black) on a wooden surface, with a blue background.
### Components/Axes
- **Sections**:
- *Good Examples* (top): 2 rows × 4 frames.
- *Bad Examples* (bottom): 2 rows × 4 frames.
- **Frames**: Each frame is labeled "Simulation after Action <1>", "Simulation after Action <2>", "Simulation after Action <3>", "Simulation after Action <4>".
- **Objects**:
- Robotic arm (white, articulated).
- Colored blocks: pink, yellow, green, blue, black (arranged on a wooden table).
- Background: Blue (consistent across all frames).
### Detailed Analysis (Good Examples)
#### Row 1 (Top Row, Good Examples)
- **Action 1**: Arm is positioned near pink, yellow, green, and blue blocks (no manipulation yet).
- **Action 2**: Arm moves slightly; blocks remain in place.
- **Action 3**: Arm interacts with the blue block (e.g., picking or placing it).
- **Action 4**: Arm retracts; blue block’s position is adjusted (suggesting successful manipulation).
#### Row 2 (Bottom Row, Good Examples)
- **Action 1**: Arm is near a black block and a green block (different setup).
- **Action 2**: Arm moves; black and green blocks remain.
- **Action 3**: Arm interacts with the green block (e.g., placing it on the black block).
- **Action 4**: Arm retracts; green block is stacked on the black block (successful stacking).
### Detailed Analysis (Bad Examples)
#### Row 1 (Top Row, Bad Examples)
- **Action 1**: Arm is near blue, green, pink, and yellow blocks (no manipulation yet).
- **Action 2**: Arm moves slightly; blocks remain.
- **Action 3**: Arm interacts with the green block (e.g., incorrect placement).
- **Action 4**: Arm retracts; green block is misplaced (e.g., not aligned with other blocks).
#### Row 2 (Bottom Row, Bad Examples)
- **Action 1**: Arm is near a blue block (different setup).
- **Action 2**: Arm moves; blue block remains.
- **Action 3**: Arm interacts with the blue block (e.g., incorrect manipulation).
- **Action 4**: Arm retracts; blue block is misplaced (e.g., not in the intended position).
### Key Observations
- **Good Examples**: The robotic arm successfully manipulates blocks (e.g., stacking green on black, adjusting blue’s position) over four actions.
- **Bad Examples**: The arm fails to manipulate blocks correctly (e.g., green block misplaced, blue block misaligned) over four actions.
- **Consistency**: Good examples show logical, successful task progression; bad examples show illogical, failed progression.
### Interpretation
This image is likely from a robotics/AI study comparing **successful vs. failed task execution** in a simulated environment. The "Good Examples" demonstrate the arm correctly completing tasks (e.g., stacking, placing blocks), while "Bad Examples" show errors (e.g., wrong block, wrong position). The purpose is to illustrate the difference between effective and ineffective robotic control, possibly for training algorithms or evaluating performance. The visual contrast highlights how small errors in action (e.g., misaligned gripper, incorrect block selection) lead to task failure.