## Diagram: Footprint Analysis for Foot Type Identification
### Overview
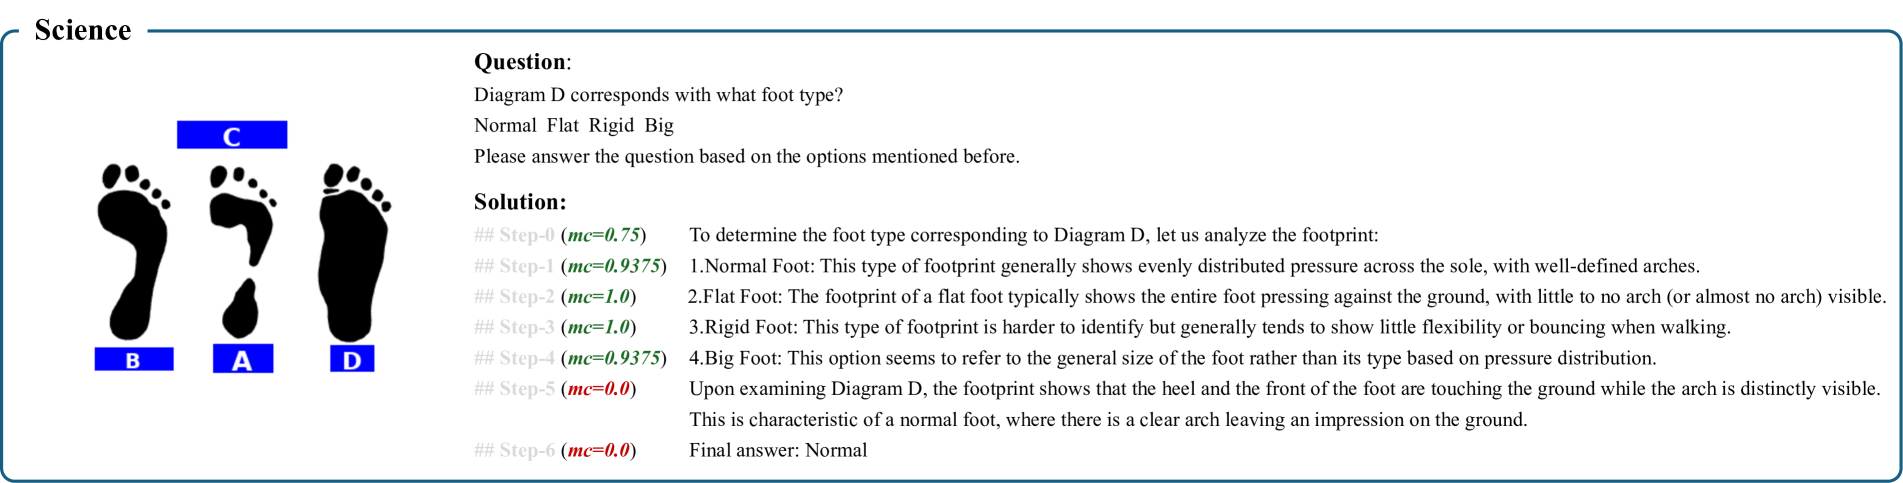
The image is a technical educational diagram from a "Science" section, presenting a multiple-choice question about identifying foot types from footprint impressions. It includes three footprint silhouettes labeled B, A, and D, a question, multiple-choice options, and a detailed step-by-step solution with confidence scores.
### Components/Axes
* **Header:** The word "Science" is positioned in the top-left corner.
* **Diagram Area (Left Side):** Contains three black footprint silhouettes arranged horizontally.
* **Footprint B (Left):** Shows a footprint with a moderate arch impression. Labeled with a blue rectangle containing the white letter "B" directly below it.
* **Footprint A (Center):** Shows a footprint with almost no arch, appearing as a full, solid impression. Labeled with a blue rectangle containing the white letter "A" directly below it. A blue rectangle containing the white letter "C" is positioned above this footprint.
* **Footprint D (Right):** Shows a footprint with a very pronounced, narrow arch, leaving a distinct gap in the midfoot area. Labeled with a blue rectangle containing the white letter "D" directly below it.
* **Text Area (Right Side):** Contains the question and solution.
* **Question:** "Diagram D corresponds with what foot type? Normal Flat Rigid Big. Please answer the question based on the options mentioned before."
* **Solution:** A multi-step analysis with associated confidence scores (`mc` values). Each step is prefixed with "## Step-X" and contains a confidence score in parentheses (e.g., `(mc=0.75)`).
### Detailed Analysis / Content Details
**Transcribed Text from Solution:**
* **Step-0 (mc=0.75):** "To determine the foot type corresponding to Diagram D, let us analyze the footprint:"
* **Step-1 (mc=0.9375):** "1.Normal Foot: This type of footprint generally shows evenly distributed pressure across the sole, with well-defined arches."
* **Step-2 (mc=1.0):** "2.Flat Foot: The footprint of a flat foot typically shows the entire foot pressing against the ground, with little to no arch (or almost no arch) visible."
* **Step-3 (mc=1.0):** "3.Rigid Foot: This type of footprint is harder to identify but generally tends to show little flexibility or bouncing when walking."
* **Step-4 (mc=0.9375):** "4.Big Foot: This option seems to refer to the general size of the foot rather than its type based on pressure distribution."
* **Step-5 (mc=0.0):** "Upon examining Diagram D, the footprint shows that the heel and the front of the foot are touching the ground while the arch is distinctly visible. This is characteristic of a normal foot, where there is a clear arch leaving an impression on the ground."
* **Step-6 (mc=0.0):** "Final answer: Normal"
**Visual Analysis of Footprints:**
* **Footprint B:** Displays a moderate, curved arch. The impression connects the heel and forefoot with a band of moderate width.
* **Footprint A:** Displays a full, solid impression from heel to toe with no visible arch gap. This matches the textual description of a "Flat Foot."
* **Footprint D:** Displays a very narrow connection between the heel and forefoot, indicating a high, pronounced arch. The solution text explicitly identifies this as characteristic of a "Normal Foot."
### Key Observations
1. **Direct Labeling:** Each footprint is unambiguously labeled with a letter (B, A, D) in a blue box below it. An additional label "C" is placed above the central footprint (A).
2. **Solution Logic:** The solution systematically defines each foot type option (Normal, Flat, Rigid, Big) before applying the definitions to Diagram D.
3. **Confidence Scores:** The solution includes numerical confidence scores (`mc` values) for each analytical step, ranging from 0.0 to 1.0. The final two steps (Step-5 and Step-6) have a confidence score of 0.0, which may indicate a system artifact or a different scoring metric for conclusion steps.
4. **Visual-Textual Correlation:** The visual characteristic of Footprint D (distinct arch) is directly correlated with the textual definition of a "Normal Foot" in Step-1 and Step-5.
5. **Elimination of "Big Foot":** The solution explicitly dismisses the "Big Foot" option as pertaining to size, not the pressure-distribution-based type being analyzed.
### Interpretation
This diagram serves as an educational tool for teaching biomechanical or anatomical classification based on static footprint analysis. The core principle demonstrated is that the shape of a wet footprint or pressure impression can indicate arch height and, by extension, foot type.
* **What the Data Suggests:** The primary data point is the visual form of Footprint D. Its pronounced arch is presented as the definitive evidence for classifying it as a "Normal" foot type within this specific diagnostic framework. The accompanying text provides the necessary criteria to make this classification.
* **Relationship Between Elements:** The diagram (visual evidence) and the solution text (diagnostic criteria) are interdependent. The text defines the categories, and the diagram provides the case study (D) to which those categories are applied. The labels (A, B, D) are crucial for linking the visual examples to the analytical process.
* **Notable Anomalies:** The inclusion of confidence scores (`mc` values) is unusual for a standard educational diagram and suggests this image may be output from an AI tutoring system or a diagnostic algorithm that quantifies certainty at each reasoning step. The 0.0 scores on the concluding steps are particularly noteworthy and may indicate a specific technical reporting style rather than a lack of confidence in the answer. The label "C" above footprint A is not referenced in the question or solution, making its purpose ambiguous—it may be a remnant from a larger diagram or a label for the central example.